Showing posts with label gift boxes. Show all posts

Thursday, 6 February 2020

WWC 257 Heidi's Challenge : Anything Goes with a Feminine Twist

Hello there, it’s time for another Watercooler Wednesday Challenge.  Heidi is our hostess this week with an Anything Goes with a Feminine Twist challenge.


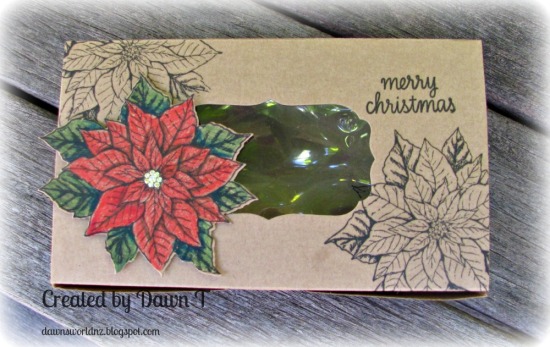
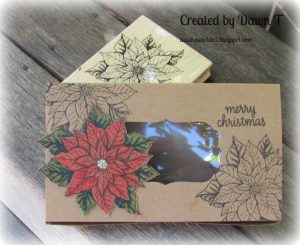
Today I am sharing a little gift bag I made a couple of weeks ago to give some bottles of Couture Creations Glitzin' Glamour (similar to Stickles) to my friend.  I purchased a Mystery Box from an Australian company and it came with 2 sets of 3 colours so I decided to gift three to Suna.  I had seen a gorgeous Valentine's Treat Box over at Chic'n'Sratch's You Tube (here) that I decided to try.

This is face on... I used some red textured card for the gift holder and some gorgeous patterned paper from Rosie's Studio - Bows and Bells 12"x12" papers.  The hole is made with a Stampin' Up oval punch and the cute label on the front was from a freebie set a couple of years ago.  The set came with the sentiments and the label dies.   I finished with some gold sequins that came in the mystery box.

Here's a view from the side.

You can just see the little box inside that holds the bottles of Glitzin' Glamour.


Come and join the fun.  Check out the projects that the other artists at Watercooler Wednesday
Challenge have created.  Then take our challenge and link your creation to the challenge post.  We'd love to have you join us.  You have until Monday at 5 pm Mountain Standard Time (Tuesday at 12.00 noon NZ time ) to link up your project.


Thursday, 1 August 2019

WWC 232 "Anything Goes" Challenge.


Hello there, it’s time for another Watercooler Wednesday Challenge.  As it's the 5th Wednesday of the month, it's an "Anything Goes" challenge.


My project today is a lovely gift box.


I saw the tutorial for this box over at Pootles.co.uk.  My base box was made with a soft sage/grey card and used a vintage looking patterned paper.  I made the flowers with a Couture Creations die and some pink textured card inked on the edges with some pink ink.  I added some gems in the centres.


Come join in the fun.  Check out the projects that the artists at Watercooler Wednesday Challenges have created then take the challenge and link your creation to the challenge post. We’d love to have you join us.  You have until Mondays at 5 p.m. Mountain Standard Time (Tuesdays at 11.00am NZ time) to link up your project

Wednesday, 7 December 2016

Hero Arts Poinsettia gift box

Hi there.  It's my day to share over at A2Z Scrapbooking.  Our challenge is Anything but a Card....

I was lucky to get give a pile of pre-cut gift boxes.  I'm going to be using some to package up mini Pecan Pies for Christmas gifts.   Here's my design

Box #1

I stamped the Vintage Poinsettia in black directly onto the kraft box and also onto extra kraft card.  I used Faber Castell pencils to colour the additional image and then die cut with the matching die.

Box #2

Supplies:
Hero Arts Antique Poinsettia stamp
Hero Arts Antique Poinsettia Die
Own gift box

Remember if you are in need of any items from the a2z Scrapbooking store  you can use code Dawn15 at checkout to receive 15% off your purchase of $25 or more. (before tax and shipping)  or chose Free Shipping on Domestic Orders $50.00 or More. Use Code FreeShipping16
Plus for every $50 spent on Hero Arts products we will send you a special gift! No special code needed

dawna2zscrapbooking


Wednesday, 11 December 2013

over 1000 posts.....

can you image it... yes I have I have posted over 1000 times.... this is in fact my 1002nd post....

today I have a card to share, that I made for a friend at work for a wedding she was going to...

Blingy Wedding card.

The brief was for a "blingy" wedding card.   I searched Flickr for ideas and then Pinterest... and finally came up with this card... being a combination of ideas from about 4  different cards.  The PP is from a Rosie's Studio pack of Wedding papers, trimmed and mounted on some silver mirror card  The heart is a Spellbinders one... two co-ordinating dies used together... one cuts the inside and one the outer part, cut from the silver mirror card.  The banner and sentiment are from a Simon Says Stamp, stamp and die set.. Lots of silver gems.  Inside I embossed down one side added the silver heart from the centre of the front panel and the sentiments " Happily Ever After" and Congratulations both from the SSS set.   My friend was over the moon about it.  

I took my Christmas cards into work and managed to sell $60 worth.  Just in time to buy some more PP to make some little tea light boxes like this one I made for a friend's birthday

Tea Light Gift box

I'm doing some Christmas ones for little gifts this year. 

I want to thank all of my followers for visiting and I really appreciate all the wonderful supportive comments I get.  You are the best.