Showing posts with label Inspired by Ardyth. Show all posts

Friday, 1 August 2025

Card Maker Success Summit July-Aug 2025

 The CMSS free classes have started but I got a slight head start by purchasing the VIP pass... and I had great plans to get started early... but live sort of took over!   I did however a couple of weeks ago - watch Ardyth's tutorial - using a Gel Plate to make some backgrounds.... and managed to make a few panels I liked.  (Here's my first card that was made over two weeks ago).

I got home from work early on Wednesday and had a play using one of the backgrounds I had saved.  I made two cards inspired by Ardyth.  


For this first one I made a 5" square card.  The background was a blue gel background that I embossed with an unknown brand folder (suspect it was from a magazine from years ago)  I then rubbed Catherine Pooler Juniper ink over the embossed area.  The gold and red panel was the panel I made using a stencil and red and gold paint.  I die cut with an ornament die I picked up at my local stationary store - came from a magazine.  I then stamped the matching stamp set in black and clear embossed. Added a silver die cut topper before double mounting on white and red panels.    Turned out a bit busier than I would have preferred. 


Next up is a smaller 4.25" square card.  This time I use a red card panel embossed with Gina K Tapestry folder and rubbed Delicata Gold ink over it.   Die cut the ornament and added a gold embossed sentiment from a Waffle Flower set called Star Snowflake.  Added some gold dots to embellishment.  

Hoping that I get some time over the weekend to watch some more videos and get a few more cards made.   We are heading out early in the morning to watch Grace play netball and then coffee before doing our grocery shopping... so then the afternoon for crafting.  


Wednesday, 16 July 2025

Christmas in July... Two cards with circles, dots and spots

 Do you know that there is a Christmas Card Makers Success Summit starting at the end of July - it's free but you can purchase the VIP pass and get to watch the tutorials straight away.   And that's what I did! 

I watched the tutorial from Ardyth Percy-Robb - which showed how to use a gel plate to get some gorgeous papers and how turn them into Christmas cards.  For my card I CASE'd Ardyth's example card, just using some different stencils and colours. 

I used a Hero Arts stencil called Crossing Waves.  I added some red paint to my gel plate and added the stencil.  I let the paint dry on the plate and then layered with some gold paint and added another paper. Once it dried I took my pull and this is what I got.   It took a few goes to get something I liked... but got there.  I used a circle die from Gina K Master Layouts 3 to make my ornament.  I used some of my roll off papers to cut the gold topper and the Merry Christmas die (both from a magazine freebie set)  For my background, I swinked some Catherine Pooler Juniper Mist onto some card.   I found a Memory Box stencil (Diamonds) that I used some texture paste to add in the corners.   I thought my background was dry but obviously not... it picked up the ink and coloured the paste.   Added some white dots of Posca paint and white gel pen and finished with some homemade star dots.  

I am adding this to latest Christmas Kickstart Challenge #100 - Merry Go Around.   Use spots, dots and circles-


And while I was in the mood for Christmas cards I made a second card for the challenge...

I used Altenew Wonderful Wreath stencil to make a half circle wreath - with two Altenew green inks - Sweet Leaf and Just Green.  I moved the stencil three times to get the three layers of leaves.  I stenciled the red berry circles, but after making a bit of a boo-boo so changed them to use circular red gems for the berries.  I used some off the left over red roll off from my previous card, covered with some clear packing tape to die cut the Hero Arts Peace stamp and cut set.  The sub-sentiment was stamped directly to the card.  Matted with some dark green card. 

Slowly building up the Christmas stash.  

Friday, 16 May 2025

Stress Free Cardmaking Summit - Inspired by Ardyth

I decided it's worth the extra cost to get the VIP option for the May Stress Free Cardmaking Summit... and I've already watch a number of the sessions.  

I got inspired by Ardyth Percy-Robb - whose 5 items for her fun fold cards, included stencils.   I did an A2 Z-fold card.  Ardyth gave lots of options for sizes and way to do a Z-fold card. 

Here's what I came up with...


I found this unnamed stencil.  Think it might be one I got from a NZ based crafter.... I used different colours of ink to add my colour and then used some small stamps from an older Catherine Pooler/CASual Friday stamp set to add the black flower elements.  I added some home made silver dots for the centres. Sentiment is a die cut from Scrapbook.com "Let's Celebrate"  

Hoping to get some more play time this weekend as Hubby and son are off to do some go-carting on Sunday... so I get a sleep in and some playtime!  


Sunday, 29 September 2024

Christmas inspired by Stress Free Cardmaking Summit

 It's been a busy weekend.  Had a lovely lunch with my friend, Yvonne, and all her family to celebrate her 70th on Saturday.  Got home around 4pm and hit the computer to watch some of the presentations from the Stress Free Cardmaking Summit.   OMG - what amazing presenters and their projects.... Quick, easy and stress free!  I started with Ardyth Percy-Robb and her stenciling ideas.   

This one was inspired by Ardyth's idea of masking off part of a stencil to use it differently.   I took a Tim Holtz stencil (Festive) and masked off one of the Holly Leaves.  I used Distress Oxide inks to add the colour and added some red Nuvo Drops.  To keep it CAS I just added a sentiment.  It's a Woodblock stamp from Paper Inspirations (circa 2005) called Favorite Things Calligraphy - stamped in Altenew Charcoal Suit grey ink.  To give the look of matting, I did a faux matting by masking off the edges and using a Copic marker. 

My next card utilised the ink left on the stencil - I sprayed with water and used it to "print" a panel.  I then took inspiration from Julia - used an embossing folder. 

Once I dried the background (you can just make out the stenciled pattern) I ran it through my machine with a Couture Creations folder (Joyful Wishes).   It's only a 2D folder so rather than inking up the folder, I swiped some Mowed Lawn Distress Oxide across it.  Was really happy with the results.  To finish I took a Couture Creations Ringing Bells stamp that I had cut with my Scan'n'Cut.  I used some Tri-blends to colour with a touch of silver pen.  I also added some Spectrum Noir Sparkle pen to it as well.   Mounted on a silver glitter circle. 

And my final card was inspired by Joy's alcohol ink backgrounds.   Must say I can't even remember when I last used my alcohol inks!  I used the matt side of some photo paper like Joy used, and used a half a large sheet to get two backgrounds.  

When with the green theme again... used three different green inks, lots of blending solution and added some gold foil. I trimmed it and added to a card base.  I used a Concord & 9th sentiment from Big on Christmas stamp and die set.   Black stamping and clear embossing on vellum before doing the die cut.  The snowflakes are from a magazine freebie set cut with white paper and added some Nuvo iridescent flat sequins. 

And I still have a panel of green ink to use 

Big thanks if you made it this far.  I appreciate your visit.   


Friday, 2 August 2024

Christmas cards at Card Makers Success Summit - Aug 2024

 There is an upcoming Card Makers Success Summit starting 8 August - 11 August.   It's free - but each presentation is only available for 24 hours... however you can purchase a life time VIP pass that allows early access to the presentations.  Great for me as I work full time and the presentation times are usually the middle of my night.   And it's a perfect theme - Christmas/Holiday cards.   Just the thing to spark some Christmas card making.  

So I've been watching a few of the videos and made a couple of cards.   I was inspired by the presentation by Ardyth Percy-Robb (Mod Merry Christmas Cards with Minimal Supplies) where she used her own homemade stencils amongst other ideas.   Ardyth took some post-it's and cut some pointy ovals to make some ornaments.   Well, I will tell you - mine turned out terrible - so I adapted the idea a bit... I took a sweet little ornament die and made myself a stencil with some masking paper.  

The die I used was from a Catherine Pooler stamp and die set- Wonderful time of the Year.  I used the dies to make the stencils and then used  Altenew's Coral Berry, Ultramarine and whatever the green ink was on my blending brush on a 4"x 4" panel.   I used the little ornament topper from the set - stamped in Charcoal Suit grey ink and also the little star on the ornament. I added some little metallic pearls as embellishments. Stamped the sentiment from Waffle Flower Star Snowflake set in the grey ink as well.   I used a grey alcohol marker to add dots around the edge and layered the panel onto some grey card.  Added to a 5.5" square card base.   

And my second card was inspired by Therese Calvird (Unlock Basic Shapes to make FUN & EASY Holiday Cards) where she used basic circles, rectangles etc to make some cards.  Both her cards used circles to make a Snowman.  One was a big snowman and the other a smaller one inside a snow globe.


I remembered I had a polaroid stamp in a Lawn Fawn Set so the idea came to put the snow man in the frame.   I stamped the image from Say Cheese set (currently sold out).  I don't have the die so fussy cut the frame and cut out the centre.  Went around all the edges with a black marker.  I cut some circles from a Spellbinders Nestibilities dies in white to make the body, used a long thin rectangle die from MFT for his hat and two circle dies cut together to make the scarf from some card I had coloured with a Copic marker.  Two tiny triangles made the ends,  A snippet of orange coloured card made his nose and some green shapes cut for leaves.  A bit of white pen to add veins and they became my holly. Added red gems for the berries, black gems for his eyes and some dark grey enamel dots for the buttons on this body. His mouth was a few black dots with a Sharpie marker.  Made a blue blended piece with some white spray and some dots of the white pen for snow.   Layered my snowman behind the opening and added the blue panel behind.   Used another sentiment from the Waffle Flower Star Snowflake set added on the frame.   Found some pretty glittery snowflake patterned paper to add to my card base and then added the polaroid frame on a jaunty angle.

I can see myself making a few more of that sweet snowman and the ornament card.  

I've watched a few more presentations and got two more cards made - still to take photos.   Can't wait to watch some more presentations and get some more ideas.  


Wednesday, 11 October 2023

Hello - have a great day

 I have a card today inspired by two amazing crafters  - Ardyth Percy-Robb and Jennifer McGuire 


My background was one I made following Ardyth's presentation at the Stress Free Cardmaking Summit and I paired it with a partial die cutting technique I watch on Jennifer's blog.   I die cut the hello from the corner of the background panel where I knew the white panel would cover it.   I used the shadow die to do the partial die cutting technique.  Added a stamped sub sentiment and added some matching gems.  


Sunday, 1 October 2023

Stress Free Cardmaking Summit - Part 1

I decided to take part in the Stress Free Cardmaking Summit - I bought the Ultimate package as I knew I'd never get to watch all the presentations over the three days - this way I can go back again and again. 

On Saturday (my time) I watched two presentations - the first by Sharon Curtis.  - She showed how to make a Christmas wreath card.   


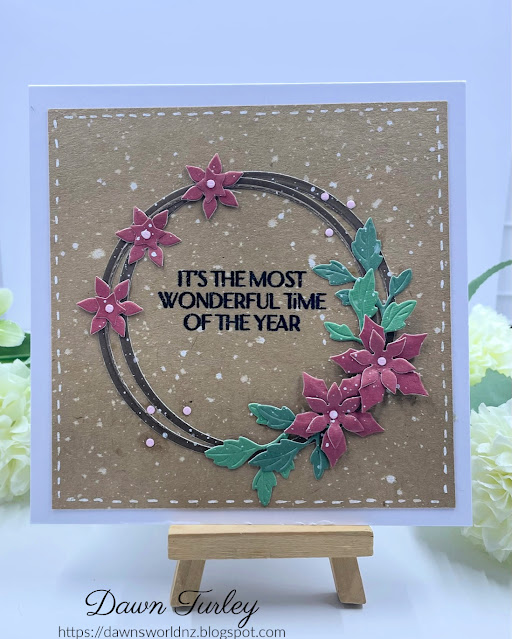
 I didn't have any of the same products so shopped my stash.   To make my wreath I used two circle dies (one Spellbinders one and one Impress one) to make the wreath frame.  I took dies from a number of companies and mixed and match to come up with the poinsettia flowers and leaves.  Sharon used a sentiment die, but I went with a stamped sentiment.   This one is from Waffle Flower Designs.  Added some of the little pink dots from a Sizzix die set as the flower centres and for embellishments.   Added the white pen stitching and some ink spatter.   It was a fun card to make and I can see myself using this idea in the future. 

The second presentation I watch was from Ardyth.  It was about easy "gel prints" with out a gel plate.  Using some shimmer powders on a smooth surface to dip you card into.   I used some Pixie powders and Nuvo shimmer powders.  

 These where the first ones done... 

Ardyth used a stencil to "stamp" with some paint made with the shimmer powders.  I tried mixing a couple of powders to get a darker blue - but it went way too dark and I really thought I'd messed it up.   But I preserved and from one sheet got 4 panels and from two of them I made these three cards. 


Note to self:  Don't use a fine die for this technique!   The backgrounds turned out a bit more grungy than I wanted but in the end was quite pleased with the outcome.  And there are still 8 panels to use!

Today I've watched a few more presentations and have lots of ideas to try out.   The summit will keep me going for quite some time trying out the wonderful techniques and ideas.  

Thanks for stopping by.   Hope you had a crafty weekend.  


Wednesday, 20 September 2023

Playing with a Gelli plate...

 A couple of weekends ago I pulled out my Gelli plate and had a play.   I had been watching some You Tube videos  - This one from Ardyth and this one from Natasha - both using inks on the gelli plate.  I did about 10 pieces and today I have two cards to share that I've made so far both using Natasha's water drops technique.   

First card: 


I used some Catherine Pooler Aquatini and Tiki Torch inks.  Still getting used to how much water to drop onto the plate. I added some white ink spray splats and some dark gray splats.  I used Gina K Master Layouts 2 & 3 to make my layers and the circles.  The background layer used Ardyth's blending trick using some Catherine Pooler Lime Rickey.   The sentiment is from Gina K's It's all you mini stamp set. 

Second card:

Another blended background using water drops.  This time I used two different blues from Catherine Pooler on my Gelli plate- one lighter and one darker.  I was also inspired by Natasha's video here   She added lots of little stamps in gold embossing  and cut into postage stamps.  I cut the panel into two and then took a lot of little stamps from a freebie stamp set and used some Rose Gold powder.  I then cut the Waffle Flower Postage Stamp die four times - twice in white card and then out of each of the dark and light blue paper.   I then fussy cut the centres out of the blue papers and glued to the white die cut which I had cut apart.  I then added the four stamps (two light and two dark) onto the panel with 3D tape.  The sentiment is from Altenew - Birthday Builder stamp set. 

I've still got lots of papers to use.  One background has been worked on... but still waiting to decide how to use it. 

Thanks for stopping by.