Showing posts with label Paints. Show all posts

Sunday, 29 June 2014

Two for the price of One....plus one extra

Well at least two cards from one stencil and another from left over ink....

I had a great afternoon playing with my inks, stencils and stamps.  Recently I was lucky enough to win a Memory Box stencil on a blog hop - it's this one 


I pulled it out today and made one background with some embossing paste and then I decided to use some Distress inks to sponge.  I used vibrant colours - Mowed Lawn, Spiced Marmalade, Seeded Preserves and Salty Ocean.
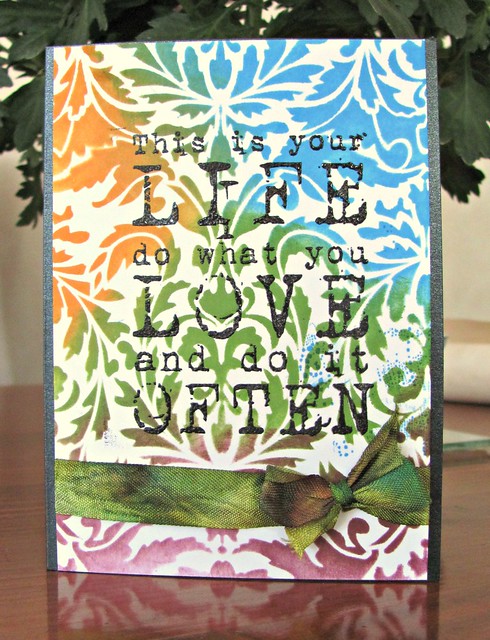
This is your life....

I used a Stamp-It sentiment as my focal point, but letting the background take pride of place.  I coloured up my ribbon with the inks but once I spritzed it, the green sort of took over... a bit more about that later! 

Before making up the card, I took the inky stencil and gave it a good spritzing with water and then used a piece of cardstock to "stamp" the stencil.  I think it's called reverse stencilling.  Tim Holtz showed in during the Stenciled Online class earlier this year.  The resulting negative of the stencil turned out very soft and airy looking.
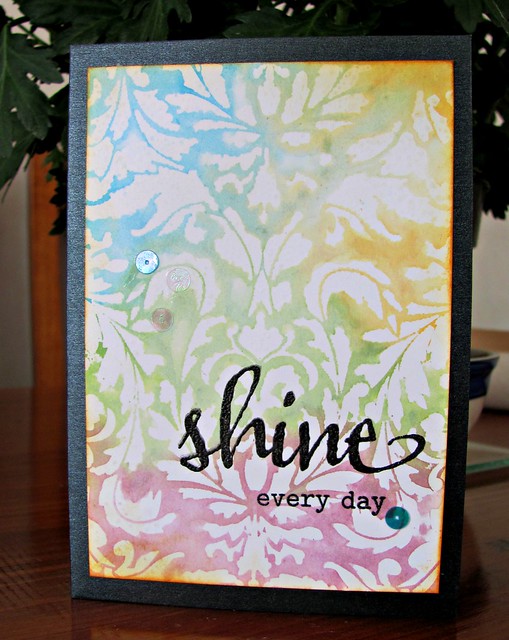
Shine Every Day

Once again, I wanted the beautiful background to take pride of place.  So just added a sentiment.  This one was from two Winnie and Walter sets and did involved a little stamp surgery... the every started life as everything.   Finished with a few iridescent flat sequins.

And my final card came about from the ink left over from my ribbon.  I had beads of ink on the craft sheet so grabbed a piece of white card stock to sop it up.  As it was very wet, as the card stock picked it up, little bobbles appeared.  I added a little more blue and orange inks to the sheet to fill in the gaps on the card.  Once it dried, a very interesting background resulted.  

IMG_8713

I decided to simply play and see what would happen.  Started by stamping the Scribbly Bird from a Dina Wakley set and enhancing it with some Copic markers.  Then stencils, inks, paints, some washi tape and the sentiment from the set.  A mixed media card resulted.   I am entering this into the Anything Goes Challenge at Simon Says Stamp

And I still have my embossed piece to do something with... a very successful day's crafting!


Wednesday, 14 May 2014

Watercolour flowers


The current online card classes, "Watercolor for Card Makers", is so much fun.  I'm loving every minute of the classes.  So much inspiration... and it's not too late to join in as once you register, you have a life time to revisit and review....Go here to have a look.

Today I have some water colour flowers to share with you.

Watercolour flower

This first one has a water coloured block background and then stamped the Darkroom Door flower which was inked with distress inks and painted. I was really pleased with how the background and flower then ended up stamping the sentiment crooked.... hence the banner. Added some clear flat sequins to finish. 

Next up is a faux watercolour technique.  My inspiration for this was a video from Wplus9 (here) but it tied into the classes, as we also learnt this technique.  

Faux watercolour flowers.

This was as I had finished the piece and then this is what I did with it.


I made a small 3 1/4" x 4 1/8" card.  The frame was made with some Simon Says Stamp woodgrain card coloured with a Copic marker.

My final sample is a more artsy water colour using a Hero Arts stamp

Arty flowers


I used the colouring on the front of the stamp to paint in my colours.  Still to make this up into a card. 

And if you want to see some more of the beautiful faux painting  do hop over to Lin's blog as well as Nancy's and Barb's.   And I came across this beautiful example by Diane

Off to watch another days videos. 

Tuesday, 24 September 2013

Stenciled Backgrounds at Die Cut Divas

Today over at Die Cut Divas,  Arlene show cased a couple of projects I did with a Dreamweaver stencil.  This month, Dreamweavers are our sponsors and they very generously provided the Design Team with some stencils to work with.  One of mine was a Damask Background.  (LJ 907 Damask)

LJ 907 Damask 
Here is the card I made

 I started with a piece of watercolour paper which I distressed with inks.  I laid the stencil on and then used some Festive Berries ink over it.  I used a long rectangle die from Spellbinders to cut it.  I tied around a ribbon and added to a blue card.  I used a Fiskars scallop edge punch and added some red card behind.   I stamped the sentiment onto some sticky back vellum cut with a Die-namics die.

My second piece is a bookmark.  This one came about as it was my first attempt at stenciling with paints.... it did not come off as well as I wanted, but I manage to selvage a piece to make this

The background was made with Gelatos and then the stencil was done with Black acrylic paint.  My sentiment is from Hero Arts and once again, I cut with a Die-Namics banner die and edged with a Copic marker to give the illusion that it is matted. 

Thanks again to Dreamweaver's for sponsoring us at Die Cut Divas.

Thursday, 5 August 2010

Believe Tag...

When I was working on my Tag Tuesday entry yesterday I originally started with a different sized template and idea.... but changed my mind.   Today I kept looking at what I had done with the tag - and thinking how can I use this piece?

So I decided to put it on a card. 
I started by printing out the background paper ( a freebie here) Next I printed the stand which I cropped from a Victorian Lamp stand image I have.  I edged the background with Tattered Rose distress ink and also used the ink to stamp HA Old French writing randomly across the paper. The sentiment is from a set by Inkadinkado.  I also inked the edge of the white card base with the distress ink before adding the background.
For the mannequin I used the Template from yesterday - I covered it with some dress pattern tissue ( received from Betty with my CCC card).  I added a lovely flower ( again with some Tattered Rose distressing) that a work colleague brought me back from her trip to Singapore recently and a stick pin ( from the lovely Pia)  I am rather pleased with the result.... now if only Flickr will behave I can add it to my photostream.

Today I felt heaps better but still barking like a seal....but had a bit more energy... so cleaned out the bathroom cupboard and cleaned the Fridge out.   Plus popped out to get some more adhesive.... and some new watercolour paints... a set of Pearlescent Watercolours by Yasytomo.  They are beautiful colours and I can wait to try them out.  A set of 21 colours for under $20.

As usual, many thanks for visiting.