Showing posts with label distress inks. Show all posts

Saturday, 2 November 2024

Woodblock Wednesday - Oct 2024

 I did this card for Woodblock Wednesday on Thursday this week, but have been soooo busy that I didn't get time to share it till now!  


I love this challenge from Amy - a good reminder to use those woodblock stamps I have.   At the moment I seem to be on a Christmas blitz... so here's another one!


I used a Hero Arts Poinsettia stamp and the sentiment is from a company called Paper Inspirations.  It's a really old stamp as I can't find if this company still exists.    I started by stamping the Poinsettia all around the edges of the panel - using Altenew Heartbeat red ink.   I stamped the sentiment with some Festive Berries Distress ink.  Added a little blending around the edges.  Added some Nuvo drops in a red and cream and some gold Kindyglitz to the centre of the poinsettias.  

Really happy with this monochromatic card.  

Saturday, 2 March 2024

Craft Roulette #204

 second post for today.... see my first one HERE

*************************************************************************************

I haven't had time to take part in the Craft Roulette challenge for a few weeks - but today I watched the replay this afternoon.  As soon as I saw the parameters I knew what stamp I wanted to use.  


I recently got some of the Spellbinders House-Mouse Designs and I had them sitting on my desk.   There was one super cute mouse with some flowers so that became my main image - and meet the Ears element. 

Thinking of you sentiment, Fairy Tale colours - soft blues, greens, pinks and purple (Princess colours!), Mouse has cute little ears and I stamped a scripty background.

I started by stamping the Spellbinders House-Mouse - Bouquet for You in Versafine Onyx Black ink onto some mix media card by Fabriano.  I then took some Speckled Egg Distress Oxide inks and lightly sponged around the mouse.  I then added the script stamp from a NZ company called Rubbadubbadoo.  I used Altenew's Gray Denim ink for stamp with.  Just needed something light. I then got out my Distress inks - Tea Dye, Worn Lipstick, Wilted Violet, Sage Green, Mowed Lawn and added little blots of colour onto my painting palette and used a brush to paint the image.  All these colours are inspired by Fairy Tale Princess.  My Thinking of You was from a LDRS Creative Anytime Stack - stamped in black and clear embossed before cutting out with the matching die set.   Bonus is I now have a lot more sentiments done.  Really pleased how it all came together nicely.

Thanks for visiting today.  Hope your weekend is crafty.

Friday, 1 September 2023

Playing along at Woodblock Wednesday challenge.

 Once a month over on Amy Tsurata's blog (Tsurata Designs) Amy runs a challenge - Using Woodblock stamps.    Very timely for me as yesterday my latest purchase - Penny Black's woodblock stamp - Snowy- arrived.   This stamp was originally designed and produced in 2008 and is still available.   After many years of wanting this one... I finally went and bought it!  

So today was a working from home day and I used my breaks to start this card and then after I did my required hours, I finished it off.


I started by adding the sentiment on my card.   It's from the Penny Black stick and shine series.  I added the stick and shine and then used silver foil.  Hard to photograph.  It looks black here.  I then used Broken China Distress Oxide to blend on the background.   I took a Montaga snowflake stencil and added random snowflakes with Nuvo Glimmer Paste.  I used a Lawn Fawn curved die to cut some snow banks.  I stamped snowy and using the stamp as a guide, used some smooshed Distress inks to paint him.  I used Candied Apple for his hat and scarf and Wilted Violet for the white shadows.  

As this was Snowy's first outing as well as using the Stick and Shine sheets... I'm entering this into Darnell's NBUS challenge

I am happy that I bit the bullet and finally got this stamp (and all the other goodies I got when I was ordering it!)   Well worth the 21 day wait for it to make it's way here.

Hope you get to do some weekend crafting.  

Monday, 21 August 2023

Elfing around at Christmas Kickstart Challenge.

I'm back home now.... brought a cold back with me... so no work today as I've been coughing a lot. Spend the morning in bed - didn't get a lot of sleep over night Saturday and into Sunday... so caught up with an extra 2 and a half hours sleep this morning and a quiet afternoon.   I decided to make a card for Christmas Kickstart Challenge where the theme this month is "Just Elfing Around"


I have a digital image from Mo's Digital Pencils that I've had for a long time.   It's called Little Elf Mim and is adorable.   I printed it onto some Canson XL watercolour paper- re colouring to a grey colour.   While I was away I was watching all of the Penny Black & Jill Foster 12 days of Christmas You Tube videos.   Jill is amazing colourist using Distress Ink re-inkers as paints.   I also watched her video about how she colours.  As I don't have reinkers I smooshed some DI onto a stamp block and used a paintbrush to colour my image 


I was quite pleased with the results.   I mostly used Distress Inks but for the grey/silver and the brown blending.  For the grey/silver I used Altenew Siver Lake ink and for the blending I used Altenew Sand Dunes ink.  For the sentiment I used Spellbinder's Yana's Christmas Sentiments.  I used some of the Canson XL watercolour paper and gold foil and die cut the sentiment with the dies.  Added some of the ink blending.  

And here is one final photo of me and the boys before I left on Saturday 


Missing them already!

Saturday, 1 October 2022

World Card Making Day/weekend.. Part 1

 Hi there.   I get to have a whole weekend of WCMD action as it's Saturday here. (7.40pm as I write this.) I also like taking part in some of the challenge that are on Saturday US time.... so Sunday for me.   Luckily the spring weather is VERY WET here in Auckland so I got to spend a bit of time in the craft room this afternoon after a quick but wet trip to the Mall for some new jeans.  

I had a friend ring me yesterday to ask if I had any Sympathy cards on hand - as she needed one.  Looked and only had one... so after work yesterday I made one and this afternoon did two more. 

Here's Friday's card 

I was inspired by a card I saw on Pinterest.  It used leaves for it's focal image.   I decided to use an unusual colour - because I had the maroon coloured card sitting on my desk.   I found a colour of ink that worked with it - Catherine Pooler's Peppermint Scrub ink.  I found some leaves in an Altenew Wallpaper Art that would work for what I wanted.  I die cut the panel with a Gina K Master Layouts before stamping.  I also took a very old wooden stamp from a local NZ company - Rubbadubbadoo that was an Old Script stamp.  I masked a little off each side and stamped it in second generation stamping as a subtle background.   The sentiment is from Hero Arts - With Sympathy set (from 2011) .  Matted with the maroon card.  For added texture I embossed the bigger panel with Gina K Tapestry folder before layering that onto a maroon panel.  

Next up are the two cards I did this afternoon

This one was inspired by a number of cards I have seen using torn edge masking and ink blending.  I chose to use Distress inks - Squeezed Lemonade, Mustard Seed, Wild Honey, Spiced Marmalade and Ripe Persimmon.   I used a variety of silhouette stamps from Hero Arts - With Sympathy and Catherine Pooler - Wild Garden to add the flowers.   The sentiment is from Winnie & Walter - A Tree for All Seasons.   A few little yellow gems finished this one.


A very simple card to finish.  I have an embossing folder which embosses the sentiment only.   I then used a Hero Arts cling stamp (from 2010) called Garden Bouquet.   I stamped it twice and then clear embossed it.  Trimmed it down and added to a white card base.  

I also had a bit of a play with making bubble backgrounds.  It was my turn to choose the challenge for my local NZ swap group and I chose Bubble backgrounds.   You add water and liquid soap with a colour medium and blow bubbles and pounce your paper onto the bubbles.   One of the video tutorial I saw used instant coffee granules - so I had a try 


The brown used the coffee and the blue was Distress Paint.  Such cool backgrounds.   

Thanks for stopping by today.  Hope you get to spend some time crafting over the weekend. 


Saturday, 4 June 2022

Three of a Kind at Sweet Stampin' Challenge.

 It's time for a new challenge at Sweet Stampin' Challenge and our theme is Three of a Kind. 


Recently I've been using my Distress Inks a bit more... For this card I did some torn edge masking and then using a Rainbow of Distress inks.  My panel is Bristol Smooth card and boy does that make the blending so so easy.  I was totally thrilled with the results.   For my three of a kind I went with foiled butterflies.  I used a Spellbinders Hot Foil stamps/dies - Glimmer Edge Butterflies.  I used some Mini Rainbow Stripe foil.  I foiled two onto white card and then used one of the negative pieces and a little left over piece of foil and added to black card and foiled. Die cut all the butterflies and also the bodies from the plain foiled card.  Another three of the a kind... I added three colourful gems to each of the butterflies.   I matted the panel onto some teal card and then onto the white base. 

Thanks for stopping by.  Do come and join us at Sweet Stampin' Challenge  


Tuesday, 1 February 2022

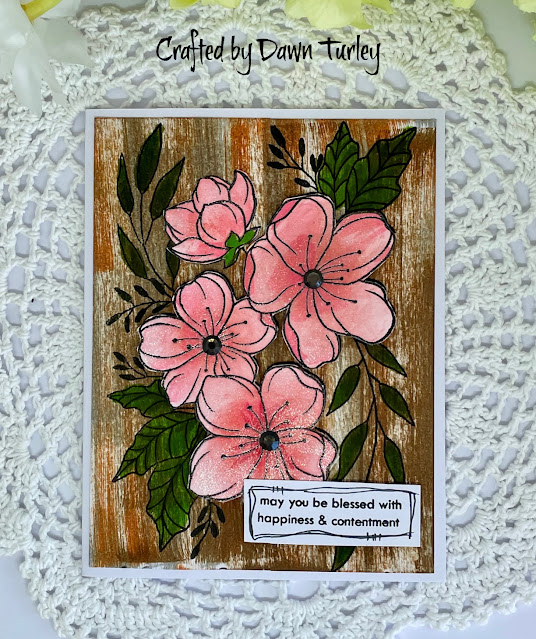
Woodgrain Background - Floral card

 Hi there.  It was a public holiday yesterday here in Auckland for Auckland Anniversary Day.  It was hot and breezy so I spend some time in my craft room as it was nice and cool in there.  

About a month ago I watched a video by Natasha Foote on making woodgrain backgrounds (here) and have been meaning to to give it a go.  I did an order from Scrapbook.com as this is where Natasha gets lots of her products from - and got a Woodware floral stamp to try out.   They are very reasonably priced.


 I made my background by swiping some Distress ink cubes down my card.  I used Rusty Hinge, Weathered Wood and Gathered Twigs, leaving some white showing as well.  I stamped the Woodware stamp (Floral Wonder) onto the wood panel and again onto white card.  I used Zig markers to colour the leaves directly on the panel and then fussy cut around the flowers after colouring with inks and Zigs.  I used my Spectrum Noir glitter pen to move the colour around so the flowers have a great shimmer to them. The bud was stuck directly to the panel and the other flowers added with some 3D tape.  Love this large floral stamp and boy are they reasonably price via Scrapbook.com.  Took a sentiment from an Altenew set and drew a frame around it before trimming it out.  It's been awhile since I did a background like this. 

Omicron is now out and about in the community but still reasonably low numbers...for now!  I'm taking advantage of the ability to work from home - 3 days in the office and 2 at home...depending on our roster for manning the Front of House - where people can come in and get their tax queries answered.  Some weeks I have to work 4 or 5 days in the office, others I can do the 3/2 ratio.  Today is an at home day... currently taking a break.   Take care out there people. 

Saturday, 27 February 2021

Shabby Chic/Distressed at Sweet Stampin' Challenge blog.

 Hi there.  Time for a new challenge at Sweet Stampin' challenge.  Our theme is Shabby Chic/Distressed.


My card is similar to one I did a week or so ago.   It is a Sepia looking card. 


I started by taking some watercolour paper and wet it thoroughly.  I then used some Walnut Stain Distress Ink smooshed onto my glass mat and painted it onto the paper.  Once it dried, I took a Kaisercraft set (English Rose) to stamp the roses in Versafine Onxy Black.  I stamped the lace stamp in the Walnut Stain ink, the flourishes in Gathered Twigs DI and also in Versamark and white embossed.  I used the Gathered Twigs to stamp a word stamp from Catherine Pooler - Birds of a Feather.  I stamped the sentiment from Altenew's Classic Beauty set in the Versafine Onxy Black and clear embossed it.  I took a white gel pen and went around the edges on the rose and leaves.  I trimmed the panel with a Gina K die and added to a Kraft card base.  

Do come and join us at Sweet Stampin' for our challenge.  

Saturday, 28 September 2019

Distressed at Sweet Stampin' Challenge

http://sweetstampinchallengeblog.blogspot.com/

Hi there.  Time for another challenge at Sweet Stampin'.  Our theme this week is "Distressed"

For my card I have added Distress ink to the distressed edges of my card.

My background was made by mopping up some inks from my glass mat a while back.  I added the brown stamping with a Hero Arts background Stamp.   I rubbed bits off to give the distressed look.  I then took my scissors and dragged them around the panel and took some Distress ink and add it to the distressing.  I used Altenew Obsidian ink to stamp the Couture Creations little stamp.  I added some distress ink to the edge of the die cut feathers.  These were a lovely gift from one of my CCC swap partners.  The colours looked a bit distressed so fitted the theme perfectly.  Added a little string bow to the bottom of the feathers.

Would really love if you came and joined our challenge.

Thursday, 15 November 2018

Sending Wishes.... Southern Girls Challenge - Inks or Sprays

It's time for a new challenge at Southern Girls Challenge Blog today.  This time the theme is Inks or Sprays.
Our lovely sponsors are


  I got to use a digi stamp from A Day for Daisies called "Breeze in Spring"   for my card

                                      
I printed out the image and then made a mask for the image and spritzed it with some Perfect Pearls spray and a white spray.  I then used Distress inks to paint the image.   Once it had all dried I die cut the panel with a scalloped die from Catherine Pooler Designs and added to some Patterned Paper that I had used a Lil'Inkers die to cut the stitching.  The Wishes die is from Catherine Pooler Designs as well.  I cut it with some dark green card.

Do come and join us at Southern Girls with your inks or sprays projects.                                                                                                                                           

Saturday, 2 September 2017

Leaves....

In the Northern Hemisphere it's coming into Fall (Autumn) while here in NZ it's coming into spring.  So leaves are falling up there and break out down here. 

Today the Flickr Hero Arts Group is having a scramble with the theme LEAVES with an option of kraft.... I took 2hr 15 mins to make two cards.. so just over an hour for each. 


For my first card I used an older cling stamp called Leaf Cluster.  I stamped it in a dark green ink and then several times in an olive ink.  Added the sentiment and it was ready to mount onto the green card base.  

And for my second card I used a set called 3 Leaves


I started by using a Nova brush to add three colours of Distress inks to make an ombre background.  I took the smallest leaf and misted it with water and used it to stamp and lift the colour from the background.  I then took the middle sized leave and stamped it twice and coloured with Copics and Spectrum Noir markers and fussy cut.  Used a Die and stamp set to make the sentiment.

I'm entering my second on into the challenge at Creative with Stamps - theme Leaves. 

Glad I took time to have a play this afternoon.  I had fun.

Thanks for stopping by. 

Sunday, 2 July 2017

Hero Arts layering Peacock

It is the beginning of the month so time for a new Challenge at A2Z Scarpbooking.  This month I have a card for the 1st.


I made this card as part of the 90 mins scramble over at the Hero Arts Flickr Group last weekend.  I used a stencil for my subtle background and stamped and die cut the Layering Peacock.

Do pop over and visit the team to see what they have come up with.  Awesome inspiration from everyone.


Thursday, 12 January 2017

Stitching -Real or Faux ... a challenge at Southern Girls

I was pleasantly surprised to get an email last month from Louise who runs Southern Girls Challenge blog...asking me if I would like to do another term with them. I'd previously been a DT member.  I had no hesitation in saying YES


I design for Southern Girls Challenge 

So here I am a member of Tracy's team and it's time for our first challenge of  2017.  To use stitching - real or faux.  Ours sponsor for this challenge are:


I got to use an image from Sasayaki Glitter.  

this one is called "Spotty and Pup"  Of course I am still enamored with my Prismacolour pencils and wanted to try out some blending.  I used pinks and purples to blend together to colour the unicorn.  I used some Odorless Mineral Spirits and a paper stub to blend.  Added some sparkle gel pen on the star and wings.  I used a stitched oval -my first faux stitching.   My second lot of faux stitching  is on my background.  I used a technique I saw on Kathy Racoosin's blog The Daily Marker.  You use distress inks.  I smooshed  a red and purple ink and watered it down a lot and then used a flat paint brush to make lines.  I used the side of the brush and some more concentrated red ink to make the thin stripe.  I then used a white gel pen to make my stitch lines.   I matted this panel onto some lilac cardstock and then onto my white card base.

Do come and join us at Southern Girls Challenge 

Thanks for stopping by

Thursday, 1 December 2016

Guest spot at StampNation... critter challenge/chalkboard technique

Over at StampNation today the latest challenge is up.  It's an Either or Both challenge.


Option 1: Critter Challenge- Use some sort of bird, animal, creature or critter on your card.
Ideas: Deer, Mouse, Cardinal, Fox, etc.

Option 2: Chalkboard Technique: Use a piece of black cardstock with white or colored ink for a chalkboard technique.


This first card is for the Option 1:  I used a bird


 I pulled out my Birdcage and Bird die from Tim Holtz and die cut it with a some white card.  I used red Distress inks to sponge the bird.  The PP is from Rosie's Studio "Home for the Holidays" I trimmed around the holly with my craft knife and slid the cage and bird underneath.  The sentiment is from Hero Arts and is white embossed.  I stamped and die cut the holly leaves and berries (SOA Candy Cane Lane) and added a bow die from Impression Obsession.

And just because I could... I made another card using Option  - Chalkboard technique.


A real CAS card.  I took a piece of some black cardstock and white embossed the Hero Arts Vintage Poinsettia and matched it with a sentiment from SOA Candy Cane Lane.  I used a Faber Castell white pen to smudge around the flower and the sentiment.   I added some white enamel liquid dots.

Hope you week is doing well.  Tomorrow is my work Christmas lunch...we are heading about 45 minutes away at a pub out in the country.  Should be a fun afternoon.


Saturday, 12 November 2016

A productive Friday night....

Friday night, hubby out with the boys, what's a girl to do?  

Why craft of course!

And that's just what I did.  I started by making 10 mini file boxes - tutorial here at Splitcoaststampers. 


I used 6 x 6 PP from Rosie's Studio that was patterned kraft - it's nice and sturdy.  The embellishments are stickers from a the $2 shop.   I am going to fill the boxes with little bags of handmade chocolates.   I was surprised how quick these were to make once the first one was done... so stinkin' cute too.

I also spend some time checking out FB... and saw a replay of a Face Book live by Gina K where she used some inks and Tim Holtz stencils to make a quick card.  I just loved these and as I had the some of the same stencils she used... I just started playing and suddenly 4 more Christmas cards made!


These two used the same stencil - just did different colour schemes.   All my sentiments are from Kaisercraft. 


And these two used a Holly stencil.  I used a stencil brush on the last one and sponging for the other one together with some splatters of orange ink.  

Just love the Dr Seuss sentiment on my final card.  It comes from "How the Grinch Stole Christmas"   And how true is that!

So a bit of a fun evening while alone at home. 

Thanks for taking the time to stop by...

Monday, 7 November 2016

Digital rainbows with Hero Arts

It is my day to share over at A2Z Scrapabooking.  Our challenge this month is all about EMBELLISHING your project.

Did you know that A2Z Scrapbooking sells the Hero Arts digital stamps and cut files  (see HERE)  We certainly do!

Wishing you rainbows

I used Hero Arts Weather Cut Digital file.  Although this is a cut file, I do not have an electronic cutting machine, so I just used the PNG file and added to a Word Document.  I printed the umbrella  four times, each time changing the colour of the print.  I then printed it onto the main panel with the clouds and sentiment.  I fussy cut out the different colours and paper pieced them back onto the card.   I also printed one copy of the umbrella onto some masking paper and  used it to mask while I sponged the  rainbow background.   I added a flourish and some Hero Arts flowers and heart gems.  Some glossy accents for the rain on the clouds and some raindrops.   I used a sewing tool to do some wriggly lines around the panel before adding to my card base.

One great advantage with using our Digi kits is that you can make you image any size.   And using even a simple WORD programme it's fun to change the colours or even print out in a very light colour to do no line colouring on an image.

Did you also know you can now get free shipping (for USA only) for Orders $50.00 or More. Use Code FreeShipping16
And for every $50 spent on Hero Arts products we will send you a special gift! No special code needed.
Or use my code DAWN15 off your purchase of $25 or more. (before tax and shipping)  - note you can only use one code so chose what suits you best
dawna2zscrapbooking


Monday, 3 October 2016

StampNation WCMD Challenge - City Scapes

World Card Making Day challenges are still going on at StampNation... It's running all weekenwd (and into Monday my time!)  This time our challenge is Cityscapes.


A fun challenge.  I recently got a NZ stamp set called NZ Iconic Places and this was chance to use it..


Supplies:


STAMPS: NZ Iconic Places Collection (Craft Creations)
                 Santa and Reindeer (Inkadinkado)
INKS:   Versafine Onyx Black
            Distress Inks -  Blueprint Sketch, Faded Jeans, Tumbled Glass, Hickory Smoke
            Colour Box Frost White
CARD:  Cre8tiv White, Basic Black
ACCESSORIES:  Copic Marker R29, Copic White liner
 

I started by creating an evening/night time scene by using a variety of distress inks.  I then stamped the Auckland Skyline... I did some creative stamping so that I could have a whole skyline.   Finished with Santa and his sleigh going across the night sky.

Hope you have had a fun weekend .... still a few more hours over at StampNation for couple more challenges. 

Saturday, 1 October 2016

StampNation WCMD Challenge #3 - Land Challenge.

I had pre-prepared some of my WCMD challenges at StampNation, but not for all the challenges.  So I found some time this afternoon to have a play for one of the other challenges.

Challenge #3 is called "Land Challenge"


My inspiration was the pine trees in the lower right corner.  


I used a Color Layering Tree from Hero Arts.  Stamped in distress inks - Shabby Shutters, Evergreen Bough and Forest Moss.  I used an aqua brush to smooch the colours and then stamped the top layer a second time. The sentiment is a Kaisercraft one.   I added some fun foam behind the watercolour layer and added to a textured card - 


I'm off to have a look at all the challenges out there and see if I can get back into the craft room for some more play time.