Showing posts with label Stencils. Show all posts

Friday, 29 August 2025

Feel better soon and a Christmas card

 Been a very busy week at work and as we had been away last weekend... not much crafting done this week.   Today I'm sharing a scrappy Christmas card and a Feel better soon card I made. 

First up the feel better card....

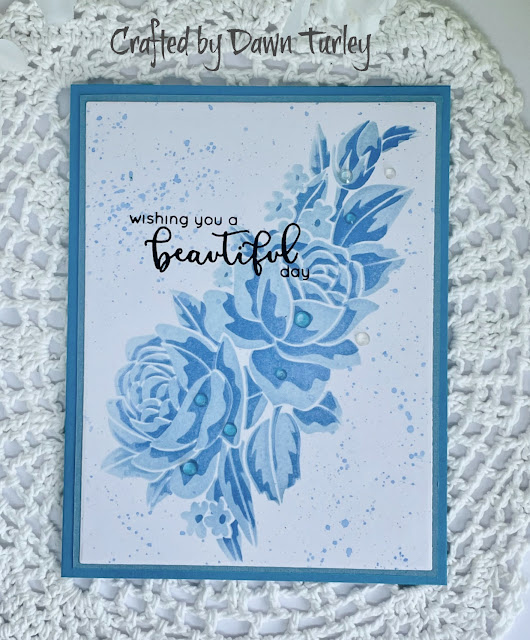
Another card of encouragement for my SIL who has just had her second round of chemo.

I recently purchased a gorgeous layering stencil from Papertrey Ink- In The Meadow - which I paired with a Waffle Flower Postage collage die and masking stencil.  I used Altenew purples/pinks  and greens inks with some soft blue to make background.  I used a sentiment from my stash - from Altenew Build a Flower  Grand Carnation stamp and die set.  

And my Scrappy Christmas card 

The patterned paper stripe was left over from a previous card.  Matted it onto a white panel and added to my card base.  The bells (Couture Creations) were already stamped and in a baggie with other Christmas bits and pieces.  I just added some colour with my Tri-blends from Spectrum Noir.   The circle die was in the bits pile, already embossed with Altenew's Organic Linen 3D folder. The little banner was already cut from a freebie from Natasha Foote.  I'd printed a few and cut with my Scan'n'Cut.  All I did for this one, was to use my dotty die to cut some dark red glitter card to make the embellishments.   

Looking forward to tomorrow as my crafty friend, Suna, is coming for a play date!   We haven't got together for a long time.... and this year I'm away for the craft fair we usually go to.   We finally found a Saturday we were both free and she is coming over.   I've been saving up ideas to do while she is here!

Hope you all get some crafty time this weekend.  

Sunday, 20 October 2024

More new stuff fun....

 Over the weekend, I've managed to get a couple more cards made with my new stuff from last weekend.  

First this card using one of the panel's I made last Sunday.  

This used the Waffle Flower Duo Layering Poinsettia stencil.  Using some Berrylicous ink from Altenew together with some Lunar Paste - Silver Lining.   I cut the panel into two pieces and stamped the sentiment from Darkroom Door - stitched Christmas.  I added the panels with some 3D foam.  I wanted to add some Poinsettia and went through my stamps and decided on this bouquet on Altenew Holiday Flower.  I used the Berrylicous ink to blend on some card and stamped the flower.  I fussy cut the red flowers.  I used some of the Lunar Paste blended onto a scrap of card and once it dried, fussy cut the whole bouquet and layered the red flowers on top.  Added a dote of gold Kindyglitz for the flower centres.   Really happy how the card turned out.  

Card two is also a Christmas one - this time using a Woodware stamp. 

The stamp set is called Printable Bauble Circles - designed by Jane Gill.  It has the circles, toppers and snowflakes.   I started by making my panel background.  I spritzed a little Distress Spritz in Peacock Feathers and Fossilised Amber.  Blended some Peacock Feathers DI around the edge.  I stamped the snowflakes in Distress Ink Chipped Sapphire.  The three baubles were made by spritzing Peacock Feather Spritz for the big blue one. Stamped the big circle and added the sentiment from Gina K's Holiday Tapestry set.  Splattered with some gold Lunar paste watered down.  The medium one used some Distress ink - Peeled Paint and spritzed with Sparkle spray and stamped the snowflakes in the Peeled Paint.  And the little on was Forest Moss Distress Ink with the sparkle spray and added the snowflakes in the DI.    Added a little Peacock Feathers ink around each of the baubles and added splatters on them all. The biggest bauble was added with some 3D tape and the other two were glued directly on the panel.  Added the topper and ruled a line for the string.  There is heaps of sparkle in real life.  

Adding this to the challenge at Darnell's NBUS 

I still a couple of more stamps, dies and embossing folders to use. Next weekend is a long weekend for us so an extra days crafting! 


Sunday, 13 October 2024

Craft Fair fun and lots of cards....

Yesterday my friend, Suna and I headed to a Craft Fair - FYI - For your inspiration.  It's held at Lake Karapiro in the Waikato area.  About 2 hours south of Auckland.   A long drive, but we always stop about half way for breakfast.  We left around 7.30 and with stops to pick up some lunch, for breakfast  and top up of petrol and we made it by 10.30.   We talked all the way down.  My GPS - took me a different way and we drove over the Dam - never been that way before.   

We spent a few hours looking around the stalls... spending most of my money at Krafter's Cart stall.... got some lovely goodies - and saw the Lisa Horton Interference inks being demo'ed.  Suna ended up buying three colours.  I managed to get some Andy Skinner stamps.... been eyeing them up for some time. 

On our way home we made a stop to visit our friend, Carol.  She lives about 20 mins from where the craft fair was.   We had a lovely catch up and she gave us some goodies as she is destashing. 

Here is my haul...

I got a new pick up tool - it has 4 replacement wax tips - and a pokey tool at one end.   

Today was busy with catching up with the chores from yesterday and doing the ironing this afternoon.  But managed to grab a couple of hours in the craft room and got a few projects done

First one used one of the Creative Expressions/Andy Skinner stamps I got.  This one is "Let Your Dreams Take Flight"  I made an NZ A5 sized panel - used two Distress Oxide inks (Vintage Photo and Lost Shadow) and two Distress Inks (Weathered Wood and Picked Raspberry) smooshed on a piece of acetate and added to the panel.  I die cut a piece with a Gina K Master Layouts 1 die and did the mat in dark pink.  Stamped the image onto the panel and the sentiment onto some scrap card and fussy cut it. 

My next card was a bit of mixed media.

I used the other part of the panel I made.  I stamped a La Blanche silicon stamp - Bird's Nest (thanks Carol) in some Toffee Crunch Memento ink.  Added a Kaisercraft stamp - rose and scripty one- stamped parts of it randomly over the background in some dark grey ink.   Added some 49th & Market rub-ons and washi tape stickers purchased yesterday.

Next one was using the Waffle Flower - Layered Poinsettia stencil I also purchased.   

It's a lovely duo stencil.   I did the poinsettia in soft greens and added the leaves, centre and the other little bits with Lunar Paste in Minty Fresh.  I cut it the same size as my card base.   I added a sentiment from Concord & 9th - Big on Christmas.  Love how it turned out.   

In fact I also made another panel with the stencil 

This time in red and silver with a touch of gold paste for the flower centres.   

Thanks for coming by today and if you made to here... I appreciate it. 


Tuesday, 4 July 2023

Weekend crafting.

 I had a busy weekend with babysitting Princess Grace but got a couple of hours to craft while she went to visit and meet her new sister... I managed a few cards....

First up a quick card made with some Pinkfresh Studio's washi.   I have the Artistic Dahila washi and had die cut them and had them in a baggie on my desk.   A quickly threw together this card. 


I used the slimline Master Layout from Gina K for my layers.  They look a bit wonky in my photo but the are not in real lift.   I die cut the centre panel from some pretty patterned paper and layered the die cut washi on it.  I add a die cut sentiment made from the co-ordinating stamp and die set. 

My second card used some new stamps and dies - some that arrived a couple of weeks ago. 


One of the dies and stencils I bought from Altenew was the co-ordinating items to the Monstera Quotes stamp set.  I had got the stamp set ages ago but not used it... so was happy to use a gift card I had won on a Altenew FB live video and get the die and stencil.  I used the Altenew Boho Vases to die cut a piece of patterned paper to make the vase to hold the Monstera Leaves.   I backed it with some kraft card.  I stamped all the leaves a number of times and used the matching stencils to add colour.  I used a variety of green inks from Altenew.  I used the dies to cut them out.  For the background I added a little green blended inks and added some fine dots with a fine liner pen.  I used a sentiment from the stamp set.   It is full of marvelous quotes and sayings.  Added the vase and built up the leaves.   Added it all to a kraft top-folding card base.   As it was the first outing for the stamps, stencils and dies I am adding this to Darnell's NBUS challenge. 

I did another card too.... it's for my local technique swap group - it headed off to it's recipient - here's a little sneak peek.


I also spend some time in crafting with Grace.   We made cat faces and she did some inking with a brayer and just had fun playing with my stuff. 


My crafting room is like a magical cave to Grace.  


Saturday, 8 October 2022

Poinsettia and Pinecones

 Hi there.   I saw the latest Christmas Kickstart Challenge is "Poinsettias and Posies"   I LOVE my Poinsettia stamps and dies.... I have a few!    But recently my friend Arlene gifted me a fabulous Elizabeth Craft Designs die set called Christmas Accents.... 


The die set is two Poinsettias and two pinecones.   I made a very simple posy of the flowers and cones. 


 I die cut the pieces in a variety of coloured card stock and layer together.   I added a green enamel dot (Altenew) to the centre of each one.   To give my background a bit of texture, I used a Tim Holtz stencil (Holly Bough) to emboss the panel.  My all time favourite Gina K master layouts 2 was used for the panel and it's layer.   The finishing touch was a red foiled sentiment from Spellbinder's Yana's Christmas Sentiments hot foil and die set.  

I'm also entering this into Darnell's NBUS (Never before used Schtuff) as it was the first outing for the Elizabeth Crafts dies and also the Spellbinders foiling & die set.   


After almost a week of wet weather we've had two quite nice days.  Cold mornings but warmer in the afternoons.   Hubby is praying for NO rain for the next few days so he can get the deck stained/oiled.  

Friday, 15 July 2022

SENZ - Creative Craft Expo 2022

 Hi there.  I spent a great day with my friend Suna at SENZ - Creative Craft Expo held in Auckland - it's running over three days.... I always take the Friday off and go with Suna.  This year, we decided to take a class - Watercolouring with Nuvo Shimmer powders.   We were  able to get three cards made.

Here is a couple of pics of me and Suna. 

Suna

Suna and I 
and here are the three cards we did....


Three different ways to use the Shimmer powders... precision watercolouring, watercolour wash and messy watercolouring.  We also painted our chipboard letters.   The last card is a vellum base with the watercolour panel at the bottom of the card.  And here is my haul


One set of Altenew stamps, stencils and dies, the Altenew Craft Your Life - Silk Art kit, chipboard elements, dies, stamps, stencils, shimmer powders, oxide inks... 

And I've booked another class for tomorrow.  Another one with Chick! Interactive Under the Sea.  Can't wait.   

I was home by just after three... so decided to use the little chipboard butterfly I did in a Make'n'Take and make a card with it... and used the left over part of the messy watercolour panel from today's class... I'll share later in the weekend.  

It's been a GOOD DAY!


Thursday, 19 May 2022

OCC Spring Card Camp 2022 - more Day 1 & 2

 Another day of Iso.... feeling slightly better again so after a quiet morning watching videos and reading and after a little nap, I got a few more cards done for homework for OCC Spring Camp 2022.  I finished off the background I made yesterday for Day 2.  I used the lighter of the two I made.


For the blending I used Distress Oxides and then used Hero Arts Swirl stencil and Catherine Pooler Midnight ink.  This a a bit of a reverse Joseph's Coat technique, using stencils.  I white heat embossed a Hero Arts sentiment wooden stamp and die cut with a Simon Says Stamp circle die.  Finished with a few clear sequins with clear gems layer up.  

One of Jennifer's Day 1 Ink lifting techniques was to blend inks, stamp and clear emboss then spritz the panel, layer another one on top and run it through a die cutting machine.   The ink transfers to the top layer giving a lighter look.   I have tried this in the past with varying success.  First attempt today, my background stamp moved and I got a double stamping.... so into the scrap pile with it and had another go. 

I ink blended some Distress Inks in Salty Ocean, Peacock Feathers, Seedless Preserves and Festive Berries.  I took an older Hero Arts Wooden stamp background - Outline Flowers and embossed with Altenew translucent embossing powder (arrived in the mail today!) It gives a really pretty shimmer to the panel.  The second panel is so soft and delicate looking.   


Jennifer uses lots of little flowers on her cards.  This is not something I do... so had to go hunting in my stash for any small flower and leaf dies I had.  Found a couple of Poppy Stamps dies - Floral Cluster and Orchard Leaves and a few slightly larger ones in the Geo Floral Frame dies from Sizzix.  I cut the Sizzix dies from white and sponged ink onto them.  The small Floral Cluster I die cut from a mixture of different coloured card stock   On this one I used dies from all of them.   The Hello There is a Hero Arts Stamp and Cut die, stacked 3 times. 


For the lighter version, I used the Floral Cluster flowers - which comes in one die with different sizes - and added them in a visual triangle around the black die cut sentiment.  This one is from Catherine Pooler Designs.

I'm loving the classes.  Watched Day 3 this morning and hopefully I'll feel like playing tomorrow.  Although, Hubby thinks I should be doing the dusting and vacuuming - doesn't think that will be too strenuous for me!  We'll see... he's not working till the afternoon, so maybe he can do it himself!  

Thanks for taking the time to get through this long post.  I do appreciate each and every visit.   

Monday, 4 April 2022

Black and White - or with a touch of colour.

 Hi there.  Today I'm sharing two Black and White cards.  For my NZ swap group, my good friend, Suna, chose a theme - Black and White with an option of a little colour.  She gave a few links to You Tube videos for inspiration.   There was one from NZ crafter Natasha Foote (here)  and I also found this one, this week, from Natasha as well.  Both of these inspired me to make cards- mostly the second video which was all about using white scraps. 

First up is a card based on both video

Natasha's technique was to take her white scraps and use stencils and black ink to make some panels. This one used Imagination Craft's Daisy Delight stencil and Tim Holtz Doily Stencil.  I added the panels to a piece of computer paper before adding to the card panel.  I added the sentiment from Altenew's Engraved Flowers set.   One of the flowers from the same set was stamped twice onto some white card and I fussy cut them.   I added the tiniest bit of colour to the centre of the flowers with some Pastel Sunrise ink from Altenew.  I added a few Altenew enamel dots to finish. 

My next card used a similar background. 


For this one, I used the Daisy Delight stencil and the second stencil was a Simon Says Stamp - Waves Stencil.  The flower is from Altenew's Craft Your Life Project Kit... Hello Beautiful. I stamped and die cut the flower and added to the card.  I used part of the same sentiment I used on the first one and added a black foiled Pinkfresh Studio sentiment.  

I haven't actually decided which one I will send to my swap partner.   But it have to go this week!  

Thanks for stopping by. 


Thursday, 6 January 2022

WWC332 - Tristan's challenge: All Things Feminine

 Hi there... welcome to our first challenge for 2022 at Watercooler Wednesday Challenge.   Tristan is our hostess with an All Things Feminine Challenge. 


As most of you will know I love florals... and nothing makes a more feminine card than flowers. 
Today I have gone with a monochromatic look.  


I used an Altenew stencil called Sweet Spring Stencil.  I used two shades of blue Altenew inks to blend over the stencil.  I used some of the darker colour to water down and splatter over the card.  I finished with a few clear gems scattered over the card  

Come and join in the fun at  Watercooler Wednesday Challenge and check out the project from the other designers.  Then take our challenge and link up your project to the challenge post.    We'd love to have you join us.  You have until Monday 17th January at 5 pm Mountain Standard Time (Tuesday at 12.00 noon NZ time ) to link up your project.


Also entering this into the challenge at The Flower Challenge... monochromatic.

Saturday, 2 October 2021

World Cardmaking Day - October 2nd

 Hi there... Saturday 2nd October is World Cardmaking Day....As we here in NZ get to play a bit earlier than the other half of the world... I did get some time to play today (and am planning to play tomorrow with some of the wonderful challenges coming up)

I made three cards today.... one A2 sized, one tiny note card and one mini slimline.  

My first card is made for a new to me challenge.  One of my design teamies (Tristan) is now desiging for Just Add Ink  Their latest challenge is Choose Two


I chose Sunshine and Silhouette.

I cut my panel with Gina K Master Layouts 2 and used some washi to mask a frame aound it.  I used a Tim Holtz stencil to add my sunshine using inks from Altenew.  Once I finsihed I took three sides of the washi off, leaving the bottom piece.  I took some stamps from Catherine Pooler's Wild Garden stamp set for my my silhouette stamping.  The sentiment is from an Altenew stamp set.  

Next up is a mini note card.  The base came about when I cut down a pre folded base to a mini slimline size.  This one is 2.25" X 3" size. (although it looks bigger in my photo)

I used a little die rectangle from one of Gina K's Master Layouts.  I had some ink of my blending tool from my first card so I used a Hero Arts stencil (Crossing Waves) that Karren send me.  The leaf is from an Altenew mini stamp set called Bitty Botanicals and the Thank You from the mini set called Best Sentiments.   I'm giving this note card to a friend who ordered two masks from me.  I had the fabric cut out, so earlier today I sewed them.  Plus another one for both hubby and myself.  

And my third card for the day - using new dies that arrived yesterday.   I am loving the 3.25" x 6.25" mini slimline size and had ordered the Pink Fresh Studio Mini Slimline Essential Bundle.  Plus I got Altenew Itty Bitty Flowers die set.  

I cut a white frame using one of the Pink Fresh Studio dies. For my flowers I took a scrap of white card and used my blending tool and Altenew's Wisteria, Hydrangea and Ultramarine inks to make my own coloured card.  I cut the layers and glue them.  Used some dark brown card to cut the branch.  Added the flowers and then added a little gold gem in the centre of some of the flowers.  The sentiment is from Altenew Engraved Flowers set.  I just couldn't get a good photo.  Even struggled to edit it.  

Enjoy spending some time crafting over the weekend and Happy World Cardmaking Day 

Monday, 31 May 2021

Mini Flower Cluster

 Hi there.   Despite the family being here, I managed to get a little crafting done this afternoon while my daughter son in law and grandson to Kelly Tarlton's aquarium.  My Dad and his partner were playing Scrabble so made the most of some me time. 

In my last Altenew order I got the Mini Flower Cluster Layering Die.  I have to say I did struggle a bit to get it layered but it turned out okay. 


I started by die cutting my layers.  I took the white layer and added some watercolour paint down one side.  I then took the Feathered Leaves Stencil and Volcano Lakes ink and blended over the same area.  I went through my card stock and found colours that worked together.   Once I had layered the flowers I added to the card with some extra leaves.   I then used the black woodless watercolour pencil to make some very find splatters.   I used a Happy Birthday sentiment from the Fresh Freesia set.  

Here are a few photos of my grandson and my grandaughter.... 


 These two hit it off like a house on fire despite the 3 year age gap.  They played so well together and then had a bath together after dinner.   Today Archie was devastated when he found out Grace was not coming to play!  But tomorrow they will get to see each other at the rehersal - they are the flower girl and page boy.   

I am so loving having a house full.  Archie is so bright and fun and I'm having fun spending time with my daughter.   And it's great to have my Dad here.  4 generations in the same house.  Very happy times. 


Saturday, 3 April 2021

Homework for Erum's Creative Colouring class

 Happy Easter to you all.  I'm spending some time up at my friend's place in Mangawhai and happily have brought some crafty supplies and a couple of WIP projects from the my class at Altenew Academy.  I'm doing Creative Coloring with Erum - Advanced Techniques Online Class


The other day on my Facebook I showed this WIP 


Yesterday afternoon I finished it off.  

This was Day 3's class - Watercolouring and Stencils.  I used this gorgeous stencil called Rose Bouquet and after stamping it with Vanilla Cream ink, I used some of the Woodless Watercolor pencils.  Added some splatters for texture.   I had forgotten my coloured card so used a darker pink ink to blend some ink around the edge of my layer piece.  Turned out perfect.  Finished with a black sentiment from Sentiment Stripes 2 stamped directly on my main panel. 

My second project started last Wednesday with me adding some Texture paste and sparkle glitter Embossing Powder to my white card.  Once it dried, I used the heat gun to set the powder.  Another one I completed yesterday 


This one was inspired by Day 2 - Playing with Textures.  I used the same stencil as my first card.  I added some WOW Sparkle Embossing powder over the paste.  I then took some purple watercolour paints (from the 36 pan set) and added it all over the watercolour card.   I case'd Erum's idea of stamping a sentiment in black on white card and fussy cutting around it for a shadow layer.   I got the Birthday stamp set this week... I was tired of trying to find a Happy Birthday sentiment so was super pleased to see this one on sale.  I added a little "girl" sentiment to finish

Our Easter weekend has had lovely weather so far.  We travelled up north Good Friday morning.  After finishing these two cards in the afternoon we headed to a local beach to enjoy the afternoon sun and even I managed to hit the water.   Then today after doing two more cards we "beached" again.  We went a little later in the day but still got some sun and yes another swim for me.  Two more days of the holiday break so hoping the nice weather continues. 

Happy Easter to you all.  


Wednesday, 29 January 2020

Mission: Inspiration - Altenew Academy Day 1

I have recently taken the latest Altenew Academy class - Mission: Inspiration.  Nicole Watt was the tutor and I have to say... it was a cool class.  Nicole gave us lots of ideas about finding and using inspiration in all sorts of ways.   Day 1 was about organising your inspiration, be in on pinterest, or in a notebook.  Nicole did a project using a Style - based on a magazine photo.  Her is her project...


I took inspiration of the white on white samples she made with the pop of colour with the sentiment.  Nicole's cards used stencils and embossing paste - but I decided to dry emboss with the stencil.

I used Altenew Layer Medallion B stencil and dry embossed it.  I added a pop of blue with the sentiment from Sentiment Strips. 

I have started a second one using some embossing paste and glitter with the Flowing Hearts stencil but need to let it dry.

I can highly recommend taking this class.  It really is inspiring!

Tuesday, 4 June 2019

Altenew June Inspiration

My on-line friend Virginia has set the Altenew Inspiration challenge this month... using a photo her husband took in Iceland

Altenew-June2019-Inspiration 

Virginia made a fabulous card using a vase and it inspired me as well.  


I used the colours - yellow and red for my flowers and the grey-green for my stenciled background.  The stencil is from Hero Arts.  The ink is from Altenew - Lava Rock.  The flowers are from the Starry Flowers set and coloured with Altenew Alcohol markers. I fussy cut the flowers so I could have then cascading down the vase.   My vase was made by stamping the tall vase from "Versatile Vases" onto some patterned paper and then cutting it out.  I added the thank you sentiment to finish off my card.

My daughter and family have headed south for a few days to visit the snow.... she messaged me tonight to say the little man had been asking when they were going back to Nanny and Pops house "cause they will be home now and I can see them or I will miss them"  - how sweet.  Melts my heart.  They will be back by the weekend.   

Thanks for stopping by.