Showing posts with label Pinkfresh Studios. Show all posts

Thursday, 29 October 2026

Justine's 12 Days of Christmas - Day 4 and Day 5

Today I enjoyed some time in my craft room, catching up on Justine’s 12 Days of Christmas. Days 4 and 5 gave me two different cardmaking briefs to play with, and it was lovely to spend the afternoon creating.

The Day 4 brief called for an embossed background, glitter strips and a large focal image. I chose a slightly different colour combination: teal green, silver and bright blue. Such a lovely mix!

I started by embossing my front panel with the 3D Snowfall folder from Creative Cardmaking Magic. For the focal image, I die-cut a large white snowflake from Elizabeth Crafts and added a little silver snowflake. Justine used a white-on-black sentiment on her card, but I went with black on white, matted with black card. A few silver dots finished it off.


For Day 5, the brief was to combine a coverplate die, a shaped frame and a cute image.

I used the Pink Fresh Studio Floral & Diamond Tiles coverplate to create my background, then found an image from a Tiddly Inks stamp set that I had already stamped and coloured. Using Nellie’s Multi Oval Die set, I made a frame and cut out the image. I attached the frame directly to the panel and added 3D tape beneath the centre portion for a little dimension. Three small silver glitter stars provided the finishing touch.

It was a lovely afternoon of crafty play, rounded off with a video chat with my daughter and littlest grandson. He had decided that the middle of the day was just the right time for a bubble bath! A lovely way to end my afternoon.


Saturday, 10 May 2025

Frame it Up...

 I've been pottering around in my craft room this week,,, bits and pieces done for up coming DT work... This afternoon I saw my crafty friend, Cindy, had made a cool card for the Pinkfresh Studio May challenge - Frame it Up. Her card reminded me that I have some die cuts in my "to use" pouch - from the Pinkfresh Artistic Dahlia set... die cut washi and a stamped and die cut sentiment.   So after going out for an early dinner with Grace and her Daddy to celebrate her 6th birthday today, (Mummy and Florence has to stay home as poor little Flo is not well) I came home and finished what I started before we went out. 

This one is a mini slimline card.  I have Pinkfresh Studio Mini Slimline Essential Bundle.  I took 2 of the dies (both with diagonal lines around the edge) and cut together to get my lovely black frame.  I found two die cuts that worked with the frame and trimmed them to fit.   I die cut a couple more of the sentiment to layer behind the stamped die cut.  Love the extra dimension this makes.  Finished with some homemade gold dots.  

Was a quick card as almost all the elements were already done.  


Thursday, 25 January 2024

Be Brave.

 I'm here to share my card for Die Cut Divas.   Our challenge this month is to use Never Before Used Stuff.   We don't have a sponsor this month. However, we're so grateful to Whimsy Stamps for giving us at $15 gift voucher for our winner.

My team mate, Arlene, send me some great funny images from Whimsy stamps.   


I had such fun making this one.  I coloured the birds with some purple pens to match the background.  I used Wilted Violet Distress Oxide ink to make my background and splattered some iridescent spray all over. I cut it with Pinkfresh Studio's Folk Art rectangles.   The sentiment is from Crafter's Companions "Reach for the Sky" set.  

So come and join us with your "New" project.  

Tuesday, 17 October 2023

Leafy fun

 I had a great day on Saturday with my friend, Suna.  We drove 2 1/2 hours south of Auckland to the FYI Craft Fair which is held in the Don Rowlands Event Centre on the shore of Lake Karapiro.  It's a great little spot for a great little fair.   It's not a huge fair but our favourite retailer - Krafter's Cart was there with a hug stand.  Meetu and her sister Neha were there and we had a big spend up!   I was reasonably constrained... only one stamp set from Gina K but lots of other stuff.. some 49th and Market laser cut ephemera leaves, some Lindy's Magical powder shakers, a stamp scrubby, some domed blenders and extra domes, a few dies - like the Pinkfresh Folk Art Frames, Pinkfresh Curvy leaves and a Spellbinders Popular sentiments!    

I got back home on Saturday afternoon at 4.20pm (left home at 7.00am) so a long day!   We went out to dinner at our friend's place to celebrate my hubby's birthday and watch some of the election results.  By 10 to 9 I was nearly asleep so we headed home.  Luckily we live 250 metres around the road.

Sunday morning our friend's arrived at 8.00am to watch the Rugby World Cup quarter final - New Zealand versus Ireland - a nailing biting game that we luckily won!  Hubby then headed off to help Michael move some stuff so I took the opportunity to make a card while he was away and before we headed out to have lunch with our son, daughter-in-law and the grand-daughters.


My background was made with the Lindy's Magical Powders - Pinkies Up Pink - It looks amazing in real life.  Once dried, I used the Pinkfresh Folk Art Frames die. I added some of my new Lost Shadow Oxide ink and a texture stamp from Kaisercraft.  It is very subtle but it is there!   I backed it onto some brown card and then used some of the same brown to use the Spellbinder's Popular Sentiments.   The shadow layer was cut with some vellum.  The leaves are from the 49th and Market Laser Cut Mixed Media leaves.   Really happy with the results.  The leaves are simply stunning.      

Now to find more time to do some more crafting.  It's coming up a long weekend here so an extra day to craft.  


Sunday, 13 August 2023

Crafting with a friend.

 Hi there.   Today I had a crafty day with my friend, Kim.  Kim lives around an hour south of where my daughter lives in a town called Mandurah.  I caught the train from the nearest station to Emma's and got off at the station 5 mins walk from Kim's house.   Kim and I "meet" each other online and then 7 years ago we meet in real life here in Perth and went to a craft fair together.  Since them we have meet several times here and in Auckland.  Today was the first time I visited her at her home. 

Here we are in Kim's amazing crafty space.   We spend a good part of the day crafting together.   And then had a lovely lunch out at a local pub. 

Kim shared all her goodies with me and I've got a number of stamped and die cut images to take home with me and I had fun trying out her Gina K inks and stamps.   Kim also gifted me a stamp set and an embossing folder and dies.   I got four cards made.  I had taken a John Next Door magazine with free stamps, die and embossing folder with me and made a card with using some Gina K dies.


I used some cheap watercolour pencils I'd picked up to colour the roses and then die cut them.  I used a postage stamp die from Gina K as a mat to my central panel.   I used an embossing folder with Gina K Soft Stone ink for a bit of a background. The sentiment is from the free set- it's an open stamp that I added a fine liner pen to colour.  

Next I did a card using a Pinkfresh Studio stamp, stencil and die set of Kim's.  


I stamped the images - they are all joined together and then I used Gina K inks - must say I really liked how creamy they are! - and then used the matching die, that cuts all the elements out.  I used embossed the background and used an oval from a Gina K Master Layout to add the sentiment and added the elements around the edge.  Such a fun card to make. 

I'll share the other cards in another post.  One is for my NZ swap group - so as I won't get it sent to Jude till after I get back, it will be blogged later in the month.  

I had an awesome time and so much fun.  Kim and I realised we both like the same sort of books, music and TV programs so had lots of chatting as we crafted.    


Saturday, 15 July 2023

Day 2 at SENZ - back for more fun.

 Today I went back to SENZ for another class.... actually ended up doing two classes.    I was already booked into a mini class with Krafter's Cart - using Pinkfresh Studios.  Patricia was teaching this one and we did three cards.... however I messed up one so ended up keeping the focal panel and I'll try the fancy fold again. 

Here are the two I finished.  


This first one is a interactive one... The circle spins.. It's a super easy design - the base and then the circle is attached with a brad.   They all use washi tape and the matching dies from Pinkfresh Studios.  


The second one is a variation on the trellis card technique.  The inside has a die cut panel.  The focal panel is a square panel with the florals added.  The florals are added with some dimensional tape.  The sentiment is heat embossed and die cut. 

The third card I messed up has a similar square panel but had a 3D column look which was supposed to fold flat... but somehow mine didn't! 

I had done a quick make'n'take with Chick from Scrapbook Central just before doing the above class... and Chick said she has space on her Distress Oxide stamping class at 11.30 - so I signed up.   We did one card and got bonus instructions for another using the same products 


This card is so simple but so effective.   Stamping with Distress Oxide inks.  The bottom layer is sprayed with water and then stamped and sprayed again.. this time with some Frost Sparkle spray.  Once this was dried, stamped with a darker blue DO and dried again... then the top layer stamped with Versamark ink and white embossed.   All the floral stamps are from a Tim Holtz stamp set.   The Memory Box birthday die was 2 white layers and the top layer in gold glitter card.   Added some little gold die cut butterflies.    The bonus card uses the DO to ink a panel and then using the shimmer spray to ink the stamps.   Haven't tried it yet.  Of course, I needed to get some more DO inks... a couple of colours I didn't have and some more Sparkle spray   - and some more of  the Waffleflower stencils to match the Postage Collage die!    That's my crafting budget for the rest of the year!!!!

I got home and as hubby was out... had a bit more of a play with some of my new stuff.   Happy, happy Dawn for sure!!!!


Monday, 10 July 2023

Mindful Stenciling.

 After a busy weekend and a 3 hour drive home yesterday, I needed a bit of me time.  So I gold embossed the stamp from Pinkfresh Artistic Dahlia set and did some mindful stenciling.   It was very relaxing.  It's a great stencil to add ink blending to.  Everything matches up beautifully.  Then today I made the card. 

For my stenciling I used the Altenew inks - two pinks (Rubellite & Razzleberry) two purples ( Lavender Fields/Deep Iris) and two greens (Grass Field & Shadow Creek) and then used one of the layers to add some Nuvo Shimmer Paste over the darker pink layer.   Once it was all dried I used the matching dies to cut out all the florals.   While I was in Milford this afternoon I popped into the SPCA op shop and picked up some card bases - trifolds with cut outs... some circles and some with a window type cut out.  They are lovely textured bases in 4 1/4" x 6" in a white colour.  About 10 of them for $4.00.  I used one of the circle ones.   I stamped the sentiment from the set in the circle centre and added some of the florals around the opening.  

We had a lovely time at our nephew's party.  Great to see all the nephews and nieces and hubby's siblings.  And nice to have a night out and away from home.  


Sunday, 25 June 2023

Merry & Bright - at Die Cut Divas.

It's my turn to share at Die Cut Divas for this month's challenge.   Our theme is "Critters" and we have been sponsored by Sheepski Designs.


 Today I'm sharing a Christmas card using Sheepski Designs - My Spy 


I started by printing the digital stamp and then used a Pinkfresh Essential Mini Slimline die to cut the panel.  This gave the stitched lines top and bottom.  I used a variety of different alcohol marker to add the colour.  Some Altenew Red Cosmos enamel dots give the reindeer noses their colour.  Added Stardust Stickles to the hat.    I used some paper from a Carte Bella Letters to Santa pack for my background and added a little Hot Foiled sentiment for Spellbinders - Yana's Christmas Sentiments.  My card base is a 5" square. 

Do come and visit our challenge and join us with your critter projects.... just remember you must use your die cut machine. 


Wednesday, 31 May 2023

Tic-tac-toe at Die Cut Divas.... flowers, Love and patterned paper.

 It's the 31st so time for the final inspiration for this month at  Die Cut Divas.  Our sponsor this month is Frantic Stamper 

 
Our challenge this week:

I chose the diagonal - Flowers, The word Love, Patterned paper.  I used Pinkfresh Studio washi and the matching die.  I used Artistic Dahlia products.  Both are available at Frantic Stamper Inc. 


I stuck the washi onto some white card.  The die cuts out lots of the images all at once.  I used 300gsm paper... but next time I'll use a lighter weight.   I used a Gina K Master Layout die to cut the dotted patterned paper.  I used an Altenew stamp for the sentiment.  

Our challenge is open till 9.00pm Pacific time.  

Supplies:
Gina K Master Layouts
Altenew - Best Sentiments 


Saturday, 20 May 2023

Artistic Dahlia - Two different ways to make a card.

 One of my recent purchases was the Pinkfresh Studio's Artistic Dahlia washi tape and coordinating dies.  Once I purchased them, I decided I need the stamps and matching stencil as well... so a quick order to my local online store (Krafters Cart) and they arrived in a couple of days!  So now I have lots of choices on using these all together.  

So for my first card I've used the Washi tape and die to cut some stunning florals.


I stuck the washi to some white card and used the matching die to cut it out.   It is a very clever idea- each of the florals are separate and it's one linked die that cuts them out. Luckily my old 12inch Cuttlebug plates fit my new Spellbinders Platinum 6 machine.  I made the frame with a Spellbinders die set (Hemstitched Rectangles) cut from some maroon coloured card.   I layered some of the florals around the frame and pop a part one into the corner.   A Couture Creations stamp and die set had jumped into my Krafters Cart order - so stamped the and die cut it.  And my Altenew Enamel Dots were the perfect finishing colour. 

I'm adding this to Darnell's NBUS challenge - as the Washi  and dies are new. 

For my second card I had The Flower Challenge #80 Pretty Pastels in mind and used the stamp and stencil combo.


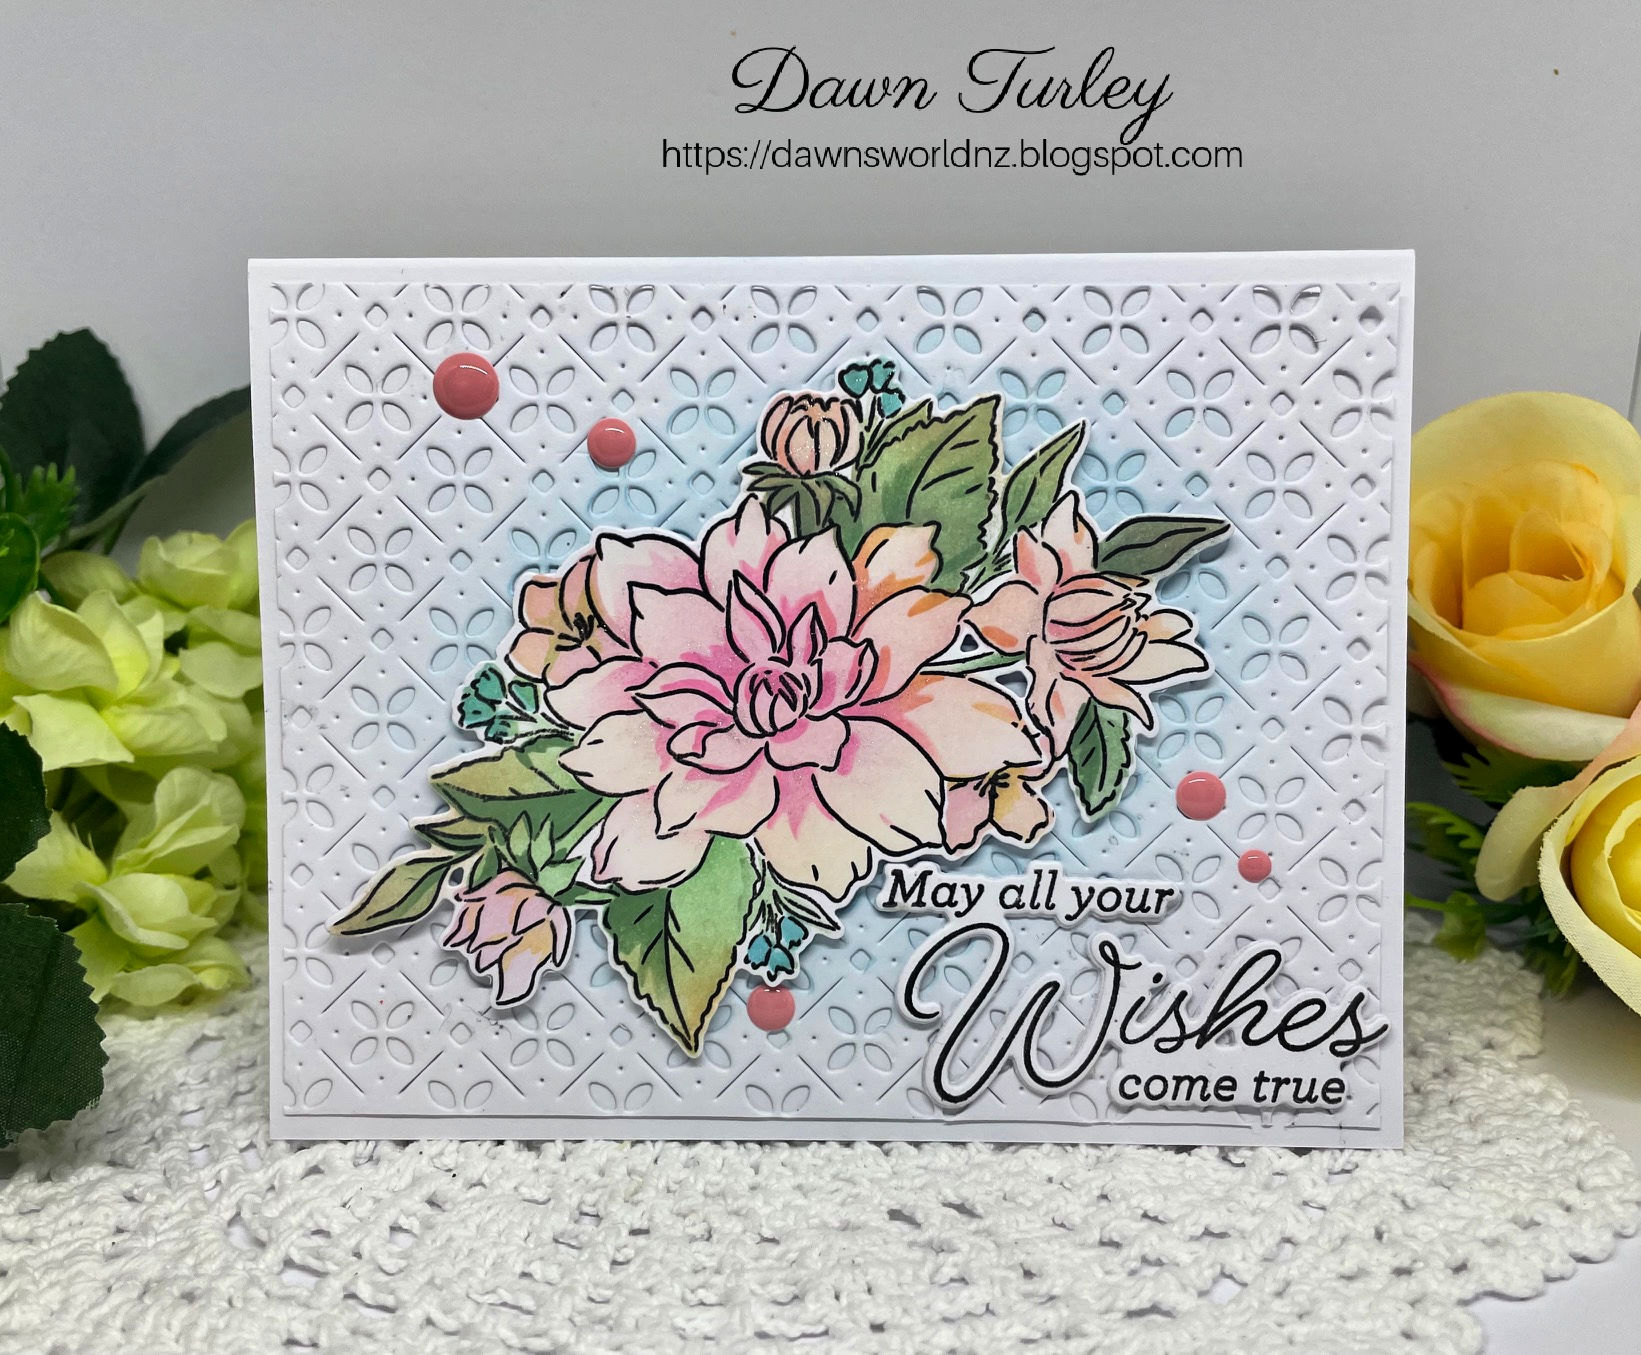
The stamp is HUGE!  - I had to put it diagonally across my original MISTI and trim a panel of card to fit.  Once stamped, I used a variety of inks to colour it in.   I has watched Jennifer McGuire's Video on  Stepping up or mixing your inks.  I used a number of colours together on some of the layers of the stencil to give more dimension.  Again, when I had finished, I used the die set to cut all the florals out.   I have heaps of both the washi and stenciled florals to use on other cards.   The sentiment is from the same stamp set (there are 4, 3 of which have matching dies!)  I layered a couple of the matching die cuts to give added stability to sentiment.   Again, the Altenew Enamel Dots had the perfect colour for my embellishments.   For some texture, I die cut the Pinkfresh Studio's Floral and Diamonds Tile Coverplate and stuck it to my base.  I blended some soft blue around the middle to add my floral centrepiece over.   I got this one finished just a little while ago - it's a cooler, windy and wet Autumn day here - nice to be in the craft room!  


Hubby is watching some rugby so I'm off to do more crafting.   


Monday, 10 April 2023

Floral background

 I was wanting to play at The Flower Challenge this month.... the theme being "Focus on the Background stamping"   I had Altenew's Cherry Blossom Bunch on my desk (had used it working on a DT card for later in the month) so made this card. 


I started by stamping the focal image in Altenew's Cloudy Night grey ink randomly across the panel.   I then die cut, stamped and stenciled the image.  I used the grey ink to stamp then used Altenew inks - Pastel Sunrise, Canyon Clay and Eucalyptus.    I used a Pinkfresh Studio stamp and die from the Just a Hello set stamped in Burnt Red ink.  I die cut the stamped background with a Lil'Inker die and matted onto  dark grey card.

Hope this is enough of a focus on the background - 


It's been an expensive weekend with our laundry issues.   The new washing machine come tomorrow and once we realised it was too wide for the space, we decided to change the super tub to a smaller size.   So bought that today... cost half as much as the machine!   Got it home and turns out the hoses are not the right size.   So now have to get a plumber to come and do some work...more money!   Hopefully by Wednesday or Thursday I'll have it all sorted and can do the washing.  

Thanks for stopping by.  

Friday, 3 February 2023

Playing with florals - and a card inspired by Bibi Cameron

 Over the last day or two I managed to get a small amount of time in my craft room.  I was tidying up a bit and decided to use a couple of stamp sets to just have a play. 

My first card uses a Pinkfresh stamp, stencil and die set called Just a Hello 

I stamped the image with versamark and heat embossed with Copper sparkle WOW powder.  I then used the matching stencils to add colour with Altenew inks.  I then used the dies to cut out the two pieces.  I used some white leather looking card to add them with some 3D tape.  The sentiment is a pre-printed one from Creative Expression.  I mounted it onto a red card base.  

My second card was inspired by a You Tube short I saw, by Bibi Cameron - see it here

I cut my slats at 1/2 inch wide and made my trellis.   I took an Altenew stamp (Sweetest Peas) and stamped four of the images.   I used my new Tri-blend pens to colour and then fussy cut them out and layered onto the trellis.   I used a sentiment from the stamp set.   An interesting technique.   Next time I'll make the slats a bit thinner.  

Thanks for stopping by today.  Have a crafty weekend.   

Monday, 13 June 2022

Watercoloured Dies.

 Recently I watched a Gina K Facebook Live (here) where Gina made watercolour backgrounds with her Zig Markers and then die cut them to use on cards.   Over the weekend, I tried it out.  My Zigs are getting a bit dry so didn't get the same bright colour ways.   I still managed to get some fun backgrounds that I used for a couple of cards.  I recently bought some Mixed Media paper - and it's perfect for watercolouring on.  

First up - using some of the pink and orange watercolour papers.    I was inspired by the cards Gina made but using Altenew Itty Bitty Branches die cuts.  


I used Gina K Master Layouts #2 to cut my centre panel.  I cut a circle die and stamped my sentiment and then added the die cuts.   I had an issue with my glue going everywhere.  I still like how it turned out - not as noticeable in real life.  

My next card I die cut some more of the pinky watercolour and some of the green one I did,


 For this card I cut the layers of the Wild Rose 3D die  and added extra ink blending over the other layers.  I made my background panel with some Marble patterned paper.  The sentiment is from a Pinkfresh studios hotfoil and die set.   You get a lot of sentiments at once... 

I'm going to make a few more backgrounds to have on hand.  

Tomorrow is my birthday - officially an Old Aged Pensioner.... 65 years old.  NZ'ers get the pension at 65 so my holiday fund will get an extra boost every two weeks!   


Friday, 10 June 2022

Celebrating with you today.

Today I'm sharing another card made with Pinkfresh Studio Just a Hello Floral stamp, stencil and die set.  When I was making the card for my Dad (here) I stamped the Floral stamp twice and used different inks when stenciling.    This card will be heading to a friend whose birthday is a bit later this month.  

This time around I used yellow/orange and purples to colour the stamp.  I recently got the Altenew Mix and Match Frame Dies and just love the deckle one in the set.   I decided to go with a soft purple card to die cut it.  I then had this beautiful blue base.  I have a pocket full with sentiments - these two are from an LDRS set.  A few gold gems finished the card.  I'm looking forward to trying out different colour schemes with this stamp set. 

I had some fun time in the craft room this afternoon... made a few cards and now just have to edit the photos.   Hubby has plans to help our son tomorrow - so some more craft time for me!  Hope you get time to play over the weekend 

Tuesday, 7 June 2022

Thinking of You

 My poor Dad has tested positive for COVID on Friday and ended up in the hospital .   His temperature spiked and he need to go by ambulance in the middle of the night.   He is doing well - on IV antibiotics and fluids.  And then yesterday, his partner also tested positive.   I made a card to send them.  

Last week I got a new stamp, stencil and dies set from Pinkfresh Studios called Just A Hello Floral.  I stamped the main image and used the stencil to colour with some Altenew inks.  The die cuts the image into two .

I decided to make a bit of a textured background for my images.   I took a Spellbinders cover die and used my embossing mat to make an embossed background.  I then used a Spellbinder frame die (Hemstitched rectangles)  to cut the lower layer.  I trimmed the bottom edge of the die cuts and added at each end of the centre panel.   I used a Woodware sentiment that was stamped in black and clear embossed.  I trimmed it and added to the centre of the card.  

I popped this into the post today so hopefully by the time it gets to them, Dad will be back home.  

Monday, 4 April 2022

Black and White - or with a touch of colour.

 Hi there.  Today I'm sharing two Black and White cards.  For my NZ swap group, my good friend, Suna, chose a theme - Black and White with an option of a little colour.  She gave a few links to You Tube videos for inspiration.   There was one from NZ crafter Natasha Foote (here)  and I also found this one, this week, from Natasha as well.  Both of these inspired me to make cards- mostly the second video which was all about using white scraps. 

First up is a card based on both video

Natasha's technique was to take her white scraps and use stencils and black ink to make some panels. This one used Imagination Craft's Daisy Delight stencil and Tim Holtz Doily Stencil.  I added the panels to a piece of computer paper before adding to the card panel.  I added the sentiment from Altenew's Engraved Flowers set.   One of the flowers from the same set was stamped twice onto some white card and I fussy cut them.   I added the tiniest bit of colour to the centre of the flowers with some Pastel Sunrise ink from Altenew.  I added a few Altenew enamel dots to finish. 

My next card used a similar background. 


For this one, I used the Daisy Delight stencil and the second stencil was a Simon Says Stamp - Waves Stencil.  The flower is from Altenew's Craft Your Life Project Kit... Hello Beautiful. I stamped and die cut the flower and added to the card.  I used part of the same sentiment I used on the first one and added a black foiled Pinkfresh Studio sentiment.  

I haven't actually decided which one I will send to my swap partner.   But it have to go this week!  

Thanks for stopping by. 


Sunday, 27 March 2022

Spring Flowers.

 Hi there... yes today I'm sharing a Spring Flowers card (even though I'm heading into Autumn)  I saw over on the Flickr Simon Says Stamp group that the latest challenge is Slimline and Spring... I have to say I have neglected my Simon Says Stamps stamps... so I pulled out Spring Flowers set and got started 


I started by die cutting the panel with a Pinkfresh Studio Essentials Slimline die.  I used some Altenew Grey Denim ink to stamp the flowers and leaves with a little masking.  I used some Prismacolor pencils with mineral spirits to colour the flowers.  Loved the softer look with using the grey ink.  I found the Tiny Words Encouragement set and stamped the sentiment in black ink.  Added a tiny black gem into the centre of the pink flower.   The panel was then mounted onto a green card base.  This is a 3.25" x 6.25" mini slimline.

I started this on Saturday evening and finished it today when we got home from spending most of the day at a Motorkana -  using cars to go around a course in a paddock!  It was for our MG club.  Peter didn't compete but was timekeeper.  We had fun catching up with some of the people we had meet earlier this year at the rally in January, and watching the MG's race around the course.  Plus bonus of a nice day.  


Tuesday, 22 March 2022

The Gentleman Crafter Sketch #11

 Hi there... back with new card inspired by Gentleman Crafter Sketch #11


I decided to make a mini slimline card with the sketch - using landscape orientation


The little butterflies are a very old Hero Arts set (circa 2007)  They are a trio of small wood mounted stamps.  I was looking for some stamps in my box of wooden stamps and came this set and it called to me to be used for this card.  I have gone monochromatic.  I used some dark blue patterned paper for the top half of the card.  The die cut panel is cut with a Pinkfresh Studio Essentials die as were the circle layers.  I had stamped the butterflies with Altenew inks  in blues and purples. and then used some Wink of Stella which caused the ink to move.  I added a Pinkfresh Studio foiled sentiment to finish.  

We had a storm come through yesterday morning... the worst rain for years... there was flooding all over the place, but as quick as it came, it passed and things dried out pretty quickly.   Our place was ok.  

Take care  people.