Showing posts with label Spellbinders dies. Show all posts

Thursday, 22 October 2026

Christmas Joy: Two Festive Cards from One Fabulous Die

Christmas cards are my favourite  type of card-making, and today I’m sharing two cheerful designs created with the same JOY focal die. By changing the colours, characters, and finishing touches, I gave each card its own personality while keeping the process wonderfully simple.

For the first card, I cut the JOY die from red card. I then die-cut only the centre negative piece from the “O” in white, blended ink over it, and added texture with a 3D Snowfall folder from Card Making Magic magazine.

To create the base panel, I used the two largest dies from Spellbinders Hemstitch Rectangles: the largest cutting die and the next size down, which adds the delicate pierced-dot detail. Once the JOY was in place, I stamped a sentiment from Rosie’s Studio Hearth & Home set in the lower corner.

Next came the star of the scene: a cardinal from the Waffle Flower Duo Cardinal die set. I cut the bird from white card, then used the coordinating stencils and Altenew inks to build up those gorgeous colours.

A few leftover green branches from a previous project found the perfect home at the bottom of the “O”. I perched the cardinal on top and finished the scene with tiny red glitter dots for berries. Such a simple detail, but it brought the whole design together beautifully.

For my second JOY card, I switched to gold glitter cardstock and made a 5½-inch square card. I used the same embossing folder again, but this time embossed the entire front of the card base before adding the glittering JOY die-cut.

For the focal character, I stamped and die-cut Penny Black’s Snowy. I cut him twice to give the finished piece a little extra stability, then coloured him with Spectrum Noir Tri Blends. Once Snowy was attached to the card, I added Distress Stickles Rock Candy to his pompom for an extra touch of festive sparkle.

I love how differently these two cards turned out, even though they began with the same focal die. One features a classic cardinal and rich red details; the other pairs a playful snowman with shimmering gold. They truly were a JOY to make!

Saturday, 14 March 2026

Pink Plaid Birthday

 There's a new challenge at Sweet Stampin' Challenge today - and the challenge is to use Gingham/Plaid. 

I did a couple of cards in different colours.  This first one is the one that will be on the blog today.

The background was stamped with the Catherine Pooler Plaid Background using It’s a Girl ink, with fine black pen details added. A die-cut panel (Gina K Master Layout 2) features a large Elizabeth Craft Designs sentiment, which was  placed ear the top to allow for a small bouquet of Sizzix and Spellbinders flowers with gem centres. The panel was matted in dark pink and mounted on a white card base.


For the second card I used Concord and 9th Plaid background stamp with Catherine Pooler Fiesta Blue ink and used the stripes stamp in black ink.  Die cut the oval from Gina K Master Layout 1 to highlight the focal floral.  Used the rosebud from Elizabeth Craft Design to cut some Scrapbbok.com watercolour patterned paper.  Happy Birthday sentiment by Memory Box was foiled in black and die cut. Finished with some gold dots.

Do come and join us at Sweet Stampin' Challenge

Monday, 27 October 2025

Curves Challenge.

 My little NZ swap group challenge was set by Jude - a card with some sort of curve on it.   My card went Maxine... and she has let me know it arrived.

I used a Spellbinders A2 curved borders One die set to make the two curved panels on my card.  I took the stunning paper from Franceville Luxe Illusions pack.  I fussy cut three of the leaves from PP and added them in the lower left hand side with a twin bow with a gold dot in the centre.   Added some little gold hearts cut from Simon Says Stamp Falling Hearts die.    Sentiment from Altenew Silk Art Craft Your Life kit.  Matted the panel with black card and added to a 5 1/2" card base.   

Thursday, 31 July 2025

MFT Magical Dragon

It the last day of the Die Cut Divas "Birthday Challenge" - and I'm here to share my card. 

Our sponsor this month - My Favorite Things - 

Such a wonderful company which sadly has recently closed.

Don't worry, though, we'll still be offering a $25 prize!  

Most of my MFT stash is older products. And for this birthday card I chose to use Magical Dragons stamp set.


I started with a piece of black card and used Altenew White Cloud ink and a Your Next Stamp - mini Star Splatter to make my starry background.   Used two Simon Said Stamp Stitched Circles dies to make the frame.   Cut the aperture from the white panel with a Spellbinders circle die.   Stamped and clear embossed the flying dragon from MFT Magical Dragons stamp set and cut with my Brother Scan'N'Cut .  Used some Spectrum Noir Aqua Markers to add colour.   Used some Spectrum Noir Black Glitter pen for the wings.  Stamp and embossed the sentiment from the MFT stamp set and cut with one of  Altenew Featured Sentiment dies.   Added it a white card base. 

You have till 9.00pm Pacific US time to join us with your birthday cards

Dawn & The Divas


Saturday, 19 July 2025

Anything but a Square.... at Sweet Stampin' Challenge

 Time for my team to share our inspiration for the latest challenge at Sweet Stampin' Challenge.   Our challenge this time is "Anything but a Square"

I could have done a rectangle card but decided to try out making a Rocker Card. 

I cut a 6" circle from white card using my Scan'N'Cut and then cut a 5.5" circle from some patterned paper.  Layered them together.  I stamp this cutie from Penny Black Tiny Wishes (discontinued)   It's from 2009 so been in my stash for a long time!  Used some watercolour Aqua Spectrum Noir pens to colour her.  I stamped on some more patterned paper and paper pieced her hat and dress.  I cut her out with a Spellbinders Nestibilities oval and scallop oval dies.  Finished with a pre-printed sentiment. 

Adding this to the Penny Black Saturday Challenge - Anything Goes 


Wednesday, 13 November 2024

Happy Birthday to my boy!

 Today my baby boy is 36!  Where the heck has the time flown.   I can not believe I have a 36yr old - who is the father of two delightful little girls!

He is also a connoisseur of Jack Daniel's Tennessee Whiskey - and that gave me my idea for his card.   


I search the internet for some images of Jack Daniels and printed this one out.  I due cut with a Spellbinders circle die and cut a scallop circle.   I took some light grey card and used Altenew 3D Masonry folder to add texture.  I search the dafont site and found one called "Bourbon Whiskey"  - it's a free font, so downloaded and typed the sentiments and die cut with Altenew dies.   He loved the card.  

Took some of my Christmas cards to work today and managed to sell around 17 of them.   I had gone overboard this year due to taking a few Christmas card classes online.   So now, just to start addressing the one's left and get ready to post in the next few weeks.  

Saturday, 11 May 2024

Choose a Country at Sweet Stampin' Challenge

We have a great challenge at Sweet Stampin' Challenge -  Choose a Country - (be inspired by the colours of the flag, the culture, the food.... the world is literally your oyster!)

I chose Japan for my country and was inspired by Cherry Blossom and Geishas

    
My Cherry Blossoms are Spellbinders Layered Cherry Blossom dies cut from some off-white card and using some Altenew inks (Dried Petals Fresh Dye ink set) to do a little ink blending in the centres.  I used some kraft card for the branches.  I used the same off white card to cut a panel and used Spellbinders Hemstitch Rectangles.  My little Geisha is an ancient (circa 2009) Hero Arts stamps - Four Dolls.  I used some of the Altenew pink inks to paint her and her matching fan, which I had fussy cut. The little sentiment is from a Catherine Pooler set - Birds of a Feather.  

Do come and join us at Sweet Stampin' Challenge.


Friday, 22 March 2024

Bird on a Branch

 It's been a busy week... haven't had much time to craft... but finished work early.  During the week I saw that Scrapbook Central was having a class by Chick Mitchell.  As this is in Wellington (8 hours south of me) I can't go... but Chick has designed some cards with a bird and some beautiful backgrounds.  I contacted her and found the bird was from Memory Box.  Of course I had to get it!  And it arrived yesterday late afternoon.  So after signing off my computer (working from home day!) and before doing the housework, I popped into the craft room and had a play. 


I started by putting the little birdie together.  I die cut with some 160gm Fabriano paper.  It's a light cream colour (although the packaging says white)  It cuts like butter.  I used inks from Altenew's Tea Party ink set to add colour to the layers with a touch of some brown to darken parts.  The branches, flowers and leaves are from Spellbinders - Layered Cherry Blossom die set.  I added a touch of the lightest red inks to the creamy dies.  Used some rose gold metallic card for the centres.   My background was a variation on a technique that Chick taught at SENZ craft fair last July.  Used a chipboard panel of leaves.  I inked them with some Distress Oxide in Speckled Egg and spritzed and laid it onto my panel.  I then blended some of the same ink through the panel like a stencil and finally just added some of the ink onto the panel.  Just love the look I achieved.   Die cut a scalloped panel from Gina K Master Layouts 4 and trimmed the panel to fit inside.  Added the branches, flowers and leaves and the little birdie.  Finished with a pre-printed sentiment from Creative Expressions Woodies.

I can't wait to try different colour combos for this little bird.   I scoped out Pinterest and have got a few samples on my board.

Entering into Darnell's NBUS challenge - as it is the first outing for the die


and Just Us Girls - in Collaboration with Time Out Challenges - Birds of a Feather


Sunday, 10 March 2024

Fractured card technique - Hello sweet friend

 Well the best laid plans of mice and men!..  My yesterday did not go as I planned... happily though!

I did watch a couple of the sessions from Card Makers Success Summit.... one in particular from Tiffany Solorio using Distress Sprays.   I only have two distress sprays - brushed pewter and tarnished brass .  Tiffany used all sorts of pretty colours and did heaps of layers.  I pull out my Lindy's Stamp Gang sprays - but they are all very muted colours - added a splotch of an Adirondack Color Wash in Purple Twilight - but my panel of mixed media paper was very pale and blah looking.   Watch out for another post with what I did with it!     Any who I had great plans to try out some more cards from some of the sessions..... 

But... my son texted to say he and the girls were on their way over to visit.... so my Saturday afternoon was spend playing in the craft room with Grace and on the floor with Florence...

I did get a message from Suna - to whom I sent a card in my NZ swap group.   It was my turn to chose a challenge - and Fractured Cards was what I chose.   Here is the card I made and sent to her.  

I started with some papers from DCWV= Ba;; & Bloom paper.  I picked it up recently on sale.  Just love the touches of foil on it.   I used some white card for my centre square.  I then used cream card and gold peelcraft lines for the fracture lines.   I used some of the flowers from Spellbinders Geo Floral Frame die set - cut with some pink card from Scrapbook.com Sprinkles paper pack,   I die cut the leaves from some 160gm Fabricano paper and used a varied of Altenew green inks to blend over them. Fussy cut the butterfly from some of the same paper pack.  The sentiment is from Altenew Engraved Flowers stamp set.  And a few metallic gems finished the card.   Suna has let me know she got it and loved it.  

And here's why not much got done yesterday 


Grace - playing with some Hero Arts Rub-ons


Florence exploring Nanny and Pop's house.


Wednesday, 25 October 2023

Star Layered Flower - Birthday card

It's time for me to share my card for Die Cut Divas this month .  Our sponsor is 

The Theme for October is Use A Layer Die Set or be sure to Layer a die cut on another die cut.

The prize is a fantastic $20 gift card to our random winner.


For my card today I've made a pretty Star Flower Birthday card. 


I used Birch Press Star Layering Flowers made with some paper I made with some Lindy's Magical Shaker powders in Pink and Purples.   My teamie, Cindy, send me the Birch Press Pinpoint Contour Plate background.   I left it in the white and added the pink and purple flowers.   The sentiment is a Spellbinder's die cut from Popular Sentiment set.  Added some enamel dots.


Do come and join us at Die Cut Divas   - don't forget to use your die cut machine! 

Tuesday, 17 October 2023

Leafy fun

 I had a great day on Saturday with my friend, Suna.  We drove 2 1/2 hours south of Auckland to the FYI Craft Fair which is held in the Don Rowlands Event Centre on the shore of Lake Karapiro.  It's a great little spot for a great little fair.   It's not a huge fair but our favourite retailer - Krafter's Cart was there with a hug stand.  Meetu and her sister Neha were there and we had a big spend up!   I was reasonably constrained... only one stamp set from Gina K but lots of other stuff.. some 49th and Market laser cut ephemera leaves, some Lindy's Magical powder shakers, a stamp scrubby, some domed blenders and extra domes, a few dies - like the Pinkfresh Folk Art Frames, Pinkfresh Curvy leaves and a Spellbinders Popular sentiments!    

I got back home on Saturday afternoon at 4.20pm (left home at 7.00am) so a long day!   We went out to dinner at our friend's place to celebrate my hubby's birthday and watch some of the election results.  By 10 to 9 I was nearly asleep so we headed home.  Luckily we live 250 metres around the road.

Sunday morning our friend's arrived at 8.00am to watch the Rugby World Cup quarter final - New Zealand versus Ireland - a nailing biting game that we luckily won!  Hubby then headed off to help Michael move some stuff so I took the opportunity to make a card while he was away and before we headed out to have lunch with our son, daughter-in-law and the grand-daughters.


My background was made with the Lindy's Magical Powders - Pinkies Up Pink - It looks amazing in real life.  Once dried, I used the Pinkfresh Folk Art Frames die. I added some of my new Lost Shadow Oxide ink and a texture stamp from Kaisercraft.  It is very subtle but it is there!   I backed it onto some brown card and then used some of the same brown to use the Spellbinder's Popular Sentiments.   The shadow layer was cut with some vellum.  The leaves are from the 49th and Market Laser Cut Mixed Media leaves.   Really happy with the results.  The leaves are simply stunning.      

Now to find more time to do some more crafting.  It's coming up a long weekend here so an extra day to craft.  


Sunday, 27 August 2023

Add Spots or Stripes...

Hi there.   I have been chock full of a cold I caught before I came home and it's not improved much this week.   I had Monday and Friday off sick... I haven't done much crafting till this weekend.   I had to make my Dad's Father's Day card (3rd September) and his birthday card (10th September) so I could get them in the post.... I'll share these later.. and then I had to make my sample card for Die Cut Divas for the 31st August.   Once that was done I thought I'd make a card for The Flower Challenge.... Add spots or stripes... made it and them realised the challenge finished two days ago!!!!!  Oh well, another card for my stash!!


I started by taking a piece of gold foiled stripe card and using my new Hero Arts Infinity Arched dies I cut the card.  I took some rose gold card and used the dies to make a frame.  Next up was to do the embossed background.   I have a Spellbinders M-Bossibility Reversable Embossing folder (circa 2012) and used the dotted chevron side.  I haven't used this folder for such a long time!  At the recent SENZ fair I picked up the a Spellbinders die called Layering Cherry Blossoms.   I die cut the flowers from some paint chips and added some inking.  The branches were cut from kraft card and I used some Altenew Sea Form ink to add shading.   The leaves were cut from green card and blended with the same ink.  Added the branches and flowers over the frame.   I had the Cherish sentiment already stamped and die cut (From Couture Creations "For You" stamp and die mini set) and added along the bottom of the frame.

All in all, a good weekend of crafting.   


Wednesday, 22 March 2023

Wrapped up for Christmas.

 Another card for Christmas Kickstart Challenge.  This month's challenge is "Wrapped up for Christmas"- use a scarf or scarves on your card. 


This one uses a pre-coloured Lily of the Valley digital image.  I've added texture by using colouring pencils before die cutting with a Spellbinder circle die.  My background was made by smooshing some Distress Oxide on to a gel plate and spritzing with water.  I then dipped my card onto the card.  I used some Nuvo Glimmer paste and a Montarga snow flake stencil.  Hard to photograph but looks stunning in real life.   Used a foiled sentiment from Spellbinders to finish. 

Thanks for stopping by. 

Wednesday, 1 February 2023

Quilt cards and some wild wet weather

 WOW - 1st of February...  Not sure where January went... all I know it wasn't the nice summery month it should have been.     I got back from my holiday early morning of the 12th - and had a week and a bit of moderately nice weather - with a bit of rain mixed in... then the rain started and over the last few days there was simply an unprecedented amount of rain in a very short time.   On Friday there was the equivalent of three months rain in a 24 hr period.   In all the time we have live in this house (30 years)  I have never seen so much water running through it.   Our garage got a small amount of  water running through it but we had waterfalls down our drive.   It was very impressive -  The house in front of us, their garage is under the house and it flooded and the flow of water continued into the house beside them.... And then overnight and early this morning we had another lot of heavy rain.   Lots of parts of Auckland had water up to 3-4 feet deep running through the streets and houses.... it was so unreal.  The little town centre about  half a kilometre from us had water running through it and shops lost stock.  

You can see the how much water there was here on my Facebook post 

So on Sunday we still had a little rain happening so I went into the craft room.... I needed to make a card for my NZ Swap group.   I got to choose the theme/technique for February and my choice was a Quilt card.   I made two cards - not sure what one I will send to my swap partner.

First one used some patterned paper. 

I found some pretty papers that went well together and made this lovely star pattern.  I used an embossing folder to add texture and then used a Spellbinders die for my sentiment panel.  The sentiment is from a Christmas stamp set from Altenew which I silver embossed on some grey/green card.  The finished card is 5.5" square. 

My second card used a similar pattern but in more bold colours 


I used white and two shades of purple to make the star.  This time I used Gina K Holiday Tapestry folder to add my texture.    Added a die cut sentiment to finish.  This one is 5" square. 

So now the decision on which one will head off to Jude.  

Back into the office tomorrow... it's been closed for the past two days so have been working from home.  Nice not to have to drive 20 mins to work, but I do miss being around people.  One day a week from home suits me. 

Wednesday, 8 December 2021

Using Patterned paper for Christmas

 I have a couple of cards to share today using some of the Anko (K-Mart) paper that I got the other week.  

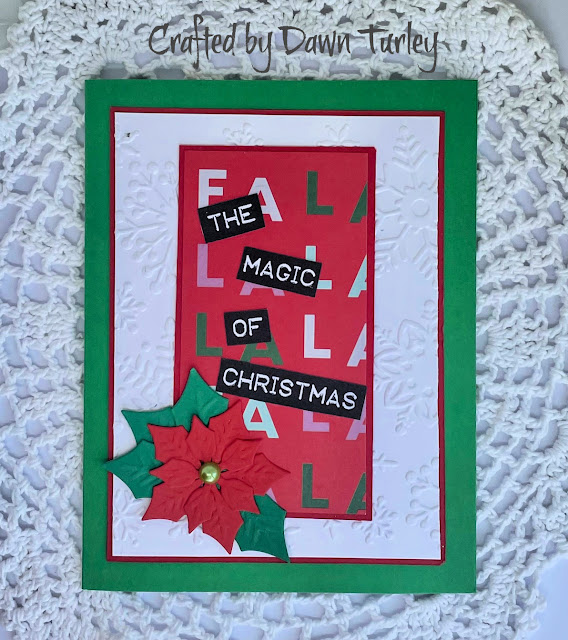
This one used a small panel of the patterned paper.  I layered it with some red card, and layered it onto a white embossed panel, also layered onto some red card and onto a green card base.  I die cut a Spellbinders Poinsettia out of red and green and layered to make my flower.  I added some printed sentiments (from Lily of The Valley)   

I am entering this into the Christmas Kickstart Challenge...If it's Christmassy - link it up


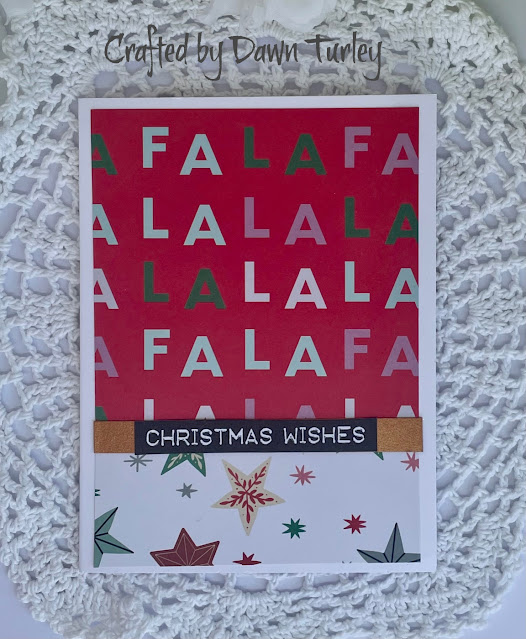
I used two different papers to make this one.  Layered a gold strip across the join and added another of the Lily of the Valley sentiments.  They are a digital set.  A very CAS card.  

Thanks for stopping by... Christmas is sneaking up quickly... 

Saturday, 31 July 2021

Thanks to Birch Press from Die Cut Divas

 Hi there.  It's the last day of the month at our Challenge at Die Cut Divas    Our sponsor this month is Birch Press Design who will be giving our winner a $20 gift certificate. 


Today my card uses a Memory Box layering stencil that my teamie Arlene picked up for a superb sale price and sent to me.   


I started by die cutting a cirle of pale blue card,  with a Spellbinders die and then used the circle stencils with three different Altenew blue inks.  I die cut a pale blue square with a Gina K Master Layouts die and backed it with a mid tone blue card.  I mounted the stenciled circle in the middle and then made a dark blue card base.  I die cut a Penny Black sentiment die from the dark blue card.  A few silver bauble gems finished it up.

Just a few hours till the challenge ends so do come and join us. 

Sunday, 20 June 2021

Shaped Card - NZ swap group

 This month's swap at my NZ group - our theme was make a card with layering dies and with a nice sentiment.... '

I have a lot of older Spellbinders nesting dies so pulled out a couple of sets and this is what I came up with. 


I used a plain nesting die to make the base and used some Patterned Paper to add on top.  I then used an ornate die for the centre.  The sentiment is from a Catherine Pooler set.  I added some blending around the edge.  Added a couple of gems in the corners.

I am slowly getting better.  Still coughing and full of phelgm.  We had a lovely quiet weekend up at Mangawhai.  The forecast was for heavy rain - but it stuck to just the nights and most of Saturday was really nice.  Today was nice in the morning but by lunch time it had clouded over and started spitting.  We went out to dinner at one of the local restuarants to celebrate my birthday.  I was too sick on Monday to go out so enjoyed the company and food last night.  

Thanks for stopping by. 

Saturday, 25 July 2020

Christmas in July at Die Cut Divas

Hi there.  It's time for me to share my card for Die Cut Divas - our theme for month is Christmas in July.   We have an awesome sponsor this month -

Cheapo Dies has increased their inventory with the addition of well known die brands like Elizabeth Craft Designs, Memory Box, Sizzix, Hero Arts, PoppyStamps, Lawn Fawn and a whole lot more. Be sure to check Cheapo Dies out here.

Cheapo Dies offers a $15 gift certificate as the prize for our winner of the July challenge,
so get started on the Christmas cards!

Today I have a CAS card.  


I embossed the background with a Couture Creations folder.  My poinsettia is by Spellbinders.  I die cut the three inside petals in red card and used the rubber mat to emboss.  I cut the largest layer in green card to simulate the leaves.  I added a little pearl embellishment to the centre.  

Do come and join the challenge this month.  And don't forget to check out all the goodies at  Cheapo Dies here. 

Saturday, 6 June 2020

Masculine Cards at Sweet Stampin' Challenge


It's time for a new challenge at Sweet Stampin' Challenge.   Our theme is Masculine/Father's Day.
As Fathers Day here in NZ isn't till September, my card is just an every day Masculine card.

I used a freebie stamp set I had in my stash, unopened for a number of years!  I stamped the boating scene in Obsidian black ink onto some kraft card stock and cut it with a Spellbinders Eyelet circle die.   I found the blue stripey paper that I though carried on the beachy/sea theme.  I used one of the sentiments from the stamp set together with the little anchors.  The centre panel was matted with some kraft and then onto a blue base. 

Do come and share your masculine projects with us at Sweet Stampin' Challenge blog.

Thursday, 14 May 2020

WWC 271 - Kath's Challenge: All About Occasions

Hi there - time for another challenge at Watercooler Wednesday Challenge. Kath is our hostess with an All About Occasions challenge.


This is a cute little 4 1/2" x 4 1/2" card.  I recently was inspired by my blog friend, Virginia Lu, to use nesting dies to create a frame.  For the frame on this one, I used some Spellbinders Hexagon dies and some textured silver card.   I did some stenciling behind the frame using a Faith Pocock Studio's Bubble stencil and some Sea Breeze Altenew ink.  I then stamped some Altenew Painted Roses in Altenew Wisteria and Hydrangea inks, and Grass Field ink for the leaves.  I fussy cut the flowers and added to the  frame.  I added a sentiment from Altenew Beautiful Day set.  I added some 3D Liquid Pearls in dark purple as my final embellishment. 


Come and join in the fun at Watercooler Wednesday Challenge and  check out the project from the other designers.  Then take our challenge and link up your project  to the challenge post.  We'd love to have you join us.  You have until Monday at 5pm Mountain Standard Time (Tuesday at 12.00 NZ time) to link up your project.