Showing posts with label fussy cutting. Show all posts

Saturday, 2 May 2026

Fairy Tale Florals + Fussy Cutting - a fun afternoon's crafting

 This afternoon, after a quick tidy up of my desk, I carved out a little “play time” in the craft room—and I knew straight away I wanted to use the colours from Altenew’s latest Inspiration Challenge. I also decided to pair it with Jen’s Live Challenge for this week: “Fussy” (use something you’ve fussy cut on your project).


I was inspired by Natasha Foote’s YouTube video from April 21st, where she stamped a large image onto a card front and then fussy cut around the outside edge. Perfect timing, because I’d just treated myself to a new pair of Tim Holtz fussy-cutting scissors this week—and I was very keen to give them a go.

I went shopping in my Altenew stash and pulled out Fairy Tale Florals. There’s a gorgeous large image in that set, and it was exactly what I needed for this design.


I stamped the floral image directly onto my card base and coloured it with the matching simple colouring stencil. For the flowers, I blended Rubellite and Razzleberry Crisp Dye Inks; for the leaves, I used Frayed Leaf and Forest Glades Crisp Dye Inks.  I used a Gold Posca pen to add gold on the stamen and flower centre. 

Next, I drew a pencil line about 1 inch in from the edge (top to bottom) and then fussy cut around the flowers so the design “breaks” the edge of the card front.  Boy, the new scissors awesome!

To add more detail, I masked off just over 1 inch on the inside of the card and blended Rubellite ink through Altenew’s Deco Leaves stencil. I used whatever ink was left on the blending brush to softly tint the stenciled area, keeping it light and airy.

To finish it off, I added a very narrow strip of gold cardstock along the inside edge of the stenciling, then stamped a small black sentiment from Altenew’s Best Sentiments mini stamp set.

Hope you are able to get some crafting time over the weekend too.  

Monday, 27 October 2025

Curves Challenge.

 My little NZ swap group challenge was set by Jude - a card with some sort of curve on it.   My card went Maxine... and she has let me know it arrived.

I used a Spellbinders A2 curved borders One die set to make the two curved panels on my card.  I took the stunning paper from Franceville Luxe Illusions pack.  I fussy cut three of the leaves from PP and added them in the lower left hand side with a twin bow with a gold dot in the centre.   Added some little gold hearts cut from Simon Says Stamp Falling Hearts die.    Sentiment from Altenew Silk Art Craft Your Life kit.  Matted the panel with black card and added to a 5 1/2" card base.   

Friday, 31 January 2025

Dancing Ballerina

 It's the last day of the month and I'm sharing my card for Die Cut Divas.   We have no sponsor this month, but Whimsy Stamps are giving us a $15 voucher for our winner. 


The challenge this month is to use something NEW!  

I only have a few Whimsy stamps... so when I found they have digital stamps I just had to buy some. 
Here's the card I made using Ballerina image. 


It's such a lovely image.  I printed it and used Alcohol markers to colour her in before fussy cutting her.  I have been following Penny Black's New Year Sketches and used this day 2 sketch - using a large frame I cut from two dies from a Spellbinders set.  I ink blended the background in a couple of Altenew purple inks and added some paint pen dots to the top half of the panel.  I then took a Kaisercraft sentiment - stamped the first two lines on the front and the rest on the inside...  I added my ballerina with some dimensional tape in the middle and glued to the edges.  

Our monthly challenge ends at 9.00pm US Pacific Time 

Saturday, 15 June 2024

Craft Roulette # 219

 Back again for my 14th submission for the Craft Roulette.  


Interesting parameters.  As soon as I saw Folded Corner, I knew I wanted to do a Corner Flip Fold card. 


Project: Anniversary - who doesn't love getting flowers for an anniversary!
Colours: Salad -green lettuce, red tomato, black olives, blueberries, white dressing and brown croutons.
Element - New - first time this stamp is being used. Got it last week.
Random - Folded corner - my card is a Corner Flip fold card.

My Teddy Bouquet stamp is from Penny Black. I got it last week and have been waiting for the ideal time to use him. I watercoloured the image with scribbled Zig Markers and fussy cut it out. It was layered onto the red panel and some white Nuvo Drops finished it off.

As it was Ted's first outing, I'm adding this to Darnell's NBUS Challenge. And to the Penny Black Saturday Challenge Anything Goes.


Tuesday, 9 January 2024

Holiday Crafting

Finally I am sharing the two cards I made while we were away on our holiday break.  Since coming back I've been exhausted after my day at work... and then the weekend was full on with little time for crafting and blogging!  Did manage a couple of cards - one for a swap and one for an upcoming design challenge post.... more later...

So here are the two card I made between Christmas and New Year


 I got this new background die recently.  And I die cut it from some black card and layered on to the white base.  I used Altenew's Bitterroot Flower stencil and die for my focal floral image.  Sentiment is from Spellbinder's Popular Sentiment dies.   A few purple gems finished the card. 
Entering this into the TIME OUT challenge... New.  Two of my bloggy friends - Helen and Greta have joined the team.

Card two 


The flower is Altenew's Ambridge Rose painted with Altenew watercolour and splattered with Gold paint (Jasart ombre metallic paints)  I decided to fussy cut the flower.  I used some Mixed Media paper.  The background was made with the watercolour paints and salt to give some texture.  I cut it with Gina K Master Layouts 2 and die cut the frame from Gina K Master Layout 12.  Added a little bow from twine.    Sentiment is from Altenew Sentiment Strips 2.

Not too bad for only have minimal supplies.   Some watercolour paper, some watercolour paints, a few stamp sets and matching stencils and dies... a couple of ML's and some coloured card.   Got my fix - a couple of hours on a couple of days.. 

Thanks for stopping by.  Hope the New Years is starting well for you.


Sunday, 2 April 2023

Paper Piecing - inspired by Michelle Short.

 I realised I didn't share this card when I made it a couple of weeks ago.  

I was inspired by a video from Michelle Short (https://tinyurl.com/y89azccx) - where she did some paper piecing using Altenew's Paint a Flower Chamomile set.   It was a delightful card and I CASE'd it 


 I stamped the image onto some white card and onto some brown patterned paper. I fussy cut the pitcher from the brown patterned paper and layered it onto the white image.   I added some brown makers to give it dimension.  I added some colour to the flowers and then fussy cut the whole image.  Michelle does the most amazing tags so I also added my image onto a tag.  I trimmed some green gingham to added to the bottom of the tag,  Added a little stripe of black to edge it.  I added the fussy cut image with dimensional tape.  For my background I die cut a panel with a Gina K Master Layout and used a Tim Holtz Sizzix brick die, layered onto a black layer before adding to a white card base.  Added a little stamped sentiment. 

Hope you all had or are having a great weekend.   I got to spend a bit of time in the craft room working on some DT work and also having a play with Grace  - she did some brayering, swinking, and using some punches.  Now I have three or four panels of solid Distress Oxide colours waiting to be used as well as some multi coloured smooshed panels. 

Sunday, 10 July 2022

Altenew's July Inspiration Challenge.


I saw the challenge (Here) and had been playing with Altenew's Hennah Elements - they reminded me of the elements on the inspiration pic.  


I had done some blending and stamping with Grace last weekend - I had fussy cut the floral elements and they were sitting in my to use bowl.   I used the colours on the inspiration pic to do some blending and then used the Dotted Starburst Debossing Cover die to give some texture of the background.  I used some Gina K die to cut the panel and then used my mini perfect layers ruler to cut the black layer.  I added the floral elements and added some green enamel dots for the flower centres. 

Thanks for stopping by... haven't been doing much crafting as we headed north to our friend's in Mangawhai.  It was a lovely weekend - Saturday was warm and sunny so we were able to get outside - lunch on the deck.  #

Thursday, 4 November 2021

WWC328 Tristan's Challenge: All About Occasions

 Hi there.  Time for another challenge at Watercooler Wednesday.  Tristan is our lovely hostess with an All About Occasions Challenge. 


I have a Christmas card to share today.   

I was working on some stenciling and found this Altenew Buffalo Plaid stencil.  I tried it out with some red and green inks... but instead of flipping and twisting I only twisted... and got a bit of a different look than it should have been.  So die cut part of the stencilled peice into a slimline panel.  I matted with red card.  I grabbed a Rosie's Studio stamp and gold embossed the poinsettia onto red card and silver embossed onto some green card.  I then fussy cut the red layer and added to the green card with some dimensional tape.  I added a silver gem to the centre.  The gold sentiment is an older Hero Arts rubber cling stamp (circa 2011)  I trimmed the red panel and matted with some of the green card. 

Come and join in the fun at  Watercooler Wednesday Challenge and check out the projects from the other designers.  Then take our challenge and link up your project to the challenge post.    We'd love to have you join us.  You have until Monday 15 November at 5 pm Mountain Standard Time (Tuesday at 12.00 noon NZ time ) to link up your project

Saturday, 25 September 2021

Butterfly Floating Panel card.

 Happy Saturday... To quote Jennifer McGuire... "Today is a good day"

The sun was shining and we are in level 3 so a bit more freedom.  Hubby and I went crusin' this afternoon.  Recently he bought himself a 1977 MG soft top convertible . A super cute little red cruiser and we took a drive with the hood down... and had a beer and coffee - takeaway and contactless pickup before heading over the Harbour Bridge and back...

Prior to leaving I had been watching a video tutorial from a New Zealand stamper - Her name is Natasha and she lives in my home town of Dunedin.  Her channel on You Tube is HERE  Today her video was called Floating Panel cards.  So after we got back I headed to the craft room and came up with this card


I decided to use this fantastic Altenew Dovetail Butterfly.  I stamped it towards the bottome of my card panel.  I did a bit of googling to find out what colours this butterfly is.  I then took my Woodless Watercolour Pencils to add the colour.  I then did the cutting and fussy cutting around the butterfly and chose to make my panel turquoise to match the blues in the butterfly.  I used a TWC stencil and Altenew Turquoise ink to add some interest to the panel.  I used a sentiment from the stamp set - love that it has favourite spelt the way we use it here in NZ - I finished with a few little silver gems. 


Thursday, 29 July 2021

WWC 321 - Tristan's Challenge: All Things Masculine

 Hi there.   It's time for a new challenge at Watercooler Wednesday Challenge.  Tristan is our lovely hostess with an All Things Masculine challenge. 


My card today is for my friend, Michael, who's birthday was on the 23rd of July.

  
A month or so ago, I brought my first card making magazine in over a year.... they just don't seem to be making it to NZ.  It was Simply Cards and Papercrafting #214 (published in UK in Jan 2021) and it has a lovely free stamp, die and embossing folder set.  I took inspiration from the magazine to make this one.    I used the little embossing folder - it's about 2 1/2" square to emboss a circle.  I then used two grey inks from Altenew to blend over and then rub directly over the embossing.  I stamp the pot, leaves, sign, fork and spade onto some kraft card and coloured them in before fussy cutting.  I used the die to cut the little labels. There is a stamp with the names, but I decided to hand print them.  I added all the elements onto the circle.  I added a strip of burlap and a twine and popped the circle over it.  I stamped the sentiment.  It looked a little stark so I added some lines of embossing done with my scor-pal. 

Come and join in the fun at  Watercooler Wednesday Challenge and check out the project from the other designers.  Then take our challenge and link up your project to the challenge post.    We'd love to have you join us.  You have until Monday at 5 pm Mountain Standard Time (Tuesday at 12.00 noon NZ time) to link up your project.


Saturday, 29 May 2021

Hey There Girlfriend

 Hi there- Here's my last card for this month's challenge at Die Cut Divas                                    

                                                 CAS-ual Fridays Stamps


Prize: $20 gift code
This is a Tic Tac Toe challenge month using the grid below.
Please tell us which row you picked on your entry.
 
For today's card, I've gone for a diagonal line on our tic tac toe - Uneven edge, Friendship and Flowers.


I used a Spellbinders die to cut my uneven edge out of some lacy looking patterned paper.  My CAS-ual Friday's stamp set is unfortuneatly now retired.  It's called "Girlfriend" and I used it to add the sentiment and to stamp the flowers.  I used some ink blending on them and then fussy cut.  Added lots of bling to the centre of the flowers and some leaves from my "scrap" pile. 

I've scheduled this post so as you read it, I'll be enjoying a full house..... my daughter, son in law and Grandson -Archie will be here and also my Dad and his partner.  It's going to be one really busy week.  Thursday is the Wedding!!!!  My son and his groom's party ( Best Man and Groom's Maid - yes his best friend, Brooke is part of his wedding party) are also coming here on Thursday to get dressed.  So very full house on the day.  Showering will need to be rostered!  

Thanks for stopping by.  

Saturday, 13 February 2021

Birthday Butterfly

 I saw that the Challenge at Simon Says Stamp is Slimline - and when I was out and about on Wednesday I came across some lovely patterned paper and some slimline cards - so thought I could have a bit of fun. 


My red card base was already cut to size and ready to use.  I had a very old Inkadinkado stamp set (Sketchy Florals) sitting on my desk from a box card I had made, and decided that a tone-on-tone background would highlight my butterfly perfectly.  I used some Catherine Pooler Rockin' Red ink to add the subtle flourishes.   The butterfly was fussy cut from one of the papers in the English Roses paper pack from Uniti.  I cut the Happy Birthday sentiment (from Paper Rose Studio) from gold glitter cardstock and the shadow layer from Vellum.   A few gold gems finished the card. 

My shoulder injection went well on Wednesday.  Not painful at all.  And so far has helped a little bit.  Time will tell.    I'm having a restful weekend away at our friends and no crafting.  

Take care all. 

Thursday, 4 June 2020

WWC 274 Dawn's Challenge: Anything Goes with a Feminine Twist


Hi there - time for another challenge at Watercooler Wednesday Challenge. It's my turn to be the  hostess with an Anything Goes with a Feminine Twist.  


 This card was inspired by all the wonderful cards I saw on the 2020 Spring/Summer Coffee Lovers Blog Hop.  I had this freebie set that came with a magazine that I had not even opened.  It was the stamps and the embossing folder.  I used white card to make the embossed panel.  I then stamped the cups and sentiment onto more white card and fussy cut them out.  I used Altenew and Spectrum Noir alcohol makers to colour the cups 

Come and join in the fun at  Watercooler Wednesday Challenge and check out the project from the other designers.  Then take our challenge and link up your project to the challenge post.    We'd love to have you join us.  You have until Monday at 5 pm Mountain Standard Time (Tuesday at 11am NZ time ) to link up your project.

Thursday, 26 September 2019

WWC240 Kath's "All About Occasions" Challenge

Hello there, it’s time for another Watercooler Wednesday Challenge.  Kath is our hostess this week with an "All About Occasions" challenge.


I've made a Birthday card this week to share with you


I started this card by spraying a white panel with some gold Perfect Pearls spray.  To make the flowers I took some watercolour paper and smooshed some Altenew pink inks on to a watercolour palette and spritzed with water and the gold Perfect Pearls.  I did the same with some green inks.  Once the panels dried I stamped the flowers and leaves from a free stamp and die set from Simply Cards and Papercraft.  I die cut the big flower and two of the leaves with the dies and fussy cut the smaller flowers and one of the leaves.  I used Rosie's clear foil stickers for the sentiments.    I added the panel to some bright pink card stock (looks a bit red in my photo)


Come join in the fun.  Check out the projects that the artists at Watercooler Wednesday Challenges have created then take the challenge and link your creation to the challenge post. We’d love to have you join us.  You have until Mondays at 5 p.m. Mountain Standard Time (Tuesdays at 11.00am NZ time) to link up your project.


Sunday, 15 September 2019

AECP - Magical Markers Techniques.

I'm slowly getting to the end of my Level 2 classes.  Today I had a go at the Magical Markers Technique class.  I originally took this class some time ago, but only recently purchased some Altenew Markers.   The class was lead by Sara Naumann and it was all about Markers.  Not just using them to colour in with, but lots of incredible techniques for other ways to use your markers.    Each lesson gave different ideas and of course, Sara explained and demonstrated them beautifully.   I went through every lesson again and came up with a card that used several different ways to use my Markers,


So what did I do?  First off I used my ruler and the R217 Velvet marker to make the frame around my panel.  Next was to make the splatters. - How you ask?  Well it's quite easy.  Scribble some maker onto a craft sheet and spritz with Isopropyl Alcohol.  Quickly use a stippling brush to pick up and flick the colour onto the card.

I used the R217 Velvet, R705 Midnight Violet and some Black Copic marker.  Just love the misty look I achieved.

My final technique was again to scribble some of the markers onto the craft mat and spritz with the Isopropyl Alcohol and then taking some glossy card stock, smooshing it on the mat.  This give an amazing watercolour look.


I was very impressed with the idea of doing this for backgrounds.  My next step was to stamp a flower from the Wallpaper Art stamp set onto the pink piece.  (actually was the Velvet ink but the diluting with the IA makes it softer)  I added clear embossing over the stamping and carefully used the heat gun to set.  I fussy cut it out.


I added a leaf from the Wallpaper Arts set with some Industrial Diamond ink and a sentiment from the Leaf Canopy set.   I don't have a small Hello from Altenew so cut one from another die I have.  A few pink sequins and I called it a day.


I learnt so much from Sara and this class.  Alcohol Markers can be used for so many different techniques and ideas other than straight colouring.  This class was excellently presented and I can highly recommend it.

I am entering this into the Anything Goes challenge at The Flower Challenge.

Thanks for visiting my blog today.  All visitors are welcome.  If you liked this post, feel free to leave me a comment.  

Monday, 27 May 2019

Laugh and Live - May Card Chain Challenge.

I'm sharing my card for the May Card Chain Challenge as Helen, my recipient  has received the card.

Badge Grab 

 I decided to use the Sketch this month 


I used some pretty Patterned paper for the bottom half of my card and a stripe of green to separate the two areas.  The beautiful floral image is from Altenew's Wallpaper Art set.  I used Altenew Alcohol markers and Spectrum Noir markers to colour the flowers and leaves.  I then used my Scan'n'Cut to cut out the flower and leaves.  I stamped the sentiment from Kaisercraft's Violet Crush set.   Some gold gems finished off the card.  

Thanks for stopping by today.

Thursday, 23 May 2019

WWC#222 Helen's "All About Occasions" challenge


Hello there, it’s time for another Watercooler Wednesday Challenge.  Helen is our hostess this week with an "All about Occasions" challenge.


I'm building up my Birthday card stash so here's another one.  I has reviewed one of my Altenew Academy class... All About Layering 3 and day 1 used Altenew Sweet Rose Bouquet.  


I stamped the layered rose set onto some white card using Altenew Enchanted Garden mini cubes (Wisteria, Hydrangea, Ultraviolet and Andromeda) for the roses and Green Valley set (Firefly, Green Field and Shadow Creek) for the leaves. I fussy cut the rose bouquet with scissors and a craft knife.  I wanted some soft brown stripes and wasn't able to find any in my huge hoard of Patterned papers, so just took a sheet and turned it over and took the Altenew Classy Stripes stencils, my blending brush and Vanilla Cream ink and made my own.  I added a lovely lacy washi tape along the bottom.  I chose to use a sentiment from a Clearly Besotted set A few purple sequins and it was done.


Come join in the fun.  Check out the projects that the artists at Watercooler Wednesday Challenge have created then take the challenge and link your creation to the challenge post. We’d love to have you join us.  You have until Mondays at 5 p.m. Mountain Standard Time (Tuesdays at midday NZ time) to link up your project

Sunday, 12 May 2019

AECP - Color Your Day

Today I am sharing a couple of cards I made as part of my Altenew Educators Certification Program -
I am working on my Level 2 program.  The class I am working on is called "Color Your Day".  This class was taken by Therese Calvird.  She is a fabulous tutor and this class was awesome. The class was designed to help you feel more confident using color in your projects.  You can be inspired by colours and that inspiration can come from literally everywhere.  Therese used some photos to give her inspiration in day one's class. 

I did some Pinterest searching to find colour combinations that inspired me.  Here's what I found
Blue and yellow became my inspiration

My first card used a Dark Navy base and then I made a bouquet using flowers and leaves from the "Adore You" set.  I coloured these with a combination of Altenew markers an Spectrum Noir markers. As I don't have the dies, I fussy cut the flowers and leaves before layering them together.  The sentiment is from "Fresh Freesia" set.  I added a frame drawn with a white gel pen and some white Nuvo drops.


I also made this card inspired by the blues and yellows.


This time I used a slightly lighter blue base.   I started by stamping the "Fresh Freesia" stamp onto some white card and coloured it with the markers.  I then fussy cut - time consuming as I used a craft knife so I could get it close to the stamped image.  I added it to the card and then white embossed the sentiment from the same set.  I cut a quick mask from computer paper and laid it over the flower, while I added the splatters of watered down silver acrylic paint.  I trimmed the image and added to a white card base.


I learn a lot from this class.  Colour inspiration is all around us.  Use of a colour wheel can also help with finding the colours that work together.  Therese also explain a formula that is a guide to a good combination for using colours together... 70 / 20 / 10.

Thanks for stopping by today. 


Thursday, 5 January 2017

Using Lace

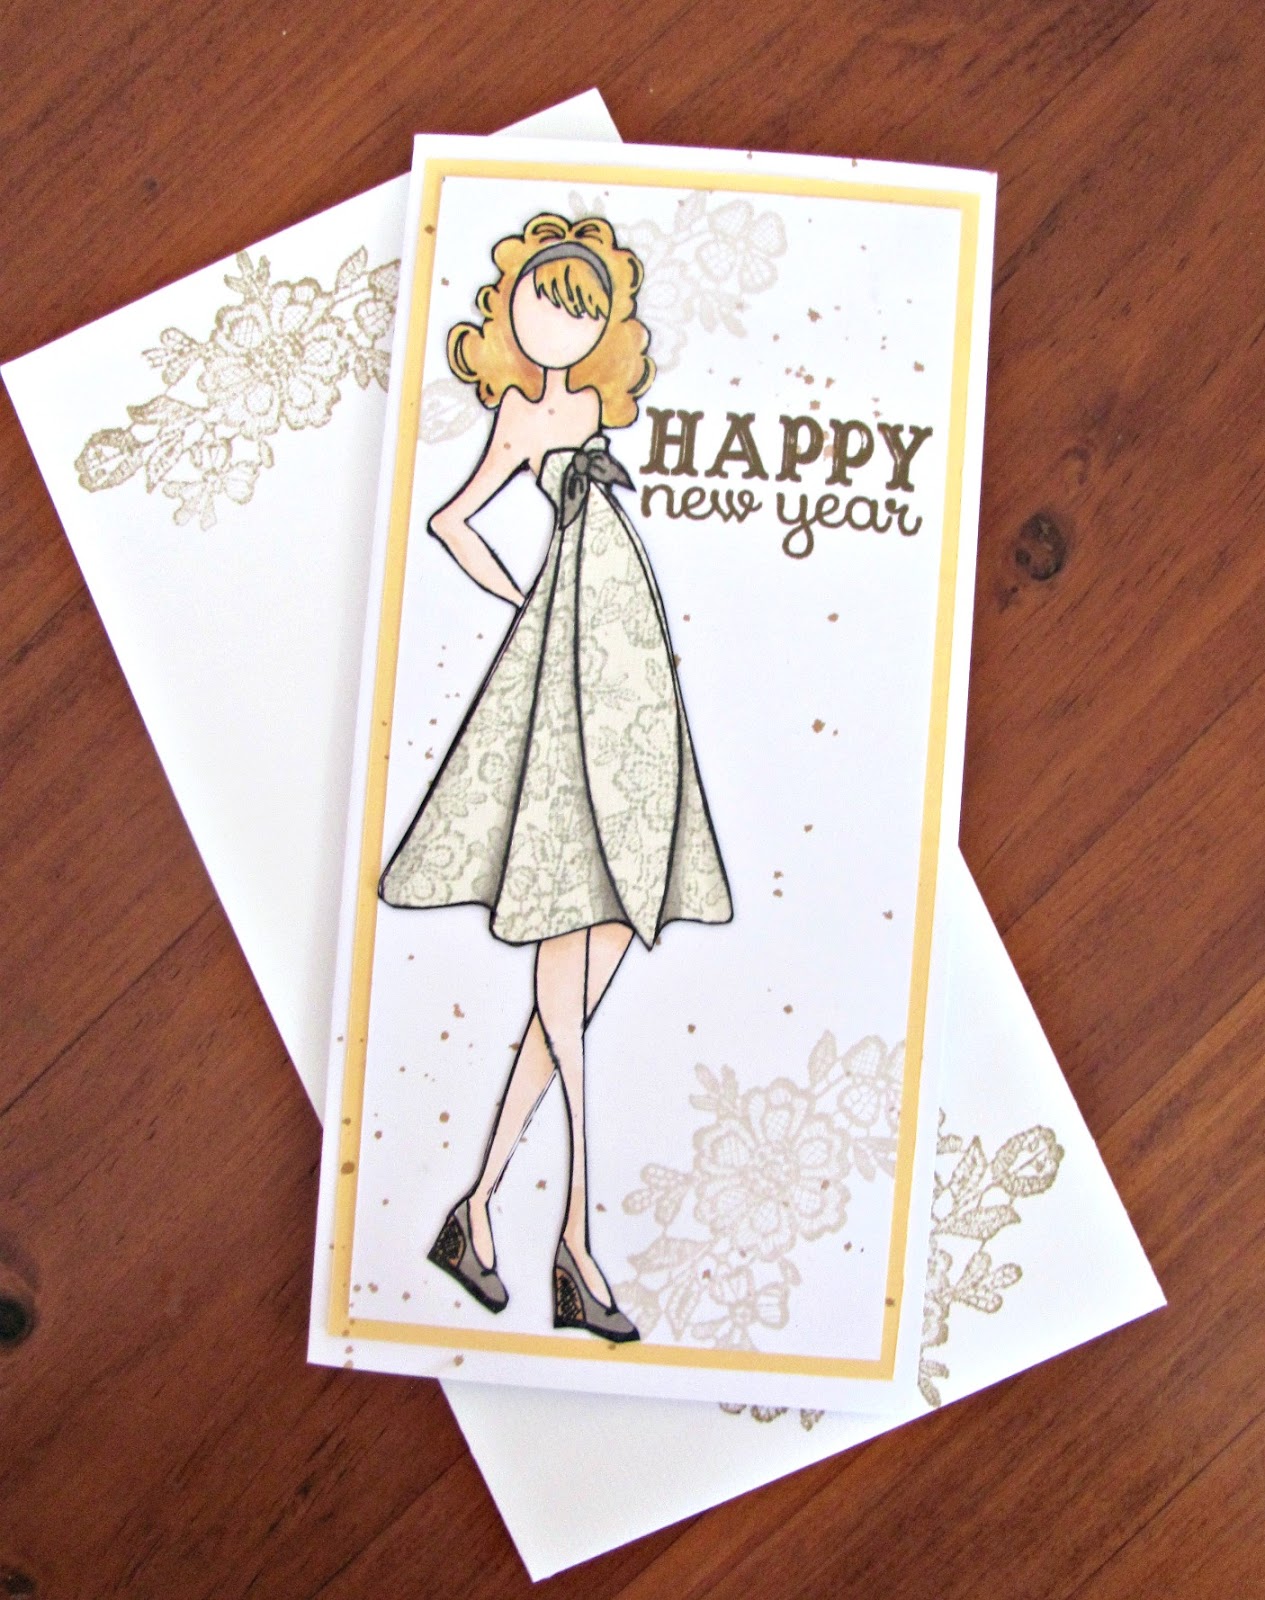
Today I am sharing the card I made for my NZ technique month challenge.  Janet chose to the theme for the month of January and it was to use LACE on your card.... it could be actual lace or a lacy cut or a lace stamp etc.  My recipient this month is my friend Suna... we both work in the same office.. me on level 8 and Suna on level 7 of our building.

I chose to use two Lace stamps from Hero Arts (no longer available) on my card. 


I started by stamping the Lace background stamp onto some cream card with Altenew grey ink.  I overstamped the skirt from the Prima Julie Nutting "Kate", added some shading and cut it out.  I stamped the whole Doll onto white card and coloured with Copics and then fussy cut both the doll and the skirt.  Pieced the two together.   I used a DL sized card after matting the panel onto some yellow card I added the second lace stamp in each corner. I splattered some of the darker coffee coloured ink and used the darkest of the coffee/brown inks to stamped the sentiment. 

I also stamped the smaller lace stamp onto a DL envelope


I was very pleased with card. 

Thanks for stopping by. 

Monday, 14 September 2015

StampNation Stamp of Approval - Friendship box

I recently decided that I needed wanted Catherine Pooler's Stamp of Approval kit - aptly named "Friendship"   It was a VERY EXPENSIVE box of goodies for me as the NZ-US exchange rate has plummeted of recent times and postage rates have risen in the US,  But I am so happy that I did get it!

As you can see it was chocker full of lovely stamps, dies and a stencil.   So here goes with what I've done so far!

This first one was CASE'd from one Isha did for the accompanying PDF.

Next up used the flower dies, and the stamped sentiments.

this one used the stencil for the background using two different colours of distress ink.  The Friend die came in the set and I paired it with a Winnie and Walter sentiment stamp

For this card I only used the Tag dies,  The background is distress ink over a The Crafter's Workshop snowflake mask/stencil.  Again used Winnie & Walter sentiments.

and finally
A Bokeh card with Teal and white inks on a sprayed background.  Sentiment and flowers from the SOA kit, leaves from Provocraft (very old Cuttlebug dies)

Thanks for bearing with me for this long post.  I've had fun with this kit and there are lots more ideas floating about in my mind.  Haven't even used a couple of the stamps and dies yet!

take care