Showing posts with label Fun Folds. Show all posts

Sunday, 19 July 2026

Fun Fold Christmas Card Inspired by Day 2 of the Card Makers Success Summit

Yesterday was Day 2 of the Card Makers Success Summit yesterday and I enjoyed watching a number of the presentations. One of the projects that really caught my eye was a fun fold card shared by Lisa from Queen B Creations.


For the base, I used a piece of red card measuring 10 ¾” x 5 ½”. This size works beautifully with a 6 x 6 sheet of patterned paper, which makes it a great design for using up those smaller papers in your stash.

I found a quarter sheet of 12 x 12 patterned paper that was just right for the front and inside panel. My Spellbinders Circle Nestabilities were perfect for cutting the 3” circle from the front panel, along with the white inner circle.

The focal image is an ornament stamp I rediscovered in my Christmas stamp stash — a magazine freebie from years ago. I stamped it in Catherine Pooler Eucalyptus ink, then added touches of gold with a Posca pen and a few gold dots for extra sparkle.

The sentiment comes from the same stamp set as the ornaments and is stamped onto a die-cut Simon Says Stamp banner. I love how the simple banner shape keeps the focus on the ornament while still giving the card a finished look.

This was such a fun card to make, and it was a great reminder to revisit older stamps and supplies. Sometimes a forgotten stamp, a scrap of patterned paper, and a little gold shimmer are all you need to create something festive and fresh. 

Tuesday, 1 July 2025

Christmas in July - Fun Fold card.

 I saw a neat fun fold card over at Splitcoaststampers a couple of weeks ago and finally got around to trying it out.   It's called Puzzle Panel Gate Fold    and it's nice and easy to do.  

I decided to make a Christmas card using some pretty Kaisercraft patterned paper.   


Here is the card standing up.  I found the paper when I did my reorganising the craft room... and thought it was perfect for this fun fold.  The base was made with a very dark green cardstock.   I stamped the sentiment for the outside and inside with Altenew Mountain Pine ink.   Both are from a free stamp set from a magazine - a very old one.   

Here it is showing the inside sentiment.   

I'm sure I'll be using this fun fold again as it looks awesome.

Saturday, 17 August 2024

Three Vintage Christmas cards - CMSS inspired.

 NB - lots of photos 

Over the last few days, I've been working on some more Christmas cards inspired by the Card Makers Sucess Summit.    Today's cards were inspired by Sande Woodson and Erin Reed.  Sande's presentation was about making an e-card or you could print it.   She provided a lovely freebie with some awesome Vintage Christmas images, which inspired me to make some hybrid Christmas cards using the digital images. 

First up -


Started by choosing my image and importing it into Word on my computer - at A2(US) size. Sande used CANVA but I find I can work adequately in Word.  Once I had printed the image, I used a Gina K Master Layout to trim it.  I added some Vintage Photo Distress Oxide all around the edges of my card base and lightly blended around the focal panel.   I created a sentiment sheet using the Merry Christmas using EFCO Brookshire font.  I used a die cut banner to cut it out and added ink blending around it. 

First time I printed it, the panel went skewwhiff so I couldn't use it... but waste not, want not - I die cut out a circle and that became the focal point on my second card


I used the circle from Gina K Master Layout #12 to cut it and then took some navy card and cut out the frame.  Used the circle that it cut out to add a bit of dimension behind the circle panel.  Found a lovely background paper in my stash and added it to the base.  Used another of the printed sentiments matted with some of the navy card to finish this one. 

My third card also used one of Sande's free images, but the card design is inspired by Erin Reed.  Her presentation was a fun fold - which I believe is called Flying Seagull fold.  I did mess up the measurements, but you can't really tell too much!

Card standing open showing the "wings"

Card lying flat for posting.

I printed the image and then die cut with a square die from a Gina K Master Layouts set.  I decorated it with a Spellbinders Poinsettia die which I spritzed with water and scrunched up.  Once they layers had dried, I carefully unfurled them and added gold Glitter Glue to them before layering them up.  Found some pearl swirls and added them to the card with the poinsettia.   Added the same sentiment again.  It's the perfect font for vintage cards. 

Thank you if you made it this far... I appreciate it.  

Saturday, 15 July 2023

Day 2 at SENZ - back for more fun.

 Today I went back to SENZ for another class.... actually ended up doing two classes.    I was already booked into a mini class with Krafter's Cart - using Pinkfresh Studios.  Patricia was teaching this one and we did three cards.... however I messed up one so ended up keeping the focal panel and I'll try the fancy fold again. 

Here are the two I finished.  


This first one is a interactive one... The circle spins.. It's a super easy design - the base and then the circle is attached with a brad.   They all use washi tape and the matching dies from Pinkfresh Studios.  


The second one is a variation on the trellis card technique.  The inside has a die cut panel.  The focal panel is a square panel with the florals added.  The florals are added with some dimensional tape.  The sentiment is heat embossed and die cut. 

The third card I messed up has a similar square panel but had a 3D column look which was supposed to fold flat... but somehow mine didn't! 

I had done a quick make'n'take with Chick from Scrapbook Central just before doing the above class... and Chick said she has space on her Distress Oxide stamping class at 11.30 - so I signed up.   We did one card and got bonus instructions for another using the same products 


This card is so simple but so effective.   Stamping with Distress Oxide inks.  The bottom layer is sprayed with water and then stamped and sprayed again.. this time with some Frost Sparkle spray.  Once this was dried, stamped with a darker blue DO and dried again... then the top layer stamped with Versamark ink and white embossed.   All the floral stamps are from a Tim Holtz stamp set.   The Memory Box birthday die was 2 white layers and the top layer in gold glitter card.   Added some little gold die cut butterflies.    The bonus card uses the DO to ink a panel and then using the shimmer spray to ink the stamps.   Haven't tried it yet.  Of course, I needed to get some more DO inks... a couple of colours I didn't have and some more Sparkle spray   - and some more of  the Waffleflower stencils to match the Postage Collage die!    That's my crafting budget for the rest of the year!!!!

I got home and as hubby was out... had a bit more of a play with some of my new stuff.   Happy, happy Dawn for sure!!!!


Monday, 26 June 2023

Festive Fun Fold Snowflake card

 I got lots of play time over the weekend and got a few cards done.   Today I'm sharing the card I made for the Christmas Kickstart Challenge.  


I found this beautiful greeny-teal cardstock and used a Sizzix thinlits Flip-it die set.  I found some patterned paper in a Reflections pad called Northern Lights, that was the perfect match and contrast.  The stunning snowflake was in my stash.  I don't have the die so must have been gifted to me... so thanks to whoever gifted it.  I also had some beautiful blue-green foil so used Spellbinder's - Yana's Christmas Sentiments hot foil stamps and die set.  A few Stampendous Spraklers sticker dots to finish the card.  


My daughter and the baby made it back home on Sunday... just two nights in the hospital.  


Archie and Finn on Saturday - Archie gave him the little monkey - exactly the same as his favourite cuddly toy.   Archie's is called Trip and Finn's is called Chip!  Archie is besotted with his little brother.  Finn is the spitting image of Archie at the same age.

Tuesday, 19 October 2021

Pinwheel Tower card

 My NZ card group's swap this month was chosen by Suze and her choice was Pinwheel Tower Card.  Luckily we got given some tutorials to have a look at to give us ideas.    Her added challenge was to make it a Summer theme.

Here is what I came up with.  


And here is each page 


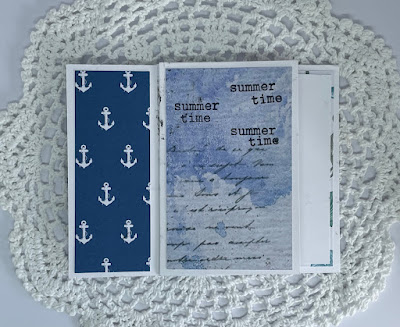
My card is an A2 size  - I found that making the tower out of  heavy patterned paper made it not as thick when folded.  I used a paper pack I had by Uniti called Oceania.  I used stamps from Winnie & Walter and one sentiment from an Altenew set.  This was fun card to make.  

Saturday, 14 August 2021

I'm back at Sweet Stampin' Challenge - Feature an Animal

 Hi all... after a bit of a hitaus with Sweet Stampin' Challenge I am back on board.  


Our challenge this fortnight - Feature an Animal

My card today is also my NZ Swap group card for August.  I got to chose the techinque and decided on a fun fold card.... Corner Flip card.  I saw this on Spiltcoaststampers and then found lots of tutorials on You Tube.   

I had fun making the card base using some purple card.  I decided to used some of my rather large stash of patterned papers to make my matted layer.  I used a cute as Colorado Craft Company stamp designed by Anita Jeram.   So cute.  It's actually a Valentine's set but I thought these two cuties could be Friends so chose a friends sentiment from an Altenew set (Engraved Flowers)  I coloured the image with Prismacolour pencils and some Mineral spirits to blend.  

Here is another view

You can see the corner flip - I used the corner I trimmed off the front layer inside the card.  

Do come and join our challenge at Sweet Stampin' Challenge.  


Sunday, 28 February 2021

Centre Fold Step card at Die Cut Divas

 Hi.  It's the last day of the month so it's the last day for the Die Cut Divas challenge.   Our sponsor this month is Hero Arts and our theme is fun folds.


I decided on a Centre Fold Step card for my fun fold today.


I cut my base card out of red card - using a template I found at Splitcoaststamper's (here)  I found some Uniti patterned paper and added it to all my panels on the card base.  I used two Hero Arts stamps and die sets (Hello There Stamp and Cut and Florals Poppy Combo) I cut my ovals from Gina K Master Layouts 3.  I used some ombre patterned paper covered with clear packing tape, to cut my die cut sentiment - a great way to get shine without getting messy with glossy accents.  I added the sub sentiment from the Hello There stamps.  I stamped the poppy and ladybug onto some white card stock and die cut it them out.  I added the poppy off the edge of the centre panel.

Do come and join up at Die Cut Divas.

Thursday, 25 February 2021

Fun folds at Die Cut Divas

 Hi there.  Thanks for visiting today.   I'm here to share with you my card for Die Cut Divas.   This month our sponsor is the wonderful Hero Arts 

And our theme for the month is Fun Folds.

I have a lot of older Hero Arts stamps and dies but recently saw some new Hero Arts goodies in stock at my local online store so couldn't resist buying a couple of  Stamp'N'Cut set.    Today I decided to go with an Easel card. 

Here is the front of the card.  I have used an Altenew 3D embossing folder and some die cut ovals from a Gina K set.  The poppy is from  Florals Poppy Combo.  I stamped it directly to my die cut oval.  I used some of the Altenew Woodless Watercolour pencils to colour it up. 

And here it is open.  I used Altenew Apothecary Labels die cuts to make my easel stopper.  The sentiment is from the HA Poppy stamp set.  

Do come and join us for our challenge.