Showing posts with label masking. Show all posts

Saturday, 18 October 2025

Stress Free Cardmaking Summit - Oct 25

 Got a few hours this afternoon to watch some more sessions of the SFCS - I watched Justine Hovey's Live presentation - on replay as it was too early in the day for me - and played along with her.   And then watch Juliana Michaels session - using precise smooshing.   All just using 5 items!

Justine did some masking and ink blending to make a lovely clean looking one layer card - I followed her placement of the masking stripes as I liked the design. 


I chose to use a green/blue background - blending with Altenew inks - Mountain Mist, Volcano Lake and Lagoon.   I used Mint tape to mask off areas to stay white.   Then stamped two flowers from an older CASual Friday stamp set called Pretty Posies.  I then stamped and fussy cut from masking paper before blending.  Used Emerald ink with a 2009 Hero Arts background stamp (Antique Background) to add some extra texture.  Once I removed the masking, I added some little sentiments from Altenew's Sentiment Strips 2.  And finished with some iridescent drops from Pinkfresh Studio.

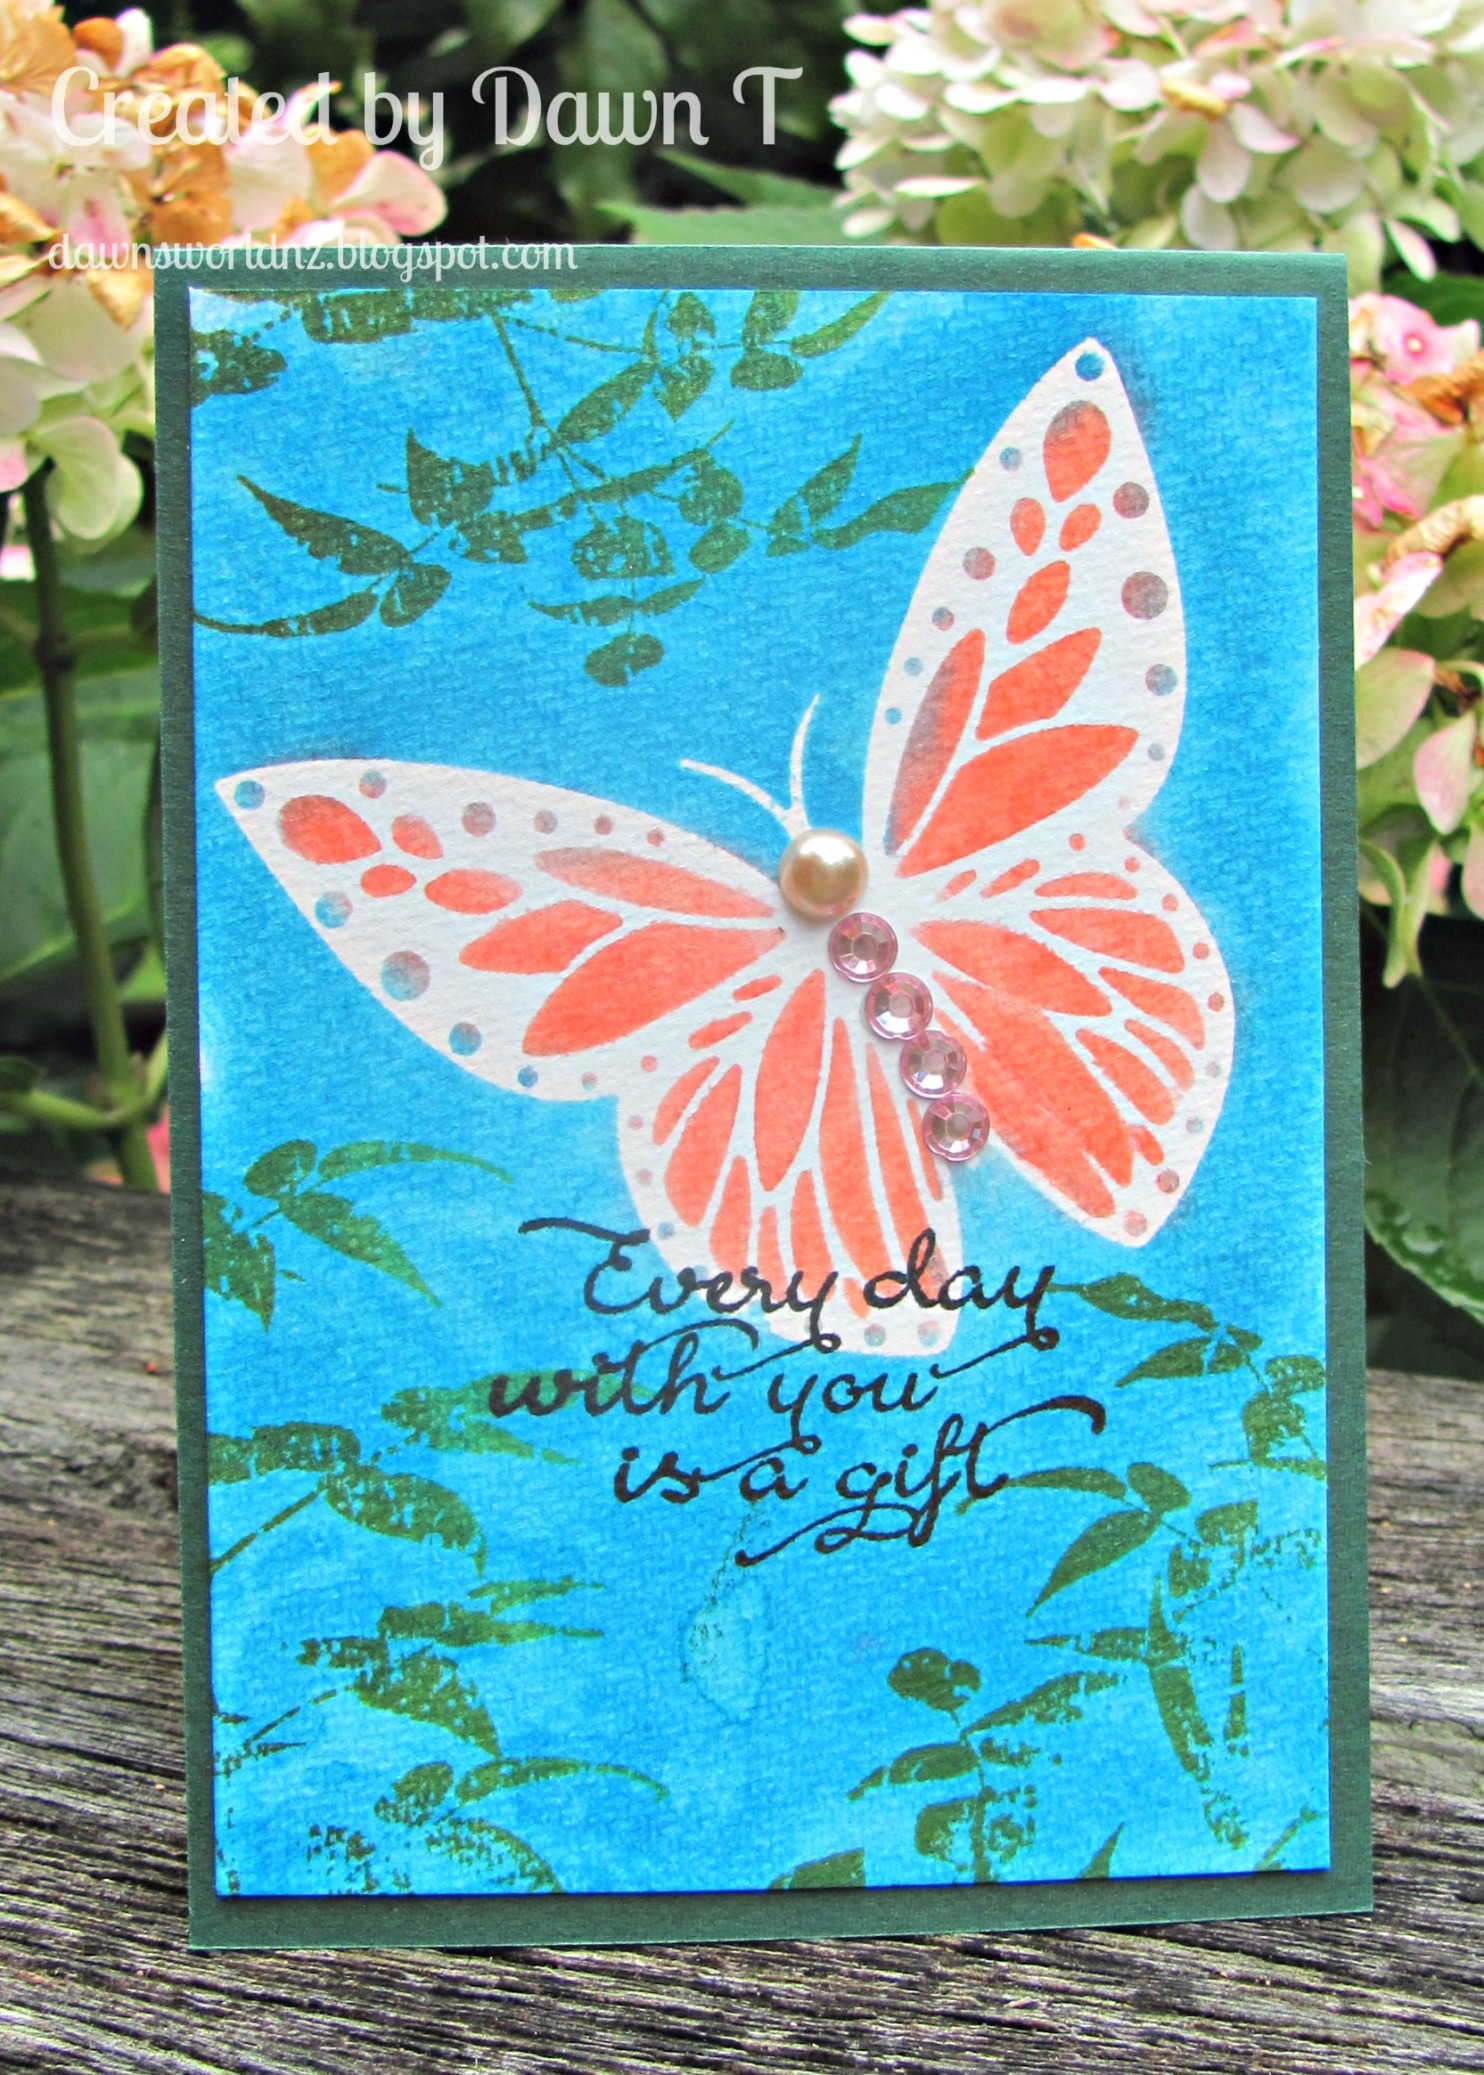
My second card is more of a mixed media card - inspired by Juliana's session.  Included using a couple of homemade ink smooshers.   I already had a flat one, but made the bubble wrap one.  


Very different from my first card today.   I used light blue and purple inks to make my smooshed background.   Use the light blue with the flat smoosher and the bubble wrap one with the purple ink.   I then used a stencil from Ranger to added the purple.  Splatters of black, white and blackberry acrylic paints (Dina Wakely paints).  My focal butterfly is from Memory Box and I used an Ultramarine ink to smoosh the bottom layer.  I used Catherine Pooler Grass Green and Eucalyptus inks to smoosh onto white card and then die cut two of the leaves from Pinkfresh Studio Curvy Leaves die set.  Added the leaves behind the butterfly and added a teeny tiny sentiment - stamped with black and a Mama Elephant stamp set.  Added some holographic dots to finish.

Had a great afternoon crafting.  Can't wait to finish watching the summit presentations. 

Saturday, 2 October 2021

World Cardmaking Day - October 2nd

 Hi there... Saturday 2nd October is World Cardmaking Day....As we here in NZ get to play a bit earlier than the other half of the world... I did get some time to play today (and am planning to play tomorrow with some of the wonderful challenges coming up)

I made three cards today.... one A2 sized, one tiny note card and one mini slimline.  

My first card is made for a new to me challenge.  One of my design teamies (Tristan) is now desiging for Just Add Ink  Their latest challenge is Choose Two


I chose Sunshine and Silhouette.

I cut my panel with Gina K Master Layouts 2 and used some washi to mask a frame aound it.  I used a Tim Holtz stencil to add my sunshine using inks from Altenew.  Once I finsihed I took three sides of the washi off, leaving the bottom piece.  I took some stamps from Catherine Pooler's Wild Garden stamp set for my my silhouette stamping.  The sentiment is from an Altenew stamp set.  

Next up is a mini note card.  The base came about when I cut down a pre folded base to a mini slimline size.  This one is 2.25" X 3" size. (although it looks bigger in my photo)

I used a little die rectangle from one of Gina K's Master Layouts.  I had some ink of my blending tool from my first card so I used a Hero Arts stencil (Crossing Waves) that Karren send me.  The leaf is from an Altenew mini stamp set called Bitty Botanicals and the Thank You from the mini set called Best Sentiments.   I'm giving this note card to a friend who ordered two masks from me.  I had the fabric cut out, so earlier today I sewed them.  Plus another one for both hubby and myself.  

And my third card for the day - using new dies that arrived yesterday.   I am loving the 3.25" x 6.25" mini slimline size and had ordered the Pink Fresh Studio Mini Slimline Essential Bundle.  Plus I got Altenew Itty Bitty Flowers die set.  

I cut a white frame using one of the Pink Fresh Studio dies. For my flowers I took a scrap of white card and used my blending tool and Altenew's Wisteria, Hydrangea and Ultramarine inks to make my own coloured card.  I cut the layers and glue them.  Used some dark brown card to cut the branch.  Added the flowers and then added a little gold gem in the centre of some of the flowers.  The sentiment is from Altenew Engraved Flowers set.  I just couldn't get a good photo.  Even struggled to edit it.  

Enjoy spending some time crafting over the weekend and Happy World Cardmaking Day 

Friday, 24 September 2021

Two cards for two challenges.

 Over the last couple of days I've been working on a couple of cards for a couple of challenges. 

First up is another card for the Let's Squash It! challenge - to sand it with numbers/words


I was looking through my Embossing Folders and found this old scripty words one.  I used as soft pinky card and ran it through the Cuttlebug and then took the sanding block to it.  Love how it turned out.  I then decided to use an Altenew die.  I die cut then cut again with a slightly larger circle to make a frame.  I added Wink of Stella all over the die cut peice.  I then made the flower - using an Altenew stamp set which I white embossed and then used inks to watercolour.  

And my second card is for the latest Simon Says Stamp Wednesday challenge... Card and Matching Envelope.    The design team used Colorado Craft Company products and even though it's not necessary to use there products, I did.


I stamped the image onto some watercolour paper and used Altenew Woodless Watercoloured pencils to colour it in.  Once it was dried I die cut the image out.  I then took my card base and used some washi to mask off the edges before taking a Hero Arts cloud mask and some blue ink to add the sky and green for the ground.  I stamped the two sentiments and then added the die cut.    I used the same bliue and green to add a bit of colour to the envelope adding a little pair of bunnies which I coloured with the watercolour pencils and a damp brush.  

Thanks for stopping by.  My weekend is starting and it's the start of Daylight Savings tomorrow night... that means summer is on it's way.   


Sunday, 18 July 2021

Christmas in July.

 It's winter here in New Zealand and today which started nice and then turned to rain, so I managed to get a few hours in my craft room.  I saw a fabulous tutorial on Facebook - one the Simply, Sweet Poppy Stencils page.  It was done by Susan Bradney using Sweet Poppy's Christmas Bauble stencil.  I recently got the Bauble stencil and decided I would try it out following the tutorial.  I CASE'd the card Susan made. 

Making this card involved making a mask, stencilling in a pale ink, using the mask and doing some ink blending.  I used some stamps from my stash (freebies from magazines)  One of my purchases on Friday was a white Posca fineliner pen.  Used it to make my snow flakes and add some to my snow banks. To add colour to the stencilling, I used Prismacolor pencils. I matted the panel onto some gold mirror card and then onto a Pearlised card base.  It's a lovely bit card 6" square.

After spending most of the afternoon making this first card my second one for the day was much quicker.   I bought Gina K's Holiday Tapestry  stamp set a while back and only opened it today.  

This one started with some patterned paper from a Uniti pack.  I die cut it with a Sunny Studio's slimline Scalloped Frame die and then embossed the big floral image at each end of the panel in silver embossing powder.  I then stamped and embossed the sentiment in gold powder.  Add some Pink Fresh gold and silver metallic pearls.  Slowly building up my Christmas card stash.  I'm entering this one into Darnell's NBUS (Never Before Uses Schtuff) as it's the first time inking up this one. 

Thanks for stopping by. 

Friday, 31 July 2020

Masking Unleashed...Altenew Educator Certification Program

As some of you may know quite a while ago I started the Altenew Educator Certification Program.... well I got a bit waylaid... I finished Level 1 and had all but one Level 2 assignment done and sort of lost the plot.

So today I got home early...work was slow so I allowed to go home a bit earlier than my rostered time... so decided to do a card... and I'd been re-watching the "Masking Unleashed" class.   This was a class with Svitlana Shayevich as tutor.   This was an awesome class, taking us from simply masking to more complex ways of masking... using both positive and negative masking.  I learnt a few good tips and tricks from this class...like if you cut your own masks it's a good idea to trim just inside the stamp lines, so that you don't get a halo around the stamping.

My  little card today used a variety different masking techniques.  It's a smaller then usual card being 3.5" x 4.75"


My first masking was some simple masking using some yellow post-it notes torn roughly to mask a space across the middle.  I then used some Vanilla Cream and blended it over the rest of the card. 


My next few steps involved stamping over the centre masked bit.  The stamp is from Nature Blossom.  Altenew has started making masks and stencils to go with their stamp sets so it makes masking easy.    I used the mask to cover the flower and stamped the leaves..  I then used the stencil/negative mask to add some blended inks over the leaves and then I stamped the layers from the stamps set. 


I then used the flower negative mask and used Coral Berry  and Vanilla Cream ink to blend over the flower before adding the stamped layers.   I stamped the sentiment and then used the masks to cover the flower and leaves.  I lost the leaves from the set, so cut some from post-it notes.  I used some Milk Chocolate ink to add splatters to the rest of the card.

The sentiment is from the Nature Blossom as well.   I was really pleased how all my masking turned out. 

So that's the last level 2 class done and dusted.  - Now to see how I got on.  I will have a final assignment to do. 

Thanks for stopping by.  Have an awesome weekend.

Saturday, 9 May 2020

Spring Stamp Camp 2 - Homework Days 1 and 2


I'm taking part in the Spring Card Camp 2.  20 days of classes.  Jennifer McGuire and Kristina Werner have organised a whole lot of artists to inspire us.

Here's my home work for Day 1 and Day 2

DAY 1 -MASKING

I made two cards for Day 1


I used a the negative potion of a circle die as a mask to start by blending Distress Oxides in Evergree, Broken China and Cracked Pistachio.  I then used some Emerald Altenew ink to stamp the little images from Winnie and Walter "Big Bang Bling"   I decided to trim it down to fit a 4.5" square card.  The die sentiment is from Winner and Walter as well.  I finished with a white embossed sentiment from Say Something by Clearly Besotted and some silver sequins.

My second card was totally inspire by Kristina - where she used her computer to print out a letter and cut around it to make a mask.   I used a G - for Grace.


I added the mask to my card and blended the background with Worn Lipstick Distress Oxide.  I then used Altenew Coral Bliss and Heartbeat for the roses and Lagoon and Emerald for the leaves.    I added the rest of Grace's name and the Happy Birthday from two different Rosie's Studio sets.  

DAY 2 - STRIPES

Day two Jennifer used masking to make stripes on her cards - one of which was diagonal stripes and Angelica Conrad used stamps to make her striped backgrounds.   I made a card that combined the two ideas... diagonal stamping


To make my stripes I used a Winnie and Walter set "Scenery - Stripes" It has a lot of different sizes and styles of stripes.  I used 8 different inks from Altenew's Enchanted Garden and Shades of Purple  inks sets to make my striped background.   I CASE'd Jennifer's idea of stamping a line art flower in the corner.  I used the smaller of the flowers in Altenew's Hello Gorgeous set.   The sentiment was made up of the die and sentiment from a Catherine Pooler/Casual Friday set called All About You.    A few clear gems from Lucy's Little Things finished off the card,

Now it's time to check out Day 3 - Dry Embossing with Stencils. 

Thursday, 2 April 2020

WWC 265 - Marsha's Challenge: Anything Goes with a Feminine Twist.

Hi there - time for another challenge at Watercooler Wednesday Challenge.  Marsha is our hostess with an Anything Goes with a Feminine Twist. 


For my card today I used a new to me technique.   Using Cling Wrap as a stamp!


I masked around the card panel with some post it tape.  I then took Coral Bliss ink from Altenew and my scrunched up cling wrap to stamp the background texture.  I then smooshed some Couture Creations Hot Pink Glitzin' Glamour (glitter glue) onto my glass mat and used the cling wrap to stamp some of this onto the panel.  It gave lovely texture with the glitter.  I stamped the dancing lady from Stampin' Up! "Beautiful You" set.  I coloured her with Altenew Alcohol marker and then fussy cut her.  I added a shadow from the set in grey ink before adding the girl.  I stamped the sentiment  onto a scrap of white card, trimmed and edged in with some black ink.  I added some doodling around the masked off area. 

Come and join in the fun at  Watercooler Wednesday Challenge and check out the project from the other designers.  Then take our challenge and link up your project to the challenge post.    We'd love to have you join us.  You have until Monday at 5 pm Mountain Standard Time (Tuesday at 12.00 noon NZ time ) to link up your project.

Thursday, 2 May 2019

WWC #219 Heidi's Feminine "Anything Goes" Challenge

Hello there, it’s time for another Watercooler Wednesday Challenge.  Heidi is our hostess this week with a Feminine "Anything Goes" Challenge.


I've made a Birthday card today - in a few days (6th May) it's my daughter's birthday so this has made it's way over to Perth.


 For this card I did some masking.  I started by stamping the Floral Bliss stamp from Simon Says Stamp and made a mask to cover it so I could stamp the vase from Altenew's Versatile Vases set.  I used the matching stencil to do my sponging with Altenew Sea Breeze ink.  I then used the mask stencil to sponge Altenew Limestone ink for the background.  The sentiment is from the Versatile Vases set.  The flowers were coloured with a combination of Copics, Spectrum Noir and Altenew markers.  I added some clear Nuvo drops to the centre of my roses.  A few pink sequins finished off my card

Come join in the fun.  Check out the projects that the artists at Watercooler Wednesday Challenges have created then take the challenge and link your creation to the challenge post. We’d love to have you join us.  You have until Mondays at 5 p.m. Mountain Standard Time (Tuesdays at midday NZ time) to link up your project.

I'm entering this into the challenge at Simon Says Stamp, Wednesday challenge. 

Thanks for stopping by, I appreciate your visit.

Thursday, 17 August 2017

OCC Rainbow Maker class - more homework


I was not feeling well today - had a Gall Stone episode over night and was still feeling nauseous this morning so had a day off.  Spend the morning reading and then after lunch I decided to do some more  home work for the class.

This ink blending card was inspired by one done by Kristina Warner from Day 1

I used a variety of Altenew inks to blend through a mask made with a Spellbinders Heart die cut.   I used the same colours to stamp the splatter with a Your Next Stamp splatter stamp.  I used 2nd generation stamping to get the softer colours.   The sentiment is from Kaisercraft.
This has been entered into the Add a Sentiment challenge at Simon Says Stamp Wednesday blog.

Feeling better this evening so it will be off to work again in the morning.   We've off to the beach tomorrow for the weekend.  I'm not taking any stamping stuff but might take some pencils and a colouring in book or two. 

Sunday, 26 March 2017

My own personal craft retreat

WARNING: PHOTO HEAVY POST

This weekend was the Mangawhai Walking Weekend and my hubby and our friends went on a four hour tramp.  my knees can't handle the hills so I set myself up on three dinning table for my own private craft Retreat!

I started crafting at 8.45am and was still going good at 2.00pm when they arrived back.  got a total of 8 cards done.  One for an upcoming DT post and 7 just for fun Cards!

So here the are!
First up is wanted to try out the technique theater Jennifer McGuire did with veramark and Perfect Pearls.  I used a very dark blue base.   I used an Altenew stamps and then heat embossed the sentiment in white.  looking  good then I flipped to mark where I wanted to trim, did so and then when I flipped it back, I'd chopped off the last letter of the sentiment!  Urrrgh. Here's how I saved it

Next I tried the same technique but with Gold Perfect Pearls


 My next two cards in involved masking and sponging.  I die cut a circle with a Simon Says Stamp die and used both the positive and negative parts.   The positive circle was temporarily glued to the card and then start pedal with the goose half on and half off.  the entire masked the goose and did the sponging.


Entering this one into the Circle challenge at Crafting When We Can
For this one I sponged through the negative space as a mask


The goose is from a Stampin' Up and the Lighthouse is an Altenew set with a Rosie's Studio sentiment.

After a quick sandwich I got onto some pencil colouring using Altenew stamps and Faber-Castell pencils and Gamsol.


Next was to use a panel I'd made last week to make a card.


And finally a card I made a card for the Lawn fawn challenge

I made this one to entry into the new Lawn Fawnatics Challenge blog... I don't have many Lawn Fawn stamps but this one has been in my stash for sometime and never been used!   Some more masking of the little clouds and the balloon.

Thanks for staying long enough to reach this point I appreciate it.

Hope your weekend was a good as mine.

Monday, 24 October 2016

Labour Weekend fun

Hi there... It's been a long weekend here in NZ with Monday being a public holiday to celebrate Labour Day - the beginning of the 40 hour working week. We headed up to Mangawhai Heads with our friends. Being the long weekend I took a box of crafting stuff with me... I spend all of Saturday crafting... Got 4 cards made. One was very involved and took nearly 2hrs to make. For me this was a long time as I tend to make much quicker CAS cards. So here is it is.........................

This card is made with freebie stamps from a magazine I got this week.  I copied the sample in the magazine using a Z-fold card.   Just changed up the colour and position of the flowers and used a different die for the sentiment.  Lots of fussy cutting involved in the making of this one.  I used Zig Markers to colour the flowers. 

So my next cards were definitely more CAS.


This is an Easel card made using a Kaisercraft Die set that I picked up for $5.00
Decorative Die Circle Card Flip 
It lets you cut a half circle and then a little half circle tab and make an easel card as well as a flip card.  I used some Penny Black stamps to decorate and some tartan PP.   Added a little die cut bow from SOA set. 

The next one was a CASE of a card by Ally at StampNation and used all SOA Candy Cane Lane stamps and one of the borders from Catherine Pooler's Yay Stripes.

 Here is Ally's card.  

I used the red at the base of the card and masked off the central sentiment before stamping the branches in two different greens.  Added some red berries and then some blue stars to pull in the colours that Ally used. 

And finally a very CAS Christmas card using some more of the SOA Candy Cane Lane collection.  This one uses the Crooky Tree - first time using it. 


My tree was stamped in the two layers with different Altenew inks.  I stamped the sentiment in some grey Altenew ink.  The edge of my panel was embossed with an edge folder.  

Well if you made it this far, I thank you and I'll leave you with a few photos of the rest of weekend.

 these two are taken on our walk at Te Arai Point. 

And this was dessert on Sunday evening... Lemon Meringue Pie made by me, with Mango Sorbet made by Yvonne.   Yummy!

thanks for stopping by.

Thursday, 9 June 2016

Rainbow Birthday

While I had my Geo Builders stamp set out over the long weekend, I made another Rainbow card.  I have a very ancient Colorbox rainbow ink pad.  I was surprised to find it was still very juicy. 


I stamped the Geo Builders stamp once, then turned it around and stamped again... this gives the circle looking image.  I masked off the little stripe, and used the ink pad to colour.  I also used ink direct to card to colour up some cardstock to die cut the You.  The sentiment is from the SOA Beautiful world collection, the You stamp set.  Added the little hearts that were part of the die set as well as some other little hearts and stars. 

We had an awesome long weekend - very relaxing and then on Monday we travelled 1.5hrs south to watch our nephew Jason, play in the Waikato rugby team against Thames Valley.  It was a Ranfurly Shield game.  It was his debut for his regional team and he did well.  Even scored a try!  It was a great day out, catching up with a few of the family who went to watch. 

Thanks for stopping by. 

Friday, 3 June 2016

It's time to do some Masking....

The latest challenge at Simon Says Stamp is all about Masking.  And I have new stamps and inks to play with.    So I pulled out my new Altenew Daisies stamp set and new Yellow inks,Zig Brush Markers, post it notes, Moltow masking pen, sentiment stamp from Sugar Pea (part of the SOA Beautiful World collection) a distress paint dauber and this is what happened!

I started by stamping onto some Canson water colour paper,  and used the Post it notes to mask the main daisy.  I then used the Moltow liquid to cover all the flowers.  I then used a blue Zig marker to do a wash of colour, added some splatters of yellow.  I then removed the masking liquid progressively and used the Inks to add the other layer to the daisies and leaves.   Added Spectrum Noir clear sparkle to the centres and splatters of the watered down Distress paint in Wild Honey.  Finished with the sentiment from the Beautiful World SOA collection.

Entered into the Mask it challenge at Simon Says Stamp
 

Sunday, 7 February 2016

Masked butterfly

Back again today to share a masked butterfly card I made for A2Z Scrapbooking.   I have really enjoyed doing some masking and inking with this one,

IMG_1457W

I started by cutting a mask with the Fancy Butterfly die (DI708) out of Masking paper and placed it onto some watercolour paper.  I used a small dauber to sponge on some Abandon Coral distress ink in the centre of the butterfly.  I then added some Mermaid Lagoon distress ink all around the rest of the card.  My leaves are an ancient Hero Arts stamp (CG288 - now discontinued)  First I spritzed with water and stamped onto the background.  This gives subtle marks.  I then used some dark green ink to randomly stamp the leaves around the butterfly.  My sentiment is from Your are my Happy ( CL923 ) from the new Valentine's collection.

I hope you take time to join our challenge this month  ( see here) with your cards that use some masking...

Remember if you are in need of any items from the a2z Scrapbooking store  you can use code Dawn15 at checkout to receive 15% off your purchase of $25 or more. (before tax and shipping)  And don’t forget that we are on TwitterInstagram and Facebook.  Follow us on these different social media outlets so you won’t miss out on any fun promotions!
Dawn

Sunday, 31 May 2015

More Masking and new stamps!

I'm spending time this long weekend with friends at the beach house in Mangawhai and have bought some supplies along... minimal (although that's not what hubby said of my rather full small suitcase and shopping bag full of supplies) but I did bring along some new Hero Arts goodies...

http://onlinecardclasses.com/maskerade/wp-content/uploads/2015/05/MSK_participant.png 

I am taking this online card class so got to watch Day 3, 4 and 5 videos all in one go. Day 3 used liquid masking (sadly not in the supplies I brought with me) and Day 4 used Freezer paper, something I've never seen here in NZ - but I believe I might be able to get at Spotlight in the quilting area- still remains to be seen.  Anywhoo that left me with Day 5 - using clear embossing for my mask - or really as I know it, resist.  However it's not just stamping and embossing bold stamps, but also using embossing ink via a pen to cover your entire line art stamps once you've coloured them.  Now embossing ink/pen I DO have.


I stamped the Hero Arts Night and Flower flower and coloured with Copics.  Once done, I used my Versamark pen to cover the flower and clear embossed.  I then sponged over with some blue Distress Ink.  Added the sentiment from Quietfire Design.
Entered into the Any Goes challenge at Simon Says Stamp

I also did some masking yesterday with Post It tape -


This is using a new Hero Arts set (Baby Animals).  I masked and coloured these but haven't made it up to be a card yet.

And other of yesterday's offerings


This one uses the new Hero Arts Colour Layering Bird.  I spend a bit of time trying out different colour combinations before making this one.  My colours:
base ~ HA Stone Wash blue, 2nd layer~Chipped Sapphire distress and 3rd layer HA Wet Cement.  Did not quite get the branch in the right place and my sentiment is rather drunkenly added to the card!  Not quite sure how that happened.   I trimmed my card down - a bit much as it turned out, so used some ombre ink to stamp Hero Arts Deco Flower background to add to the side.   Finished with splatters of the inks.

If you are interested in getting any of the Hero Arts stamps and dies and stencils be sure to check out A2Z Scrapbooking (this is where I get my Hero Arts goodies) and if you are spending over $25 in store, use my code Dawn15 to get a discount of 15%.

thanks for stopping by.  Your visits are much appreciated as a your comments. If you like what I've done, please let me know!