Showing posts with label Let's Squash It. Show all posts

Saturday, 17 September 2022

Let's Squash It... Cuz 2 out of 3 ain't bad.

 Hi there.   Today I have an entry for the Let's Squash It challenge... Cuz 2 out of 3 aren't bad!   The challenge is to use an embossing folder and fill 2/3 of the card.   

I decided to do a Christmas card - inspired by a card I saw on You Tube by Gina K.  

I used a big sweater folder and trimmed it down to 2/3rd of the card size.  I layered it onto black card and then onto a white card layered with black and then red.   I die cut an oval and layer.  The sentiment is from Holdiay Tapestry by Gina K.  Added a Spellbinders Poinsettia die cut and some Catherine Pooler die cut holly leaves.  


Sunday, 21 August 2022

Christmas Pinecones.

 Hi there... Here's one of the cards I did yesterday afternoon.  It's a shaped Christmas card.  I made this with two challenges in mind. 

The challenge at Let's Squash It - is Don't be So Square.   Use your embossing folders and make a shaped card.   I made my card base using a very old Tim Holtz die  - called Vintage Cabinet Die


I cut it three times  -two used as the base and one for the embossed panel.  The embossing folder is an Altenew one - Classic Pinecones Slim 3D folder.  I used some Rocky Shores and Mocha Altenew inks to blend on some colour on the cones, and Moss for the needles.   The pre-printed sentiments are some digital images from a magazine.  

I'm also entering this one in the Never in a Nativity challenge at Christmas Kickstart. 


Saturday, 30 July 2022

CAS at Let's Squash it....

 Just sneaking in with a last minute entry into the July's Let's Squash It challenge - 

 I was looking through my Facebook feed and saw a lovely CAS card... which got me thinking I had better hurry up if I wanted to enter the July challenge... it closes in a couple of days.  

In the end my card was nothing like the one I saw...

I had some lovely cream card - hard to get the colour right in the photo.... I took a strip and used a Darice embossing folder - Daisies.  I took some metallic paste and rubbed it over the panel.  I matted it on to black and added to the same colour base.  Took a sweet sentiment white embossed onto black - this one is from a LDRS set.  A few sparkle enamel dots finished it beautifully.  

Thanks for stopping by... I'll be back shortly with my Sweet Stampin' Challenge card. 


Thursday, 26 May 2022

OCC Spring Card Camp 2022 - Day 5 & 6


I'm back working this week, albeit working from home... but that means less time to spend crafting.   I'm getting a little behind in my homework... but made harder because each day there are lots of different techniques and ideas and I really want to try them all....

Day 5 - Stamped Wreaths.  Our tutors for this day were Laura Bassen and Daniel West.   Laura did a stamped wreath by using some fine lines to help placement of the stamps and Daniel did a reverse masked circle to stamp around for his wreath - and some embossed resist.   Both tutors made gorgeous cards.    I was inspired by Laura - but to make things easier for me, I used my Gina K Wreath stencil.  

A very CAS wreath using some Catherine Pooler "Tilly's Garden" stamps and CP inks.  The sentiment is from a Gina K stamp set.   A few little coloured gems finished the card. 

Day 6 was all about colour blocking... out tutors were Keisha Charles and Lea Lawson.   Keisha gave us ideas about using dies to colour block and Lea did some different type of colour blocking with hot foil and stencils.  I used some scraps to do my colour blocking - using  two panels I made in Day 1 that my stamping got messed up on.   

I took the darker and lighter panels and cut them up into two inch squares. Then layered them my card base.  I trimmed it down and then dry embossed then with a dots and spots folder.  I swinked some Delicata Gold ink across the top.  Added a big sentiment panel - a Kaisercraft sentiment cut with a Spellbinders die.  A few sequins to finish and it was done. 

I'm entering this second card into the Let's Squash It Challenge. 

Thanks for stopping by.


Saturday, 19 March 2022

Embossing and Debossing together...plus another Christmas card

Hi there.  There's a fun new challenge this month at Let's Squash It...  Emboss/Deboss


The idea is to have both the embossed and debossed side of an embossing folder together on your card. 

I decided to use an edging folder to emboss and deboss on my square card - 


This is a little 4.25" square card.   I used a edger embossing folder and debossed at the top and embossed the bottom of the card.   I used a Poinsettia stamp (Kiwi Stamping Co- no longer in business) I stamped it twice and coloured with Copic markers in a dark red and a light green.  I added Spectrum Noir sparkle pen to the red petals.   After fussy cutting, I layered the two.  The sentiment is from Gina K's Holiday Tapestry.

And while I had the Holiday Tapestry set out, I did another Thumping card 

I used a slightly darker grey ink on this one.  Altenew's Grey Denim and then used Azurite (dark blue) for the thumping.  I also used the same dark blue ink to add the sentiment.  A few silver sequins to finish. 

Thanks for stopping by today.  It's been a good day!  Made two Feijoa Loaves - one for us and one to deliver to Grace and her Mum and Dad.   For those of you who don't know what a Feijoa is....


they are a fruit... we have two trees and this was three days worth.  They are a very perfumed sweet fruit.  A bit of an acquired taste - one I love!   As does our Princess.  She loves going out the back to where the trees are and check if there is any fruit.  It drops of the tree when it's ripe.   


Saturday, 19 February 2022

Go Green!

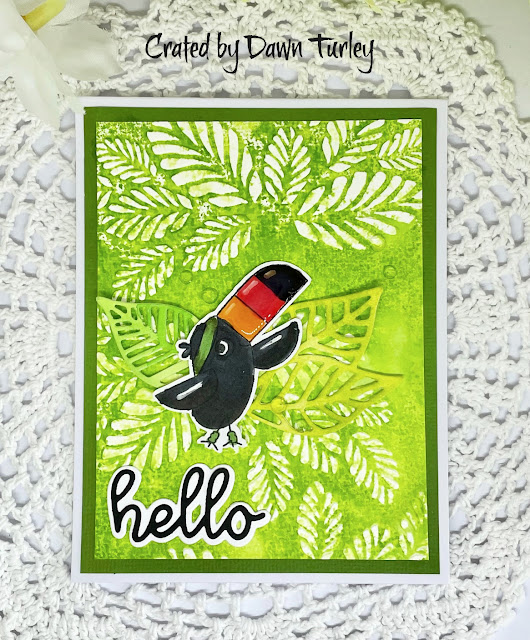
 Yes, today my cards are GREEN.... I decided I better get a card into the latest challenge at Let's Squash It.... but OH NO... I didn't read the brief properly  - It's Green and an insect!!!!  I've made two GREEN cards ... I had finished the cards before I realised - but managed to add a butterfly to one to meet the criteria!  

Here's the first card that DIDN'T follow the brief...  

I took a Craft Concepts Folder and some Catherine Pooler Lime Rickey ink and used a brayer to add the ink to the folder.  I have to admit this is the third try to get the look I wanted.   I had this little MFT Toucan sitting on my desk so added some colour to it.  I added Glossy Accents to her beak.  I used a dimensional dot behind her and slipped the die cut leaves (also from the scrap bowl) behind.  The sentiment was also in the scrap bowl - so not sure who it's by.  Did some matting, adding to a white base.  I really like this one.  Good practise to try th
e inking the folder technique.  

And here's the card I added the butterfly to so it DID meet the brief.  


For this one I took some light green card and an Altenew 3D folder.  I then look some green Altenew ink and blended over parts of the folder to highlight the embossing.  I added white dots on the flowers and added some pearls.  I had a silver foiled sentiment which I blended the green ink over. ( so hard to photograph) and added the Memory Box die cut Butterfly.  So this one is going into the Let's Squash It challenge


I must say though, I had a great afternoon playing in my craft room.   Staying home as much as I can...as Omicron numbers are rising... 1906 today.  Luckily no places of interest in my part of the city. 

Saturday, 25 December 2021

Merry Christmas from the Die Cut Diva team....

 Merry Christmas to you all.... Here is NZ the day is almost over.  Hope your will have an awesome day wherever you are.  

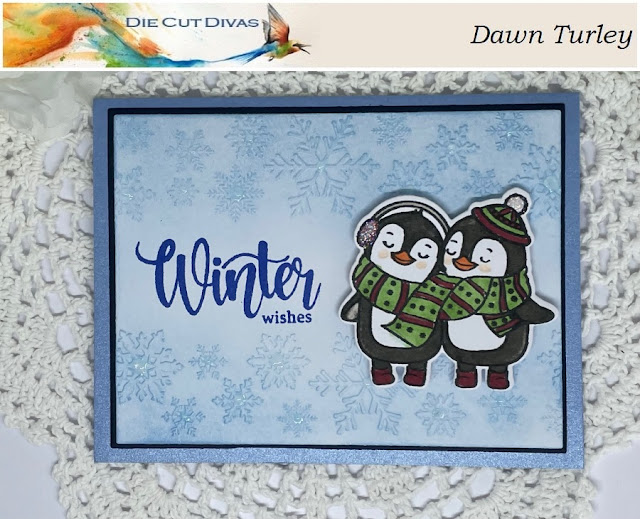
Today I'm sharing a Winter card with you - for Die Cut Divas


We are so happy to present Frantic Stamper as our Sponsor for our December Challenge of Winter/Christmas project with an optional twist to make a shaped Winter/Christmas Card.


My card uses two penguins from Gina K Designs - Playful Penguins and a sentiment from the set.  I embossed the edges with an edging folder.  Our sponsor, Frantic Stamper has a large stock of folders, and dies.  Do go check them out. 

Do come and join us - our challenge is open till 9.pm US Pacific Time on the 31st December. 

I'm entering this one into the "It's your call" challenge at Let's Squash it.   I used a border embossing folder for my snowflakes.  

Wednesday, 13 October 2021

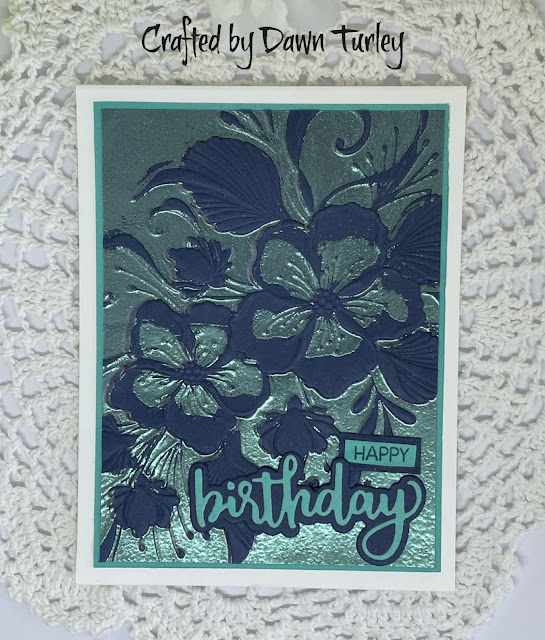
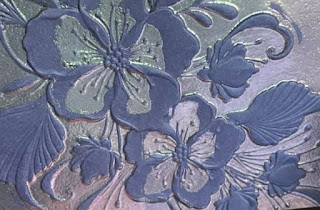
Double Embossed with Winter Illusion Powder

I'm back with another Double Embossed card.  I've used the same folder that I used the other day but for this one I've used some powder I bought a very long time ago when I first started card making.  It's called Winter Illusion.  It works best on dark card and changes colour depending on the light.    For this one I used some very dark blue card 


This is the view of where it looks teal, so I used a teal layer and then used the Honey Bee stamp and die cuts for the sentiment.    

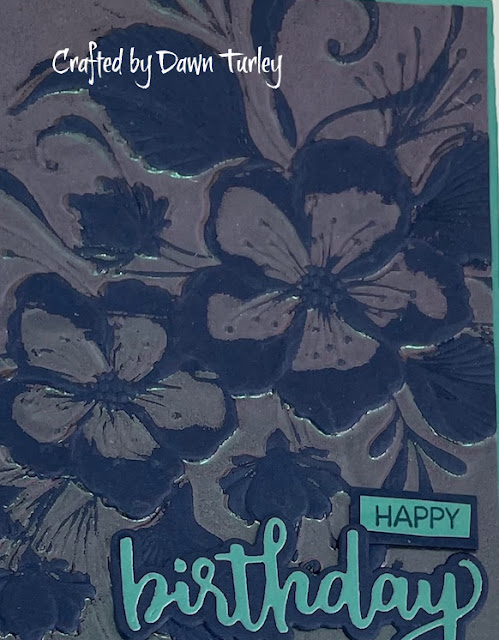
And here's a view where it looks quite different - a pinky purpley colour. 

Here it looks pinky-purple.  This powder is amazing and I had completely forgotten about having it.  I found it when I was looking for something totally different.  

I'm entering this into the following challenges.

Let's Squash It - Double Embossing 

Just Us Girls - Heat Embossed Embossing Folder.  


Thanks for stopping by.  


Monday, 11 October 2021

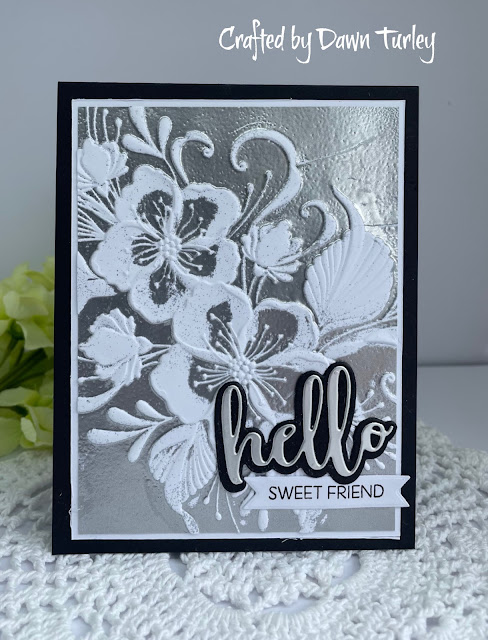
Double Embossing....

 I was excited to see over at Just Us Girls the latest challenge was Heat Embossed Embossing Folder and the link to Jennifer McGuire's video  and also the Let's Squash It challenge...with it's Double Embossing Challenge.   Gail had given us a wee sneak peek of what was upcoming.  


So on Sunday I pulled out some Embossing folders, my Versamark and some different embossing powders.  Four background peices done... two awesome, one ok and one a bit of a failure... wrong colour card and wrong powder.  So far I have finished one card which I will share now.


For this one I used Altenew's Decorative Florals 3D folder and used versamark to ink up the folder.  I then used Altenew's silver powder to emboss the background.  I was over the moon how well it turned out.  I trimmed the panel down and added a white layer before adding to a top folding A2 black card base.  I used a die cut an hello sentiment from silver card and did the shadow in black.  These are from Honey Bee as is the little sentiment.  The little flag die si from a Gina K Master Layout set. 
Entering this one into both challenges. 

Here's a wee sneak peek of the other awesome panel 


I used a powder called Winter Illusion that I have had since I started stamped around 13 years ago.  Was suprised it still worked.  It changes colour with however you tilt the card.  Here you can see the two colours... teal and pinky purple.  Still have to make it into a card yet.  

Still in Lockdown here... another week at Level 3.1 - we did manage to catch up with our son on Friday evening... sitting on the deck socially distancing.   But not able to see Grace yet... she doesn't understand that she can't go inside to play with her toys or give Nanny and Pop a cuddle.  So it's a waiting game till we can moved levels.  Cases are going up and down all over the place here in Auckland.  So it's back to the dining table for the next little while.  

Friday, 24 September 2021

Two cards for two challenges.

 Over the last couple of days I've been working on a couple of cards for a couple of challenges. 

First up is another card for the Let's Squash It! challenge - to sand it with numbers/words


I was looking through my Embossing Folders and found this old scripty words one.  I used as soft pinky card and ran it through the Cuttlebug and then took the sanding block to it.  Love how it turned out.  I then decided to use an Altenew die.  I die cut then cut again with a slightly larger circle to make a frame.  I added Wink of Stella all over the die cut peice.  I then made the flower - using an Altenew stamp set which I white embossed and then used inks to watercolour.  

And my second card is for the latest Simon Says Stamp Wednesday challenge... Card and Matching Envelope.    The design team used Colorado Craft Company products and even though it's not necessary to use there products, I did.


I stamped the image onto some watercolour paper and used Altenew Woodless Watercoloured pencils to colour it in.  Once it was dried I die cut the image out.  I then took my card base and used some washi to mask off the edges before taking a Hero Arts cloud mask and some blue ink to add the sky and green for the ground.  I stamped the two sentiments and then added the die cut.    I used the same bliue and green to add a bit of colour to the envelope adding a little pair of bunnies which I coloured with the watercolour pencils and a damp brush.  

Thanks for stopping by.  My weekend is starting and it's the start of Daylight Savings tomorrow night... that means summer is on it's way.   


Tuesday, 21 September 2021

Sand It! at Let's Squash It!


Today I'm sharing the card I made for the latest Let's Squash It! Challenge.... and the theme is Sand It!  Yes..Use an embossing folder that includes numbers or letters AND Sand It!

For my card I chose to use a Christmas folder....


I took some aqua card stock and ran it through the folder.  I then took my sanding block and sanded the words.  The card had a white backing so it came through when I sanded.  I had the little gnome already stamped and sitting in my bits and bobs container so just had to colour him up.  I chose some darker teal colours. 

My stash of different Christmas cards is growing. 

Happy to say Auckland is going to Level 3 tomorrow... so click and collect coffees and takeaways  - yeah.  Still at home for at least another two weeks and then it will be review again.  


Tuesday, 17 August 2021

A bit of Christmas - 4 Christmas cards

 Hi there.   Over the last few days I've made some Christmas cards for a few challenges and some just for fun.  

First up is a  card I made for Let's Squash It challenge.  The challenge is Not Paper, Not Card.

I took a piece of vellum and used a Christmas word folder.  I wrapped it around some dark red card stock.  I used a lighter red card and some dark green card together with a Hero Arts Poinsettia stamp and matching die cut to make my flower.  I layered the red panel onto some dark green then onto my white card, 

Second one was for the challenge at Christmas Kickstart.  Jo and Gail provided a beautiful photo inspiration. 


I took my inspiration from the brightly coloured tree.  

My tree came from a magazine freebie stamp set.  I took some patterned paper to add to my mini slimline and stamped the tree.  Then I took some Nuvo drops and 3D Liquid pearls and added lots of blobs and dots.  I gold embossed the sentiment from the stamp set. 

My next two cards were just for fun. 

la

Playing with my setncil again.  This time I blended my desert scene and stamped the Bethlehem stamp (from a NZ company Montarga Stamps) - It went a bit wonky but I was happy with the results.  Add the sentiment along the bottom.  I used pencils to colour in the rest of the stencil and added Wink of Stella all over.  

And finally using a fun fold I used recently. 


I made the cuts on my card and then added my patterned papers.  I used three different sheets of paper. Two for the backgrounds and the other one to cut out Father Christmas.  I then used a die to cut out the big Christmas and stamped the little Merry. 

thanks for getting to here... I know it's a big post.   

Things here in NZ have taken a turn for the worst.  We've got a case of Covid in the community so the whole country has gone into Level 4 lockdown.  Here in Auckland and in the Coromadal Peninsula,  it's for 7 days - rest of the country it's for 3 days.   The case has no links to the border or managed isolation so we are just waiting to see if there are more.  So working from home for the next week.  

Take care out there people.  

Saturday, 17 July 2021

Embossed Daisies.

 One of my new purchases yesterday was Altenew's Daisies 3D embossing folder.  It is simply stunning.  I have made two cards - both inspired by Vicky Papaioannou.  Check out her video HERE

For my first card I used some black card.

I then took some Metallic Rub-on paste I've had forever.... you use your finger to rub the colour on.    I used the Gold to add colour to the embossed areas.  I used a Paper Roses Birthday die to cut the main sentiment in gold card and the shadow layer in vellum.  I took part of an Altenew Sentiment Strip that I had sitting, alreay embossed, in my extras mug.  

Edited: This one is going into the NBUS (never before used schtuff)  Here .  Thanks for the reminder Linda.


My second card also used some of the Metallic Rub-on.  This time my card was some Cream Pearl card. 

I embossed the cream card and then using my finger, rubbed silver onto the centre of each daisy and smooshed it out a bit - not all over the daisies though.   It's really difficult to photographic.  I matted it to some silver card and then onto a card base made with the cream pearl card.   I used Altenew's Thanks die.  I diecut the Thanks from black card and layered it onto the shadow cut from the silver card.  Again I used a part of a sentiment strip from my extras mug.. although it looks silver, it's actually white.  This card is 5 1/2" square.

I'm entering both cards into the following challenges. 

Let's Squash It - Shimmer and Shine


I love this folder and there are so many different ways to use it.  

Thanks for stopping by - Enjoy your weekend, hopefully with some crafting involved. 

Wednesday, 23 June 2021

Let's Squash it - take three!

 I'm back with a final entry for Let's Squash It.... Nature and watercolour


Many of you know I have heaps of embossing folders.... but I couldn't not get a new 3D one from Altenew - Decroative Florals and it arrived yesterday.  I LOVE my folders and use them lots. 


I took a piece of watercolour paper and my folder.  I used some Ultramarine ink from Altenew to swip and blend onto my folder, spritzed with some water and ran it through my trusty Cuttlebug.  I then spaltter it with some of the blue ink watered down and some bronze Nuvo drops diluted.  I used some bronze metallic card stock to die cut the Slim Sentiments die.  I cut it into two sentiments as it is a really long die cut.  

At long last I am almost well again.  Still a slight cough rattling around my chest but definatly better.  I had my hearing tested today and although there is some slight loss of hearing in the high frequency range it's still in the acceptable range.  Just need to check again in a year.   And I've got my appointment for my first COVID injection - 12th July.  

Thanks for stopping by.  Hope the week is going well for you.  

Monday, 14 June 2021

Let's Squash it - Nature and Watercolour - Take 2

 Hi there.  Thought I'd better do a card for the challenge at Let's Squash it... following the theme correctly 


So today I took some watercolour paper and embossed it with a Darice folder. 

After embossing I took my Altenew 36 pan watercolour pallette and took the aqua to add a wash of colour to the background.  I allowed it to dry and then added the light green for the leaves and yellow and orange for the daisies. I added some orange splatters.  Once it dried fully I added the sentiment from Couture Creations with Altenew Obsidian ink.   Added a few little black gems and it was done.

Today is my birthday and as I' still off on sick leave, it was great to spend some time in the craft room making this card.  I also tidied up a couple of my drawers.  I got a nice parcel delivered today from my son and daughter-in-law and grand daughter. 

Isn't it gorgeous.  I've eaten a couple of chocolates already.   And can't wait to have a hot bath and use the bath ball an the soap.  

Thanks for stopping by.

Sunday, 13 June 2021

Grown with Love

The lastest challenge is on at Let's Squash It....


I'n not sure if my card really fits the challenge as my folder is not a nature one - other than it is a  weave pattern and my card is the Nature theme.  I used some watercolour pencils to colour it in.    So I am pushing the bountries a bit. 


My stamps come from a freebie set with Simply Cards and Papercraft #214.   The background panel is coloured by smooshing Old Paper distress ink onto my glass mat and spritzed with water and dipping my panel through the watery mixture.  I added the burlap and added the embossed panel over the top then added the pots of herbs.  My panel is added to a dark green card base. 

So ladies, if this doesn't fit the challenge... just let me know. 

Update on my health:  Still coughing a lot and stuffed up.  Doctor's advised me to stay home till Wednesday.  So more time resting up and reading and crafting. 

Tuesday, 18 May 2021

Let's Squash It #8 Let's Make some Space and Bring on the Bling!

 I'm back with a card I've made to enter the Let's Squash It Challenge.


The challenge is to use an embossing folder that leaves some space and to add bling.   I recently got an Altenew order and purchased the Simple Frame 3D embossing folder so used that as my inspiration. 

I embossed onto some white card and trimmed around the embossing.  I then took some Altenew Encanted Gold pigment ink and a dauber and added colour to the embossing.  It is really sparkly looking (hard to photograph).  I had the Hill Blossom stenciled panel sitting on my desk.  Orginally wasn't sure about the colour scheme (plus there was a little smudge of the yellow ink) but trimmed it down to fit in the space left by the centre of the frame and added some flicks of gold ink splatters.  Add a sentiment from Sentiment Stripes 2. To added some bling I used Nuvo drops in Copper Penny to the flower centres and the corners of the frame.  I made the card a little smaller at 5" x 41/8".

This morning I had to be at the Radiology Group at 8.00am to have an MRI on my shoulder.   Half an hour in the machine, lying still.  I close my eyes so I dont' get the closed in feeling if I'm looking up at the tube I'm in.  Luckily they have ear plugs for the noise and also give you headphones and put on whatever radio station you like to listen to.   Was pleased when it was over even though I felt a little dizzy when I first came out.   Hopefully this will let the specialist know why I'm still feeling pain in my left shoulder. 

Thanks for stopping by.