Showing posts with label Honey Bee stamps and dies. Show all posts

Thursday, 22 December 2022

Last minute gifts

 This week at Splitcoaststampers the main tutorial was a delightful Easel Note Holder.  I decided to make some last minute gifts.


I had four Post-It note pads at home and used some purple and white card to make the bases.  I had a couple of different patterned paper packs sitting on the floor next to my desk (just waiting to be put away!) so grabbed some papers to make my easel portion.   Die cut some sentiments for three and used pre-stamped and die cut bits from the Magic pile to add to the other one.  Now to make one for myself!

My bags are packed - just a couple of last minute items to go in.   We head off at around 8.00am in the morning as it will take about an hour to get to the airport and get the car parked.  Our flight is at 11.50am but the expected number of people through the airport tomorrow is around 50,000 so there will be long queues.    Everyone is super excited - on both sides of the "ditch"  - the Aussie's are over their bout of COVID (thank goodness) and we've been taking care to stay away from crowds.  

This will be my last post before Christmas - so I'm wishing all my friends and followers - a Very Merry Christmas.   Enjoy spending time with friends and family.   See you in the New Year 💖💖

Wednesday, 27 July 2022

Print with a Die.

 Hi there... well the lovely Maxine set the challenge for our NZ technique swap group this month..... and what a challenge it was!  Use a die to make a print.  Luckily she gave us precise instructions!  Basically you cut a die from mixed media/watercolour paper, use watercolours to paint the back and saturate with water and print it onto another sheet of watercolour card.  Let them dry and go for gold!

I cut two of the Simon Says Stamp Fresh Daisies.(circa 2012 but still a favourite).  I liberally painted with Nuvo shimmer powder and water before turning it over and pressing it onto the another piece of watercolour paper.  I let them dry and then after colouring another die cut added both the die cuts to the printed card.  Added lots of splatter - some white gesso mixed with a little of the leftover blue powder. I die cut a black Hello from Honey Bee Bitty Buzzword stamp and die set and used some vellum for the shadow.   The little lovely stamp is from the same set.   I finished with some gold gems.  Really pleased with the results. 

My card went to Maxine this month... and she has let me know it arrived.   Just in time to get there in July!  I did procrastinate a bit - really wasn't sure what die to use, so left it till nearly the end of the month.   

Thanks for stopping by today.   

Saturday, 9 April 2022

Floral Heart - using stencils and dies.

Second post today  - to see my designer card for Sweet Stampin' Challenge - go HERE.

 Hi there.  I'm here to share my entry for the latest challenge at The Flower Challenge. - Add a Heart

My card was inspired by two artist - Gina K and Natasha Foote.   Gina made a card using a heart made with scraps - I was inspired by her design and Natasha's inspiration was to use die cuts to add to a shape. Natasha's was  more of a floating die cuts - but I used a white card to add my die cuts to. 


I used three flowers I made using Altenew's Bitterroot flower stencil and die set.   It is a toughy to do, but once I got the idea of what parts of the stencil worked together, I used different combinations of the pink Altenew inks,  I drew around the heart die and worked out where to put the flowers and the leaves and glued them down.  I then ran the piece through my new Spellbinders Platinum 6 with the die.  It is from Gina K Master Layout 4.  Layered it onto the black heart.   The background was inspired from Gina's card.  I used my Scor-Pal to add the lines and then a grey Altenew ink to blend over.   I used a Honey Bee die cut sentiment.  To make it shiny I added some clear packing tape to black card and then cut the die.  Used white for the shadow layer.  The little sub-sentiment from the same Honey Bee set and was cut with Altenew's Featured Sentiments die set.   Love the little rounded corners.  

Had my Rapid Antigen Test this afternoon - Negative - so all good to go tomorrow afternoon.   I made a couple more cards yesterday and today which I've scheduled for Monday - so do come back for a look.

Take care.... see you all in two weeks!


Sunday, 31 October 2021

Coneflowers Three Ways

 I have been wanting to get the Altenew Build A Flower Coneflower since it came out in April but it's been popular and everytime I look it's been out of stock.... but I saw it at Krafter's Cart - my local online store, so it made it's way to me and arrived on Friday.   I decided to try some different techniques using it.   So over the weekend I had a play.... three techinques and four cards later ...

FIRST TECHNIQUE... stamping the layers in mixed colours. 


The are three layers to this stamp.  I used a variety of Altenew inks - putting the purples around the out edges and the pinks towards the centre.  I used a blending brush to ensure a smooth tranistion.  Did each layer a couple of times. I used the matching die to cut the flower.  To add some extra texture I added a stamp from A Study in Watercolour stamped in Andromeda ink and added some gold splatters.  The sentiment is from the BAF Coneflower set.  I used Pinkfresh Studio mini slimline dies to cut my panel.  

SECOND
TECHNIQUE - Watercolouring.


I used some Archers 185gm watercolour paper to gold emboss both flowers from the set.  I then used Altenew 36 pan watercolour set to add the colour. Once it dried I added some white details.  I used the matching die to cut the flowers.  To make my background I was inspired by Therese Calvrid.  I made a stencil by cutting a rectangle out of some vellum.  I then added some Forest Glades green ink and then used Classy Stripes stencil to add some extra inking.  I gold embossed the sentiment from the set. 

THIRD TECHNIQUE- ink smooshing. 

I made two cards using ink smooshing.  


I took some Archers 185gm watercolour paper and smooshed some Shaded Lilac and Worn Lipstick Oxide inks onto a palate.  I too

I smooshed some Shaded Lilac, Worn Lipstick  and Mowed Lawn Oxide inks onto a palate and took some Archers 185gm watercolour paper and put my paper into it.  I dried it off and then stamped the flowers.  I didn't dry it completely so when I took my Spectrum Noir pen to add sparkle, the ink bleed a bit.  I to another piece of the watercolour paper and did some more light smooshing, and run it through Altenew's Daisies 3D folder. I layered the panel to some purple card and used the same ink to stamp my sentiment onto before trimming it.  Layered onto a cream card base. 

My second smooshed background was a bit darker than the firest one.  


I used some Woodless watercolour pencils from Altenew to add extra colour to my flowers.  I added a die cut sentiment and some clear gems.  

Well I appreciate if you made to the end of this post... as you can see I had a great time playing with this set.  In fact this afternoon I even started another card that I will finish tomorrow.  

Hope you weekend was full of crafting too.  Not much else I can do here as we head to the end of the 11th week in lockdown.   Take care 

Wednesday, 13 October 2021

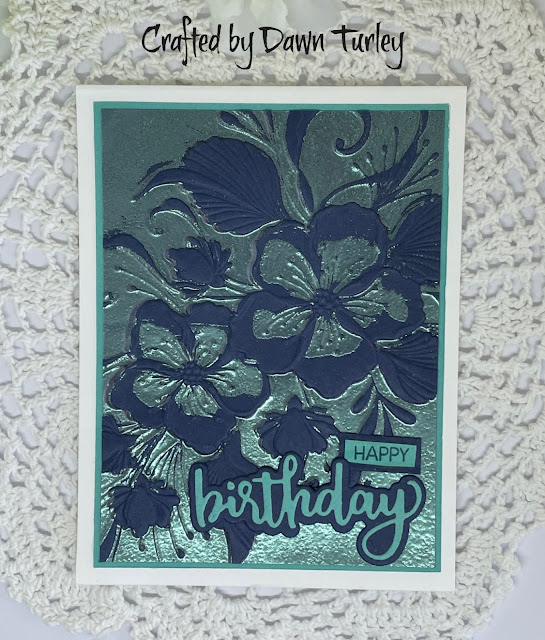
Double Embossed with Winter Illusion Powder

I'm back with another Double Embossed card.  I've used the same folder that I used the other day but for this one I've used some powder I bought a very long time ago when I first started card making.  It's called Winter Illusion.  It works best on dark card and changes colour depending on the light.    For this one I used some very dark blue card 


This is the view of where it looks teal, so I used a teal layer and then used the Honey Bee stamp and die cuts for the sentiment.    

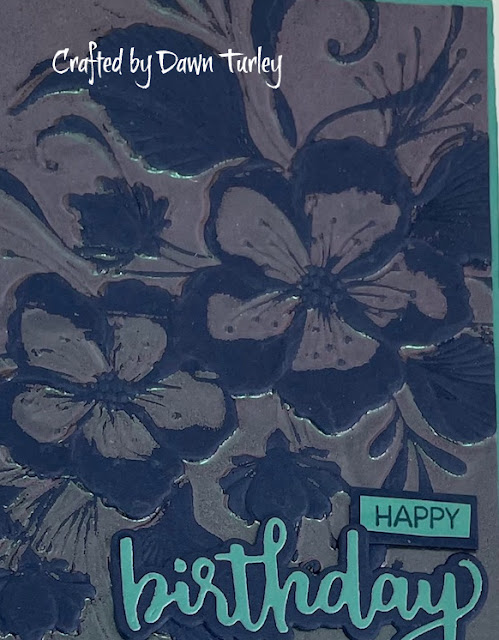
And here's a view where it looks quite different - a pinky purpley colour. 

Here it looks pinky-purple.  This powder is amazing and I had completely forgotten about having it.  I found it when I was looking for something totally different.  

I'm entering this into the following challenges.

Let's Squash It - Double Embossing 

Just Us Girls - Heat Embossed Embossing Folder.  


Thanks for stopping by.  


Sunday, 8 August 2021

Die cut Flowers Mini Slimline

I saw the the last challenge at The Flower Challenge is to use a die with an optional - slim line card. 


I have a number of Altenew layering floral dies so pull out Fantasy Florals to make a mini slimline card. My base started as a large slimline which I trimmed down.


I added double embossed lines around the front of the card base.  To make my flowers I took some white card and using the mini blending tools from Altenew together with inks from the Cherry Blossom and Green Fields set plus a touch of Bamboo ink, to make the colours.  I then die cut all the elements of the flowers and the leaves.  One of the flowers was glued directly to the card base and the other one added with some 3D tape.  I recently purchased Honey Bee's Bitty Buzzwords Stamp and die sets.  I used the little sentiment to white emboss directly onto the card and then took some of the pink blended card and die cut the Love - I then die cut two more in white and layered all together.  The shadow was diecut from vellum.  I added some clear gems which look great in real life, but don't really show well on the photo.    

I'm sending this off to my daughter in Australia, as she has been very unwell with a horrendous ear infection that has caused her to not be able to hear with one ear and suffering really bad vertigo.  I can't give her a hug so a card to let her know I'm thinking of her. 

Thanks for stopping by.  Hope you managed some crafty time over the weekend.   I didn't get as much as I'd have liked, but I did get a good amount of cleaning around the house...  Cleaned the inside of the washing machine, hubby cleaned the rangehood filters, and I did the oven... at least the the racks as my oven is a pyrolitic self cleaning one.  The cycle took 4 hrs and then about another hour to cool down.