Showing posts with label Altenew 3D folder. Show all posts

Saturday, 10 August 2024

CMSS - Inspired by Juliana Michaels... not one but three cards!

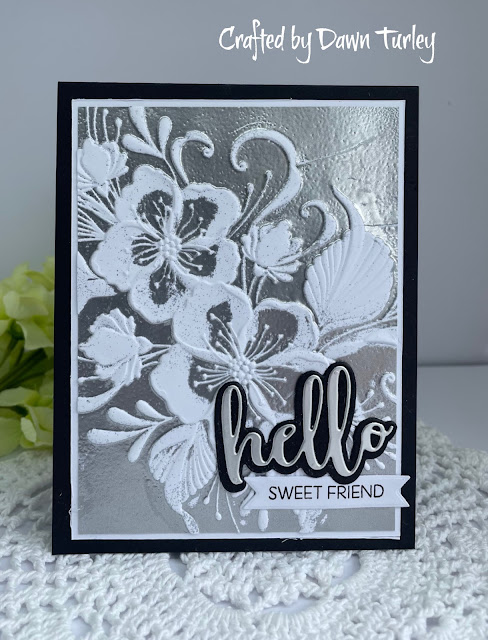
 Yeap, I loved the presentation by Juliana Michaels and made not one card, but three!   Her technique was using stamping foam and an embossing folder.   This is a favourite technique, but one I don't use all that much.  

As I am doing mostly Christmas Holdiay cards this summit - I chose an Altenew folder.  Classic Pinecones Slim 3D folder.  I heated my foam and pressed it into the folder.   Chose the "sticky up" side (although hard to determine with a 3D folder)  

First card I inked the foam with some Vintage Photo Oxide ink.   I used some 240gms Fabriano Start Mixed Media paper.  It says it is white... but it is really an off white colour.  It's A4 size so my card bases become 4 1/8" x 5 3/8" - just a smidgeon less than a US A2 size card.  

Love the colour I got with the Vintage Photo ink.  I trimmed the stamped panel leaving a tiny white border.  Matted the panel with some brown card - the same colour as my pinecones.   I used an Elizabeth Craft Designs die set - Christmas Accents.  It's an older die set, with two sizes of pinecones and two sizes of the poinsettia flowers and leaves.   I used two tones of brown for the cones, and some red paper.  I made my own green paper by using Distress ink in Pinecone direct to the paper.  A little fellow centre finished my poinsettias.   I made these cards yesterday and fortuitously my order from Krafters Cart arrived - with the Concord & 9th - Big on Christmas stamps and die set.  I stamped the big FA LA LA and used the die to cut it... and added the sub-sentiment directly on the card. 

Card two- I used Weathered Wood Distress Oxide to stamp the foam, trimmed and added to a dark green mat.  

This time I chose an older stamp and die set from Hero Arts- Holly Jolly.  We have been tidying up the storage space under the stairs - where I store some of my stamps... ones I haven't used in forever!  Saw this set and thought it would be perfect against the background.  I used more of my own green paper to stamp on and die cut the holly leave.  Added some Altenew enamel dots for the berries.  The sentiment is from the same stamp set.  

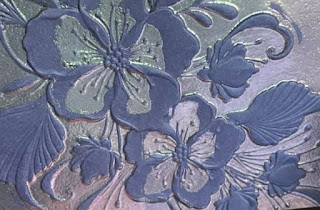
For my third card, I reheated the foam and used the other side of the folder.  Used the Weathered Wood Distress Oxide ink and definitely got a totally different look. 

I trimmed a larger border around the panel and used a Gold Sharpie to add a faux mat.  I stamped another of the stamps from Concord & 9th set - gold embossed directly onto the panel.  Added some die cut stars (from the same die set) with a little gold gem in the centre. 

The stash of Christmas cards is growing quickly with the inspiration from the Card Makers Success Summit.. and I still have nearly 40 more presentations to watch.  

Tuesday, 2 July 2024

Inspired by Natasha...two cards

I've been crafting a bit for the last few days.. The long weekend was busy and I even managed some cards after work yesterday.  I made two cards inspired by YouTube videos I watch by Natasha Foote...her channel is HERE

First one was inspired by this video.  It's about coloured silhouettes 


I loved Natasha's use of purple so I did the same...of course I LOVE purple!  I did some ink blending like Natasha did on her card using some Villainous Potion Oxide ink , but when I decided to use Spellbinders Labels 1 to cut my panel, I lost a bit of the blending so I added some soft blending around the edges using Wilted Violet Oxide and added some splatter as well.  The panel went onto a white Decorative Labels 1 die cut.   I stamped a birthday sentiment from Altenew's Birthday Builder set  using the same Oxide ink.  Natasha has a neat trick for making a false layer - using some tape to mask off a little strip of the card and blending on ink.   Love how it always gives a great look. 

And the second card is inspired by this video.  It's called White Ink Embossing Tips and Tricks.


I've done some similar type of embossing - this one I took some teal card and an Altenew 3D folder (Silk Art) and white ink...inking up the raised side of the embossing folder.  I ran it through my Platinum 6 machine - and reinked and did it another pass through the machine.    This adds the ink to the debossed side of the card.   Once the ink had dried I added some Altenew Aqualicious Fresh Dye inks to the raised areas.   Added a foiled sentiment - used Go Press and Foil Aqua foil with a Pinkfresh Studio Perfect Sentiments hot foil plate and die set.   A few teal gems finished the card. 

Now I'm over to see Natasha's video for today.  She posts about three times a week. 

Friday, 1 December 2023

Flowers for December - Altenew at Die Cut Divas

 It's the first of December - can you believe it!  2023 almost finished.   And of course it's a new challenge at Die Cut Divas.    Our fantastic sponsor is none other Altenew!   We are thrilled to have such a fabulous sponsor 


And they have generously offering a gift voucher of $50 for our winner.  Our theme for the month is perfect - FLOWERS  - Altenew have the most amazing floral stamps and dies.  


I recently purchased the Ambridge Rose stamp, stencil and die set.  Today is the first outing for it.  I stamped in with Versafine Onyx Black and I used Altenew purple inks with the stencils.  I then die cut the rose with the matching die.   To make the background I used some blue card which was die cut with a Waffle Flower Deckle die and then ran it through my machine with Altenew's Dotty Circles.  The sentiment is from Altenew's Versatile Greetings.  I used some Altenew Charcoal Suit ink swinked it onto some scrap card to die cut the hello and white card for the background.   

Do come and join us for this month's challenge.  

Entering this into Darnell's NBUS challenge as it the first time using the stamp, stencil and die for this one. 

Sunday, 28 May 2023

Interference Inks... two ways.

 Over at Splitcoaststampers this week, there was a great video using black paint/gesso and Cosmic Shimmer Opal Polish.  Christine used gesso and  3D embossing folder.   I don't have the Opal Polish, but I do have some VERY ANCIENT Opalite inks so decided to give them a go.   First up I used black acrylic paint with an Altenew Bergenia folder.... EPIC FAILURE!!!!   Next I tried with some black Obsidan ink (Altenew) brayered onto the folder and embossed onto white card.   Let it dry and then did a direct to paper technique with the Opalite inks ( Crystall Blush, Nordic Ice, Golden Mist and Cypress Frost)   It looks like versamark ink... no colour but once it hits the black it is supposed to show the colour.  Well with this one... it's there but only ever so slightly, if you tilt it in the light....So difficult to photo on this one 


Here you can just about see the colours... and definitely you can see it on the black card.  I swinked it on and then used a die from Concord & 9th Just Saying Dies.  A few black enamel dots to finish. 

I had more success using black card with the embossing folder. 


I added the inks by swinking across the embossed panel.  It really shimmers and shines.  I backed it onto the maroon card.  The sentiment is from Altenew's Versatile Greetings Dies, cut from the maroon card and backed with white card.  Added some white enamel dots.    I've had these Opalite inks for a very long time - bought them at a craft fair in 2016.  I think I might have used them once or twice and then stored them in the bottom draw of one of my cabinets.   I must admit I was surprised it still worked!  

Thanks for stopping by. 


Thursday, 26 January 2023

Optical Illusion background

 I was inspired by Natasha Foote's optical illusion background in her video the other day -  (see it Here) and decided I needed to try it out.   

My first sheet... I did my drawing a little small - ended up only doing part of a panel and die cut it out


I did change it a bit by colouring in some of the spaces rather then add more lines.  I die cut out a circle.  I used a Couture Creations scalloped die to layer behind my circle.   Added some sticker flowers around the edge.   I added a love die cut word.  It was an unbranded die I got for $2.99.  I cut it once from black card and one out of some foiled card.  I cut the heart part out and layered it over the black.   Added a little part of a pre-printed sentiment. 

For my second card I did my drawing larger and used a purple gel pen.  


I did some partial die cutting to make my panel a little narrower and matted with some black.  It looked a bit stark on the white card so added some texture with an Altenew 3D folder.  Added the panel and an ephemera butterfly. The sentiment is one from LDRS - It's one stamp with lots of sentiments that you then die cut.  

I'm entering this into the Wednesday challenge at Simon Says Stamp - anything goes...

Had lots of fun doing this technique. Nice to try something new.  

Sunday, 21 August 2022

Christmas Pinecones.

 Hi there... Here's one of the cards I did yesterday afternoon.  It's a shaped Christmas card.  I made this with two challenges in mind. 

The challenge at Let's Squash It - is Don't be So Square.   Use your embossing folders and make a shaped card.   I made my card base using a very old Tim Holtz die  - called Vintage Cabinet Die


I cut it three times  -two used as the base and one for the embossed panel.  The embossing folder is an Altenew one - Classic Pinecones Slim 3D folder.  I used some Rocky Shores and Mocha Altenew inks to blend on some colour on the cones, and Moss for the needles.   The pre-printed sentiments are some digital images from a magazine.  

I'm also entering this one in the Never in a Nativity challenge at Christmas Kickstart. 


Monday, 9 May 2022

Gelli plate backgrounds.

 Yesterday I posted a picture of some of the Gelli plate backgrounds I made.  


Today I'm sharing two cards I made with some of them.

First up is the pink and gold one.  


I made a mini slimline card.  I used Altenew Natures Blossom stamp set to make the focal image.  Die cut a birthday sentiment from Honey Bee and added the sub-sentiment from the same set.

Next up was a one of the backgrounds that was a bit dark looking.  I'd added too much purple ink - but look at how great this one turned out.


I used a 3D embossing folder by Altenew and then a sanding block to take a bit of the paint off before running my Hero Arts Unicorn White ink lightly over the top.  The sentiment strip is from a pre-printed sheet by Taylored Expressions.  

I still have quite a few left to play with.  

Saturday, 19 February 2022

Go Green!

 Yes, today my cards are GREEN.... I decided I better get a card into the latest challenge at Let's Squash It.... but OH NO... I didn't read the brief properly  - It's Green and an insect!!!!  I've made two GREEN cards ... I had finished the cards before I realised - but managed to add a butterfly to one to meet the criteria!  

Here's the first card that DIDN'T follow the brief...  

I took a Craft Concepts Folder and some Catherine Pooler Lime Rickey ink and used a brayer to add the ink to the folder.  I have to admit this is the third try to get the look I wanted.   I had this little MFT Toucan sitting on my desk so added some colour to it.  I added Glossy Accents to her beak.  I used a dimensional dot behind her and slipped the die cut leaves (also from the scrap bowl) behind.  The sentiment was also in the scrap bowl - so not sure who it's by.  Did some matting, adding to a white base.  I really like this one.  Good practise to try th
e inking the folder technique.  

And here's the card I added the butterfly to so it DID meet the brief.  


For this one I took some light green card and an Altenew 3D folder.  I then look some green Altenew ink and blended over parts of the folder to highlight the embossing.  I added white dots on the flowers and added some pearls.  I had a silver foiled sentiment which I blended the green ink over. ( so hard to photograph) and added the Memory Box die cut Butterfly.  So this one is going into the Let's Squash It challenge


I must say though, I had a great afternoon playing in my craft room.   Staying home as much as I can...as Omicron numbers are rising... 1906 today.  Luckily no places of interest in my part of the city. 

Thursday, 25 November 2021

Craft Your Life Project - Hello Beautiful.

 Hi.  I have two cards to share today using products from Altenew's Craft Your Life Project kit - Hello Beautiful   

First card uses the 3D Embossing Folder that came in the kit.  


I was a bit stressed yesterday - working from home can be a bit stressful at times... so during my 15 minute break I slipped into the craft room and threw this together.   I used some white card to emboss with the folder.  I then took my blending tools and used what ink was on them to lightly add colour to raised areas.  I added a little sentiment from the stamp set in the kit.   I love the mini slimline size. 

My second card uses stamps from the kit.  


This card took inspiration from a video from Natasha Foote...(here)  Her video was about framing an image.  I look one of the smaller floral stamps and stamped with black Obsidan ink and clear embossed it.  I then used Altenew Woodless Watercolour pencils and a paint brush to colour them in.  I then used a black fineliner pen to draw around it.  I matted it onto some gold card and then onto a dark brown cardbase.  Another of the small sentiments from the stamp set finished off the card.  

I've now had my hair cut.... finally.  First one since early July this year.  Much tidier now. 


Wednesday, 17 November 2021

Washi Two Ways

 Altenew are currently having a Get Wild about Washi contest as part of a release of new Washi tapes. 

I have a few of the Altenew Washi tapes.... and chose to use Peach Gold Wide Washi to make two cards today.. together with new stash that arrived yesterday.... Craft Your Life Project Kit - Hello Beautiful 

First up I used the washi as a background 

I covered some cream card with the Washi to make the background.  I stamped the Flowers from the Kit stamp set and then used the colouring stencils to add the colour.  I wanted to use muted colours to match the soft colours of the Washi.  I gold embossed the birthday sentiment (from Altenew's Birthday Builder set) onto some brown card and added to the background.  Die cut the floral element and added with 3D tape. 

Entering this into The Flower Challenge... #62  "Add leaves"  

And for my second card  I did some embossing with the 3D embossing folder from the kit. 


I had a little panel of the Washi on the cream card, left over from the first card.  I took some of dark brown card and ran it through the folder.  I trimmed it down and then laid the washi panel on embossed panel before running it back through my Cuttlebug.   Before gluing it down, I added some Altenew Enchanted Gold pigment ink blended over the raised embossing on the background and did a little sanding of the top layer.   A few pearls and a die cut sentiment finished it off.  

If you visit the Altenew blog there are lots of inspiration for using washi.   


Wednesday, 3 November 2021

Card Chain Challenge Reveal

 It's time for the CCC reveal.  I got to send a card to Nelleke in the Netherlands.  I chose to use the colours for this challenge


I used Altenew's 3D Daisies folder and embossed the die cut panel.  I then took some metallic paints and added some details with pencils.   Added a friendship sentiment.  

You still have time to join the challenge for November.... see here 

Thanks for stopping by.


Monday, 11 October 2021

Double Embossing....

 I was excited to see over at Just Us Girls the latest challenge was Heat Embossed Embossing Folder and the link to Jennifer McGuire's video  and also the Let's Squash It challenge...with it's Double Embossing Challenge.   Gail had given us a wee sneak peek of what was upcoming.  


So on Sunday I pulled out some Embossing folders, my Versamark and some different embossing powders.  Four background peices done... two awesome, one ok and one a bit of a failure... wrong colour card and wrong powder.  So far I have finished one card which I will share now.


For this one I used Altenew's Decorative Florals 3D folder and used versamark to ink up the folder.  I then used Altenew's silver powder to emboss the background.  I was over the moon how well it turned out.  I trimmed the panel down and added a white layer before adding to a top folding A2 black card base.  I used a die cut an hello sentiment from silver card and did the shadow in black.  These are from Honey Bee as is the little sentiment.  The little flag die si from a Gina K Master Layout set. 
Entering this one into both challenges. 

Here's a wee sneak peek of the other awesome panel 


I used a powder called Winter Illusion that I have had since I started stamped around 13 years ago.  Was suprised it still worked.  It changes colour with however you tilt the card.  Here you can see the two colours... teal and pinky purple.  Still have to make it into a card yet.  

Still in Lockdown here... another week at Level 3.1 - we did manage to catch up with our son on Friday evening... sitting on the deck socially distancing.   But not able to see Grace yet... she doesn't understand that she can't go inside to play with her toys or give Nanny and Pop a cuddle.  So it's a waiting game till we can moved levels.  Cases are going up and down all over the place here in Auckland.  So it's back to the dining table for the next little while.  

Saturday, 9 October 2021

Add a button at Sweet Stampin' Challenge..

 Hello there.  Today it's time to share for the latest challenge at Sweet Stampin' Challenge.  It's Susan's teams time to share for our Add a Button challenge.  

I made a sweet little card using some punches and dies plus some buttons I made a long time ago with a mold and some resin. 

I used some kraft paper to emboss with Altenew's Organic Linen 3D folder.  I used a older punch to cut some white card for my daisies.  I took some of the buttons I had made which were sitting in a jar just waiting for the right project!  Been there about 6 years! and finally the right project!  I used a Sizzix die to cut the leaves from some pretty green paper.  I finished by stamping the sentiment from Honey Bee's Bitty Buzzword stamp set, cut with a flag banner from a Gina K Master layouts.  

Do come and join us - make a project and add a button.  


Thursday, 9 September 2021

WWC 324 Kath's Challenge: All About Occasions

 Hi there.  It's time for another challenge at Watercooler Wednesday Challenge. Our hostess is Kath with an All About Occasions Challenge.

Last Sunday was Father's Day here in New Zealand and this is the card I send to my Dad. 

I was struggling for ideas for Dad's card.  I  did some Pinterest searching and was inspired by several different cards to come up with the final result.  I took some heavy weight kraft paper and ran it through my machine with an Altnew 3D folder (Organic Linen)  I then took another piece and using a Striped folder inked up with Catherine Pooler Juniper Mist inks to give a letterpress look.  My focal image is a little stamp from Couture Creations called Whiskey.  I coloured it with some Prismacolour pencils and die cut it with a circle die from Simon Says Stamp.   I used a Kaisercraft stamp (Occasions) to white emboss the sentiment.  I die cut with a flag banner die from Gina K.    Three small black gems finished off the card.  

Come and join in the fun at  Watercooler Wednesday Challenge and check out the project from the other designers.  Then take our challenge and link up your project to the challenge post.    We'd love to have you join us.  You have until Monday 20th Sept at 5 pm Mountain Standard Time (Tuesday at 11.00am  NZ time ) to link up your project.


Saturday, 17 July 2021

Embossed Daisies.

 One of my new purchases yesterday was Altenew's Daisies 3D embossing folder.  It is simply stunning.  I have made two cards - both inspired by Vicky Papaioannou.  Check out her video HERE

For my first card I used some black card.

I then took some Metallic Rub-on paste I've had forever.... you use your finger to rub the colour on.    I used the Gold to add colour to the embossed areas.  I used a Paper Roses Birthday die to cut the main sentiment in gold card and the shadow layer in vellum.  I took part of an Altenew Sentiment Strip that I had sitting, alreay embossed, in my extras mug.  

Edited: This one is going into the NBUS (never before used schtuff)  Here .  Thanks for the reminder Linda.


My second card also used some of the Metallic Rub-on.  This time my card was some Cream Pearl card. 

I embossed the cream card and then using my finger, rubbed silver onto the centre of each daisy and smooshed it out a bit - not all over the daisies though.   It's really difficult to photographic.  I matted it to some silver card and then onto a card base made with the cream pearl card.   I used Altenew's Thanks die.  I diecut the Thanks from black card and layered it onto the shadow cut from the silver card.  Again I used a part of a sentiment strip from my extras mug.. although it looks silver, it's actually white.  This card is 5 1/2" square.

I'm entering both cards into the following challenges. 

Let's Squash It - Shimmer and Shine


I love this folder and there are so many different ways to use it.  

Thanks for stopping by - Enjoy your weekend, hopefully with some crafting involved. 

Wednesday, 23 June 2021

Let's Squash it - take three!

 I'm back with a final entry for Let's Squash It.... Nature and watercolour


Many of you know I have heaps of embossing folders.... but I couldn't not get a new 3D one from Altenew - Decroative Florals and it arrived yesterday.  I LOVE my folders and use them lots. 


I took a piece of watercolour paper and my folder.  I used some Ultramarine ink from Altenew to swip and blend onto my folder, spritzed with some water and ran it through my trusty Cuttlebug.  I then spaltter it with some of the blue ink watered down and some bronze Nuvo drops diluted.  I used some bronze metallic card stock to die cut the Slim Sentiments die.  I cut it into two sentiments as it is a really long die cut.  

At long last I am almost well again.  Still a slight cough rattling around my chest but definatly better.  I had my hearing tested today and although there is some slight loss of hearing in the high frequency range it's still in the acceptable range.  Just need to check again in a year.   And I've got my appointment for my first COVID injection - 12th July.  

Thanks for stopping by.  Hope the week is going well for you.