Showing posts with label Memory Box. Show all posts

Saturday, 20 July 2024

Fun Day at The Auckland Papercraft Show...

 Yesterday I took the day off and together with my friend, Suna, we head off to The Auckland Papercraft Show.  The big craft fair this year was cancelled, so a few of the contributors got together to put on a smaller show.  It was over the Harbour Bridge so off we went.  Luckily for us, the weather held and it was a good drive over (plus the traffic was quite light!)  We spent up well ... have to support the local stores!  And we had super fun taking part in a class.  It was from Scrapbook Central and our tutor was the lovely Chick Mitchell.  We did 3 cards in 2 hours- lots of ink blending and embossing - and lots of painting with watercolour shimmer powders.  Our kits used products from Memory Box.  I didn't quite finish my cards during class so did that last night.  


Are they just gorgeous!   And luckily for me, I already own the bird die.  And the sentiment foil and die set.   I loved the colours we used  - did have to buy one Distress Oxide colour - Tattered Rose. 

Of course, I did a good amount of shopping.  - Got some practical storage - extra large stamp pockets and another Tim Holtz tin for my Distress Oxides.  And some glue and Stick-It double sided adhesive.  Got a cool snowflake embossing folder from Altenew, a Birthday stamp and die from Gina K, a cute Birthday Wishes die from Creative Expressions and some different rub-ons.   All in all, a great haul.  


Sunday, 17 May 2020

Spring Card Camp 2 - Day 6 Homework

Warning: Photo heavy post

I'm back today to share five cards I made for Day 6's homework.  Day 6 was all about Colour Blocking.   The idea was to take three different colours of cardstock and emboss a background stamp then cut up the card to make some cards. 

I used a Hero Arts background stamp (Antique Background circa 2009) and pale purple, pale green, pale blue pearlescent card..  I white embossed the background.  

Card 1

I cut the three panels and mounted onto to black and then a light cream card.  This was then mounted onto a darker cream base.  I used a sentiment from Altenew Sentiment Strips 2.  Added some silver sequins to finish.  

Card 2

I took two of the panels and laid them on my card base.  I die cut a white butterfly with a Memory Box die - Chloe Butterfly and laid it over the top of the panels.  The white embossed sentiment is  from the Altenew Sentiment Strips 2.

Card 3

I layered the strips of coloured pieces at different levels.  Add some blue and white strips.  The You die cut is from Catherine Pooler Designs.  And the sub sentiment is part of one of the Altenew Sentiment Strips 2.  I masked the word you before stamping with some Obsidian ink.   I added some blue and green sequins to finish. 

Card 4

 For this one, I used only blue and green panels layered onto some black card.  I added to a white base which was trimmed to a bit narrower than a normal base.  I added a printed sentiment from Catherine Pooler Designs.  A few green gems finished it off. 

and finally Card 5

I trimmed the colour blocks to squares of 1 3/4" and added to the black mat.  The base is a square of light grey card.  The sentiment is from an older Penny Black set (circa 2012) called Wishes.  I stamped in Catherine Pooler ink - It's a Boy. I die cut the stamped circle and also a Spellbinders Scalloped die.

So from three pieces of card I got 5 cards and had some tiny pieces left over.  Not quite enough for another one. 

Thanks for stopping by today.  It's been a fun weekend making these and also finally spending some time with my son and his family.  Little Grace has grown so much in the last 9 weeks since I last saw her.  She is walking all the time now and has 4 teeth.   I was so happy that she came to be straight away and gave me a big hug.  

 Here I am reading her book to her.  I was sitting on the floor playing and she came over with her book and plonked her little bottom on my leg.  So cute.

Friday, 19 April 2019

Happy Easter... every day is a gift

It's Good Friday today and I got a bit of time to play in my craft room.  A couple of cards done... am now well ahead with my DT samples.  This afternoon I pulled out an alcohol background I had done on some photo paper.  It was a bit more vibrant than usual so decided to trim it down a bit for just a smaller focal panel.


I layered the panel onto a maroon card and then onto a cream base.  I die cut the Memory Box Bella Bouquet from the cream card and added to the card.  I used Altenew Rose Gold embossing powder to add the sentiment.   Like how the maroon card really showed off the panel.

Today was a really nice day, the sun was shining and it was warm.  Hubby went over to our son's place to help him remove some trees and plant some new fruit trees... 4 Feijoas.  I made some veggie soup and took it around for lunch.  Erin is only 10 days away from due date... so I thought I'd take this around so she didn't have to prepare lunch for the boys.  

Happy Easter to you all. 

Friday, 8 March 2019

Bendi Card

Well I miss read the challenge for my NZ card swap group.  Jude's challenge was to make a Bendi Frame card- with an animal on it,  and I did a Bendi Fold card. Back to the drawing board for me!  Oh well, I'd never made one before so it will was great to try the fold out.  I'm sure I'll find someone to send it to.... Plus as it is a scene card I'll be entering it into the Simon Says Stamp Wednesday challenge -Create a Scene.

I googled Bendi card and found some great tutorials, but went with the one I found at Splitcoaststampers.  I don't usually use American sizes for my cards - our card stock is slightly longer and slightly less in width... but today I had bought some card stock that was wider and taller than usual so was able to trim it to the correct 8 1/2" by 5 1/2" size.  So here's what I did :


I've made a Garden scene.  I used the new green card stock to made the card base. I used some gorgeous patterned paper.  Wish I knew who made it, but the packaging has gone!  It's A4 sized and card weight.  I missed measured, so needed to added the scalloped edge to hide where it was a bit short.  It think it gives the impression of grass.   I added a park bench die cut (Couture Creations) cut from brown card and two kitties ( Cosy Kitties - Poppy Stamps) cut from black card.  I used a floral die (Bella Bouquet - Memory Box) to add in one corner.  Added some Nuvo drops in Ivory Seashell and Autumn Red.   Added a sentiment from an Altenew stamp set - Engraved Flowers.

I enjoyed the making this card fold and will try it again some time.

Thanks for stopping by. 

Wednesday, 23 September 2015

September CCC card for Lizzy

I really love taking part in Deborah's CCC monthly challenges.   You get to send a card to someone and someone sends you one.   This month, I got to send a card to Lizzy in Australia.

Each month Deborah gives options for the card... a colour combo, a sketch or a theme.  For September I chose the colours - Ivory, Olive and Cobalt Blue


My card base is Ivory and my olive is Distress ink sponged through a Tim Holtz stencil.  My butterfly is a Memory Box die and the friend die is from the SOA from StampNation and is by CAS-ual Friday. The rest of the sentiment is from Winnie & Walter and is stamped with a Memento ink.  Finished with some blue enamel dots for the butterflies body.  Lizzy has now let me know it has arrived.

I'm entering this into the Die Crazy challenge at Simon Says Stamp

Wednesday, 1 July 2015

On your Bike for summer

There's a new challenge up at Die Cut Divas and it's all about Summer.
Our sponsor is DiesRUs.


 They have so many stunning dies from many companies.


For this card I started by making my background.  I used a Hero Arts mask to make my clouds.  I sponged on some green at the bottom and stamped the grass (from a WPlus9 stamp set)  I stamped the sentiment (Hero Arts) and the balloon (Hero Arts)  I die cut the Penny-farthing bike from Memory Box (Memory Box dies are available at DiesRUs).  The frame is a die from Elizabeth Crafts Designs (Thanks Arlene for sending this to me)   My background embossing folder is a new one from We Are Memory Keepers.  Its a 3D one is is stunning.  Particularly on the shimmery grey card stock. 

Thanks for stopping by.

Thursday, 10 July 2014

Stitched chervon from Pretty Pink Posh.

Have you heard of Pretty Pink Posh?  They have some amazing sequins and other embellishments on their site, but also a couple of really cool dies.  I was taken by the Stitched borders on, so decided to get it.  Really fast delivery time I must say too!

Anyway I had this idea in my head to do a series of die cuts in various colours with the chevron die so went with it...


I layered the stripes of colours to form a bit of a diamond pattern.  For the top of my card I cut the you from the Simon Says Stamp from the white space and again from red card and inlaid it.  The sentiment is from the matching stamp set,  The  butterfly is a Memory Box die.  Added a few sequins and all done.  It turned out exactly as I planned. 

Entering into the Die Cut Challenge at Virginia's View and the Word die cuts at Moxie Fab World.  

Sunday, 29 June 2014

Two for the price of One....plus one extra

Well at least two cards from one stencil and another from left over ink....

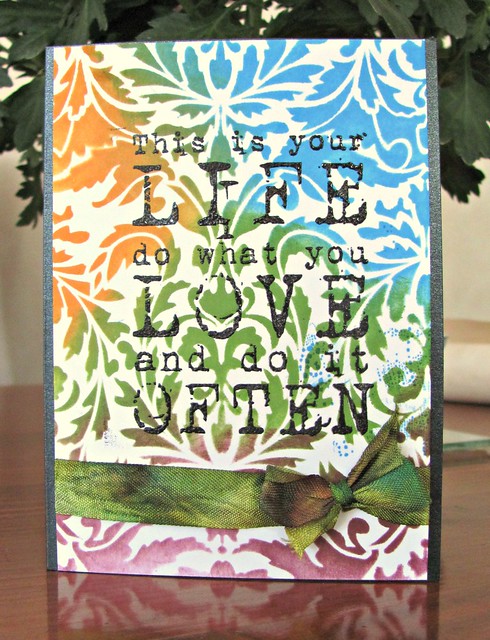
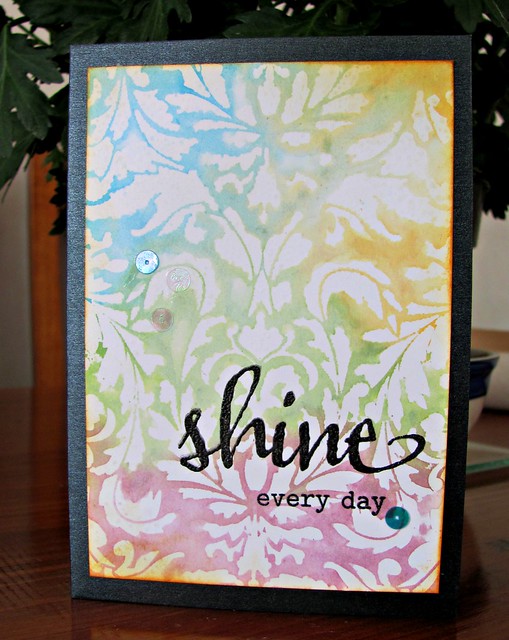
I had a great afternoon playing with my inks, stencils and stamps.  Recently I was lucky enough to win a Memory Box stencil on a blog hop - it's this one 


I pulled it out today and made one background with some embossing paste and then I decided to use some Distress inks to sponge.  I used vibrant colours - Mowed Lawn, Spiced Marmalade, Seeded Preserves and Salty Ocean.

This is your life....

I used a Stamp-It sentiment as my focal point, but letting the background take pride of place.  I coloured up my ribbon with the inks but once I spritzed it, the green sort of took over... a bit more about that later! 

Before making up the card, I took the inky stencil and gave it a good spritzing with water and then used a piece of cardstock to "stamp" the stencil.  I think it's called reverse stencilling.  Tim Holtz showed in during the Stenciled Online class earlier this year.  The resulting negative of the stencil turned out very soft and airy looking.

Shine Every Day

Once again, I wanted the beautiful background to take pride of place.  So just added a sentiment.  This one was from two Winnie and Walter sets and did involved a little stamp surgery... the every started life as everything.   Finished with a few iridescent flat sequins.

And my final card came about from the ink left over from my ribbon.  I had beads of ink on the craft sheet so grabbed a piece of white card stock to sop it up.  As it was very wet, as the card stock picked it up, little bobbles appeared.  I added a little more blue and orange inks to the sheet to fill in the gaps on the card.  Once it dried, a very interesting background resulted.  

IMG_8713

I decided to simply play and see what would happen.  Started by stamping the Scribbly Bird from a Dina Wakley set and enhancing it with some Copic markers.  Then stencils, inks, paints, some washi tape and the sentiment from the set.  A mixed media card resulted.   I am entering this into the Anything Goes Challenge at Simon Says Stamp

And I still have my embossed piece to do something with... a very successful day's crafting!


Sunday, 27 April 2014

Tag - you're it!

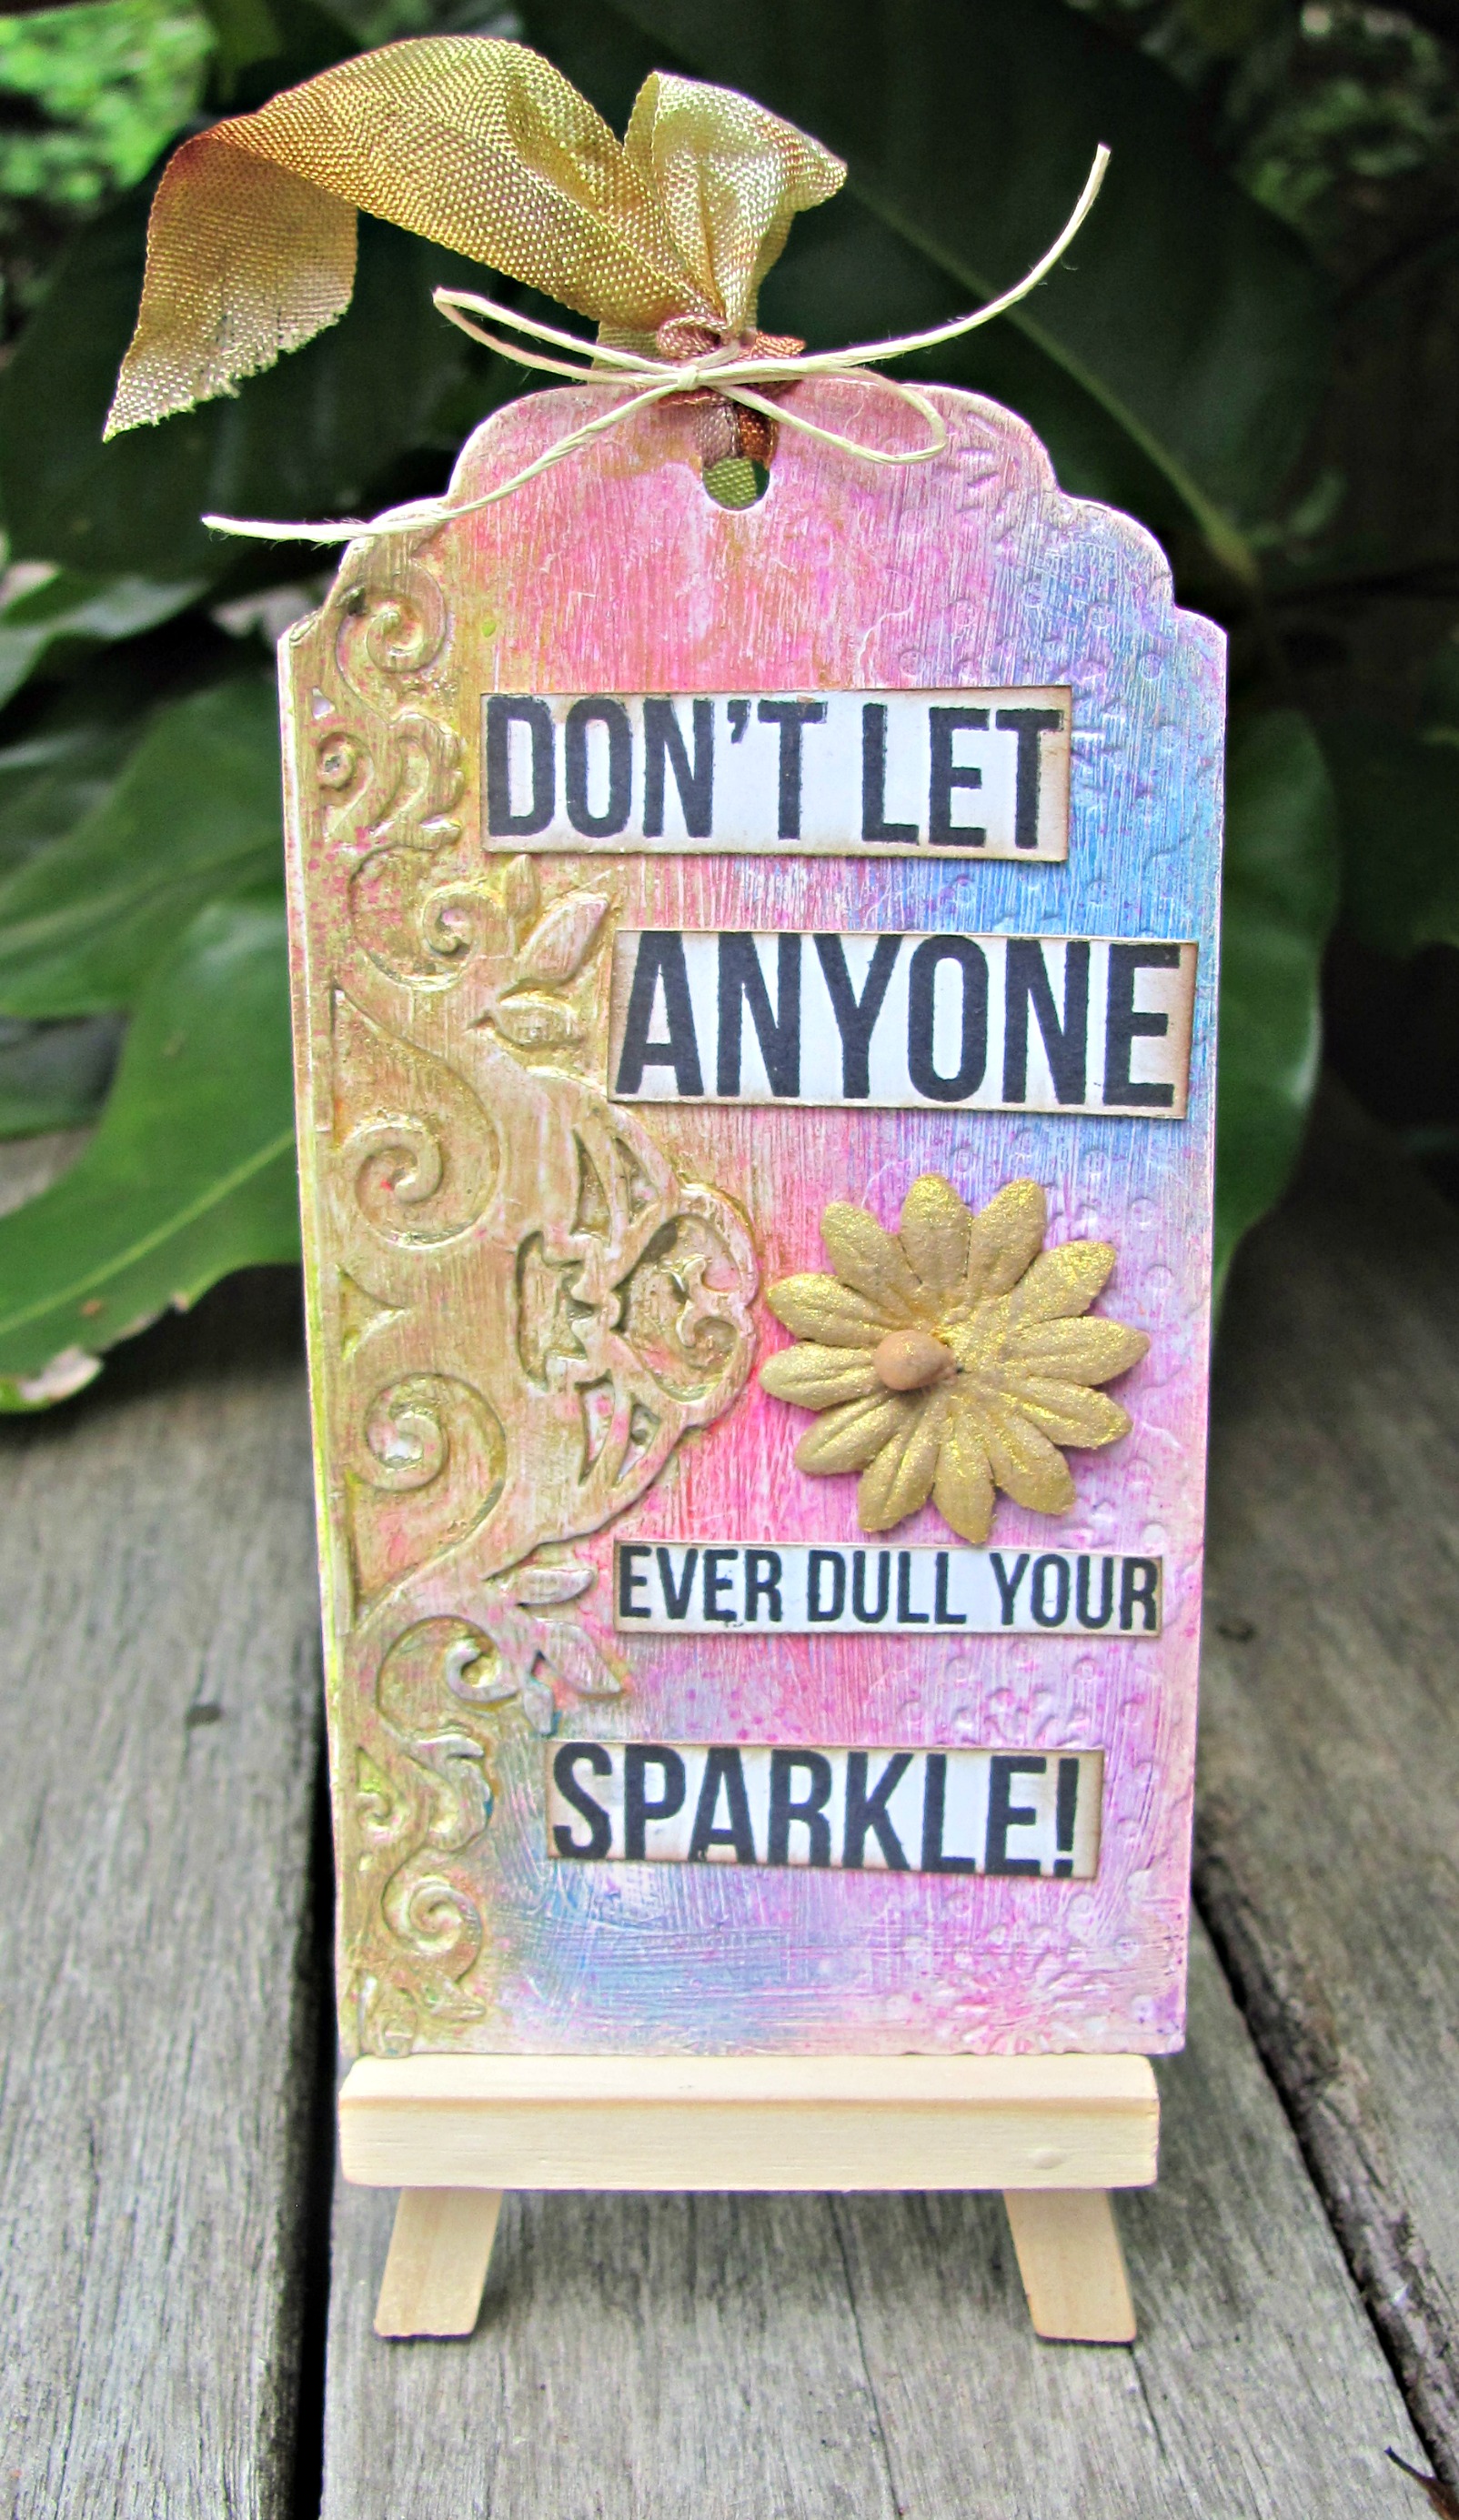
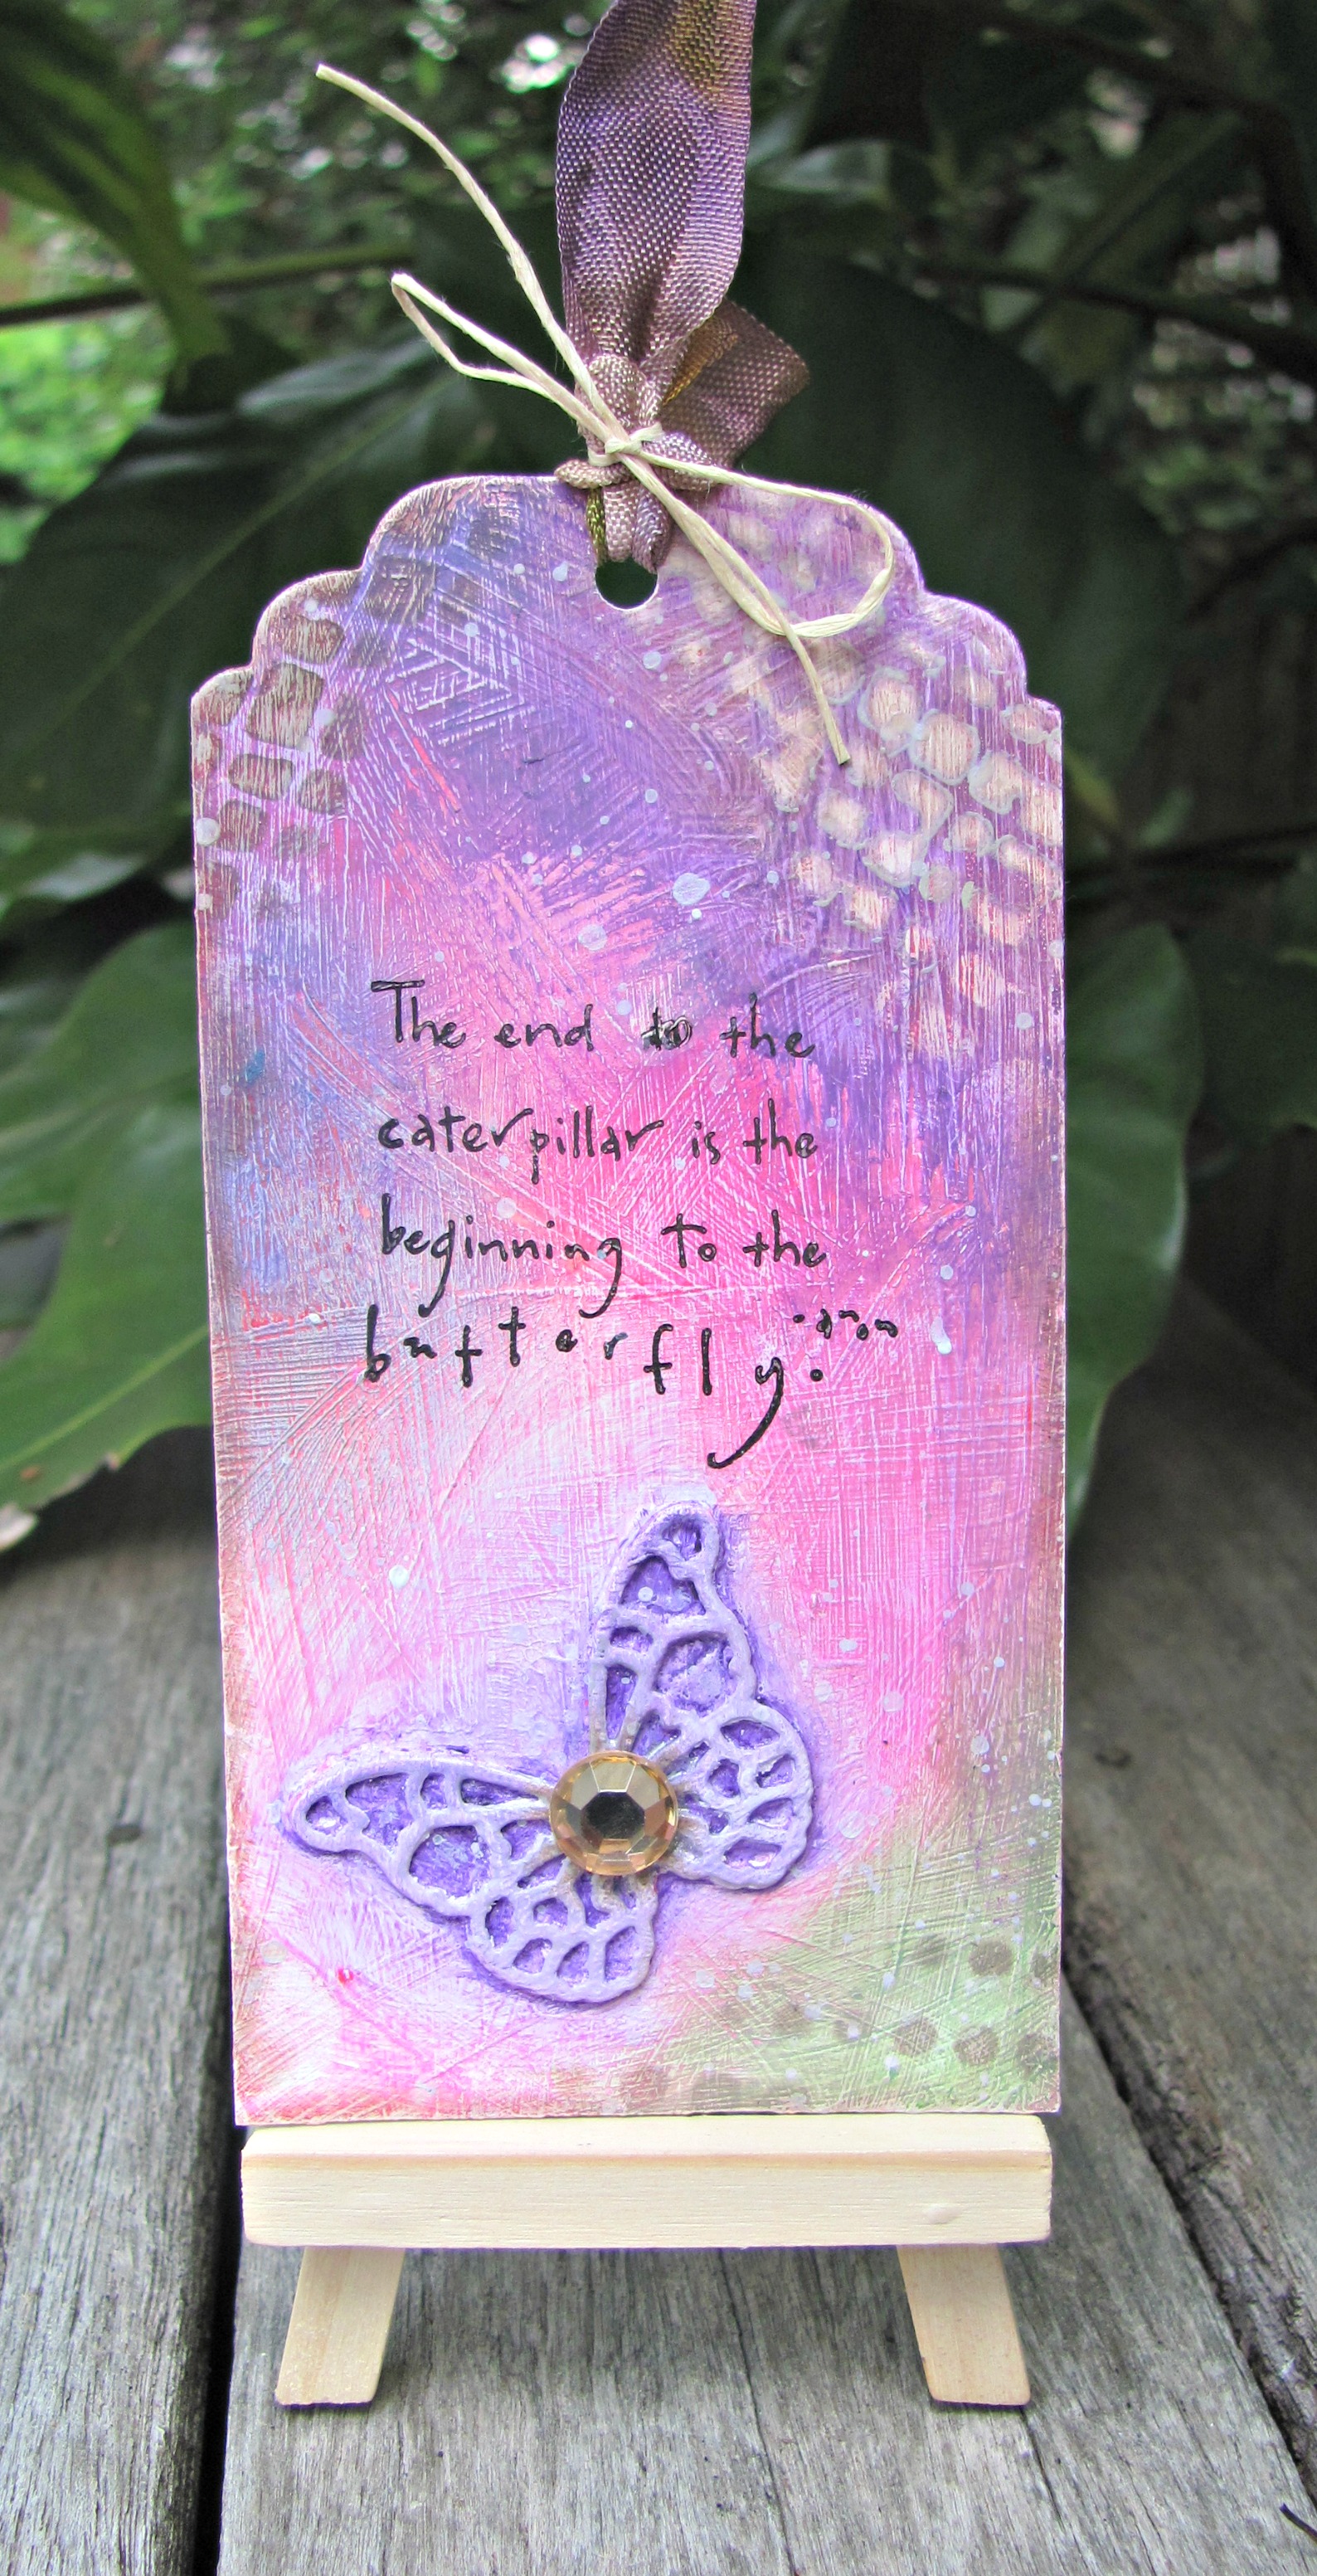
I am taking part in a tag swap with a theme of "Quotes"   There are six of us taking part in the swap so I had to provide 5 tags... I decided to do 5 different tags using the same techniques I used on my canvases.   Each tag is 5 1/2 inches tall and 2 3/4 inches wide.  I used Spellbinders dies to shape the top of the tags.

Don't Let Anyone Ever Dull Your Sparkle Tag

This one used a Spellbinders De-lite die and the sentiment is from Kaisercraft.

Live Beautifully Tag

This is the tag I made the other day, just shaped the top.

Butterfly Tag

For this one, I used some stencils, a Memory Box die, and a Penny Black stamp for my sentiment.

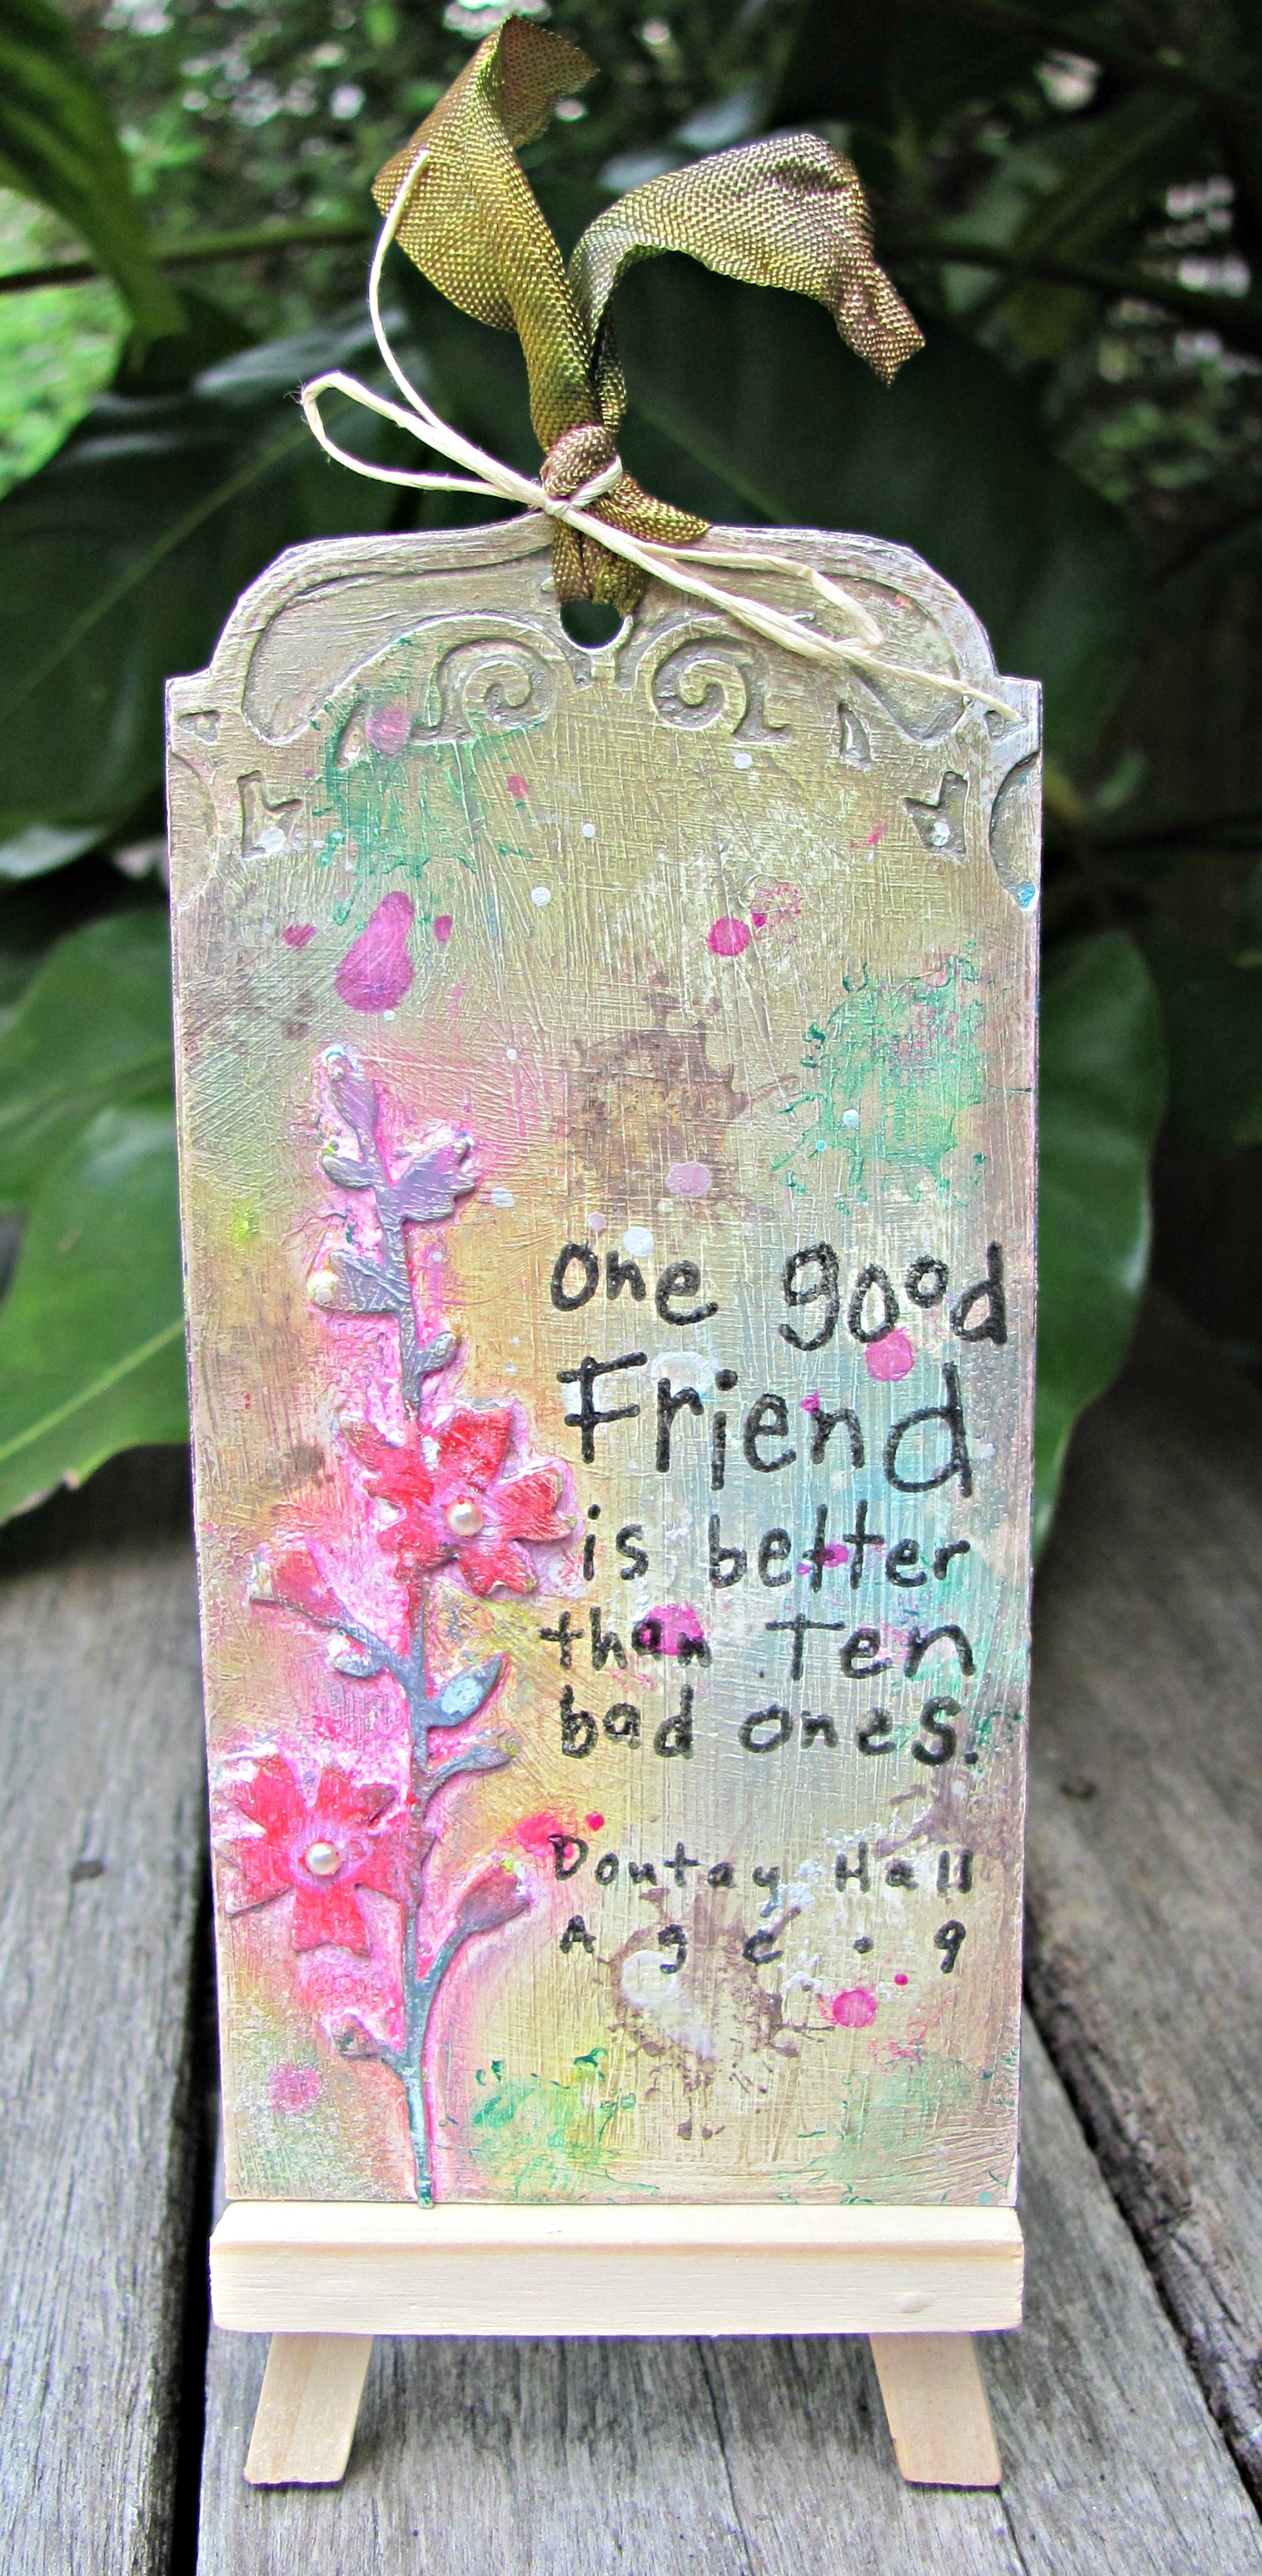
One Good Friend Tag

Another Memory Box die and this time the quote is from Inkadinkado.  

Within Your Heart Tag

For this final one, another Spellbinderd De-lite die with a Penny Black quote. 

Hope the recipients enjoy the tags when they arrive.  

EDITED:
I entered these into the "Paint It" challenge at City Crafter Challenge blog and am happy to say I got a "Spotlight Artist" award :-)


Dawn

Monday, 19 August 2013

The Positive and the Negative

Did that catch your attention!  Today I am sharing two cards.... using die cuts... the positive and the negative.

First up using the positive. 

Christmas Candle

The words are Memory Box dies.  They are a bit bigger than I was really looking for, but by adding them to a long thin card, I made the most of them. I used some American Crafts Foil card.  The dies are extremely fine and as hard as hell to get onto the card.  I used my mini Xyron to adhere them.  It was hard to ensure you don't stretch the letters.  Still with the help of my T-ruler I manage to get them reasonably straight.  I added the candle which I had coloured with Pearlescent paints and fussy cut.  This candle is a Kaisercraft stamp. I added strips of the foil card top and bottom of my panel.  

Now onto the negative.

A negative Christmas

I had kept the negative from cutting out my words and put the little bitty bits back and added them to some white card.  I trimmed them up to be the same size and added them to a white card base.  The Holly was stamped and coloured with Copics and fussy cuts.  This is another Kaisercraft mini stamp. I added Glossy Accents to the berries.  The foil is awesome to work with.  The pack I got is 12x12 ~ 30 sheets of red, green, silver and gold.  

These made a good start to my Christmas cards.  

I'm entering this into the CAS challenge at Whimsy Stamps 
and Christmas cards at Moxie Fab World

Thursday, 8 August 2013

Runway Inspired Challenge #41


Isn't this just the most incredible dress and very inspiring it was.

IMG_7254

My inspiration was all the pretty pink flowers on the dark background.  Not sure if it's black or deep purple so went for black.  Used a technique called "Joseph's Coat"  (Tutorial from Splitcoaststampers HERE) The background was made by sponging Distress inks onto white card and then cutting out the Memory Box butterfly.  I stamped a small flower from a studio g set in Versamark and clear embossed.  Then sponged Black Soot distress ink over.  I dry embossed my white panel and then layered it onto pink card before adding to the black card base.  The sentiment (Kaisercraft) was stamped onto white card and cut in a banner shaped, edged in black and added to the card.  Finished the butterfly with some black gems.

Also entered into the following challenge
Flutterby Wednesday ~ Anything with Wings

Hope your week is going well.  I've been home for most of the day with a dreadful cough.  Went to work, but ended up coming home and having a nap.  Coughing quite a bit and that's quite draining.  


Saturday, 22 June 2013

Simon Says Stamp ~ Summer Fruits....


This week's challenge at Simon Says Stamp is "Summer Fruits"  ~ a hard task for me as we have been having some of the coldest weather of the year over the past week.  A huge storm front has past over the entire country.  The other afternoon on my way home it was only 7 degrees C.  Auckland is usually quite temperate, but need the winter woollies that day.

Still playing with a Mo Manning image last night, made me think of summer and having fun. 

Summer Fruit

This cutie is available at Mo's Digital Pencil and I used the picture as my example for colouring her.  I used Copic markers and once she was coloured, a Spellbinders oval to cut out.  I used a Scalloped oval for my matting.  And then I put both on top of a Memory Box oval die, so you could only see a few bits sticking out.  The PP was from a pack I picked up at K-Mart for just a few dollars.  The colour seemed to be fit my theme.   

I'm sitting in my lounge room with the heater going as it's got very cold again.  My craft room is on the dark side of the house and it's COLD in there just now.   We are heading out for dinner this evening with our son and his girlfriend...to celebrate Mel's and my birthday's.  Her's was earlier in June too.  

Hope your weekend is fun (and maybe warmer than mine!)


Wednesday, 20 March 2013

Easter Wishes

When I got my Cardmaker Magazine, there was a delightful card from Julie Overby that was so pretty and when I saw it as the Project in the newsletter (here)  I knew I was going to CASE it... I just adapted it with what supplies I had.

IMG_6719


I only had the Tessatina die instead of the Spellbinders Lattice die, so had to cut it 4 times.  I used my Xyron mini sticker maker to layer it onto some green PP.  The cross stamp from Inkadinkado was too large for the size I wanted so I stamped it and then photocopied at 75%.  Reduced to the perfect size!   I cut it with a Spellbinders oval and then trimmed a blue mat and added to the Fancy oval die cut.   I cut out a banner with the Simon Says die and stamped the sentiment.   My outer mat looks black but is in fact a very dark purple which looks awesome with the dark teal.

Entering this into the Easter/Spring challenge at Simon Says Stamp

Thanks for stopping by.