Showing posts with label Dreamweavers. Show all posts

Saturday, 5 April 2014

Some fun with Stencils.

Over at Virginia's View, this month's challenge is "Stencils"  A very on trend item these days!  I shared a couple of stencils cards the other day (however made prior to Virginia's challenge starting) but I have entered this one already

Stenciled Background

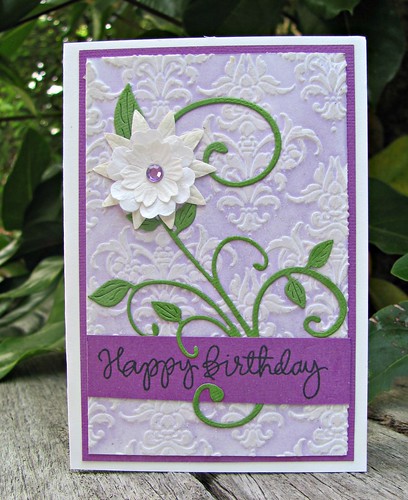
I used a Dreamweavers stencil and some embossing paste to make the background.  Once it dried I added some Hero Arts Passion flower ink (my new favourite purple ink)  I then finished it with the die cut leaves, the flower and sentiment from Simon Says Stamp.  This is heading off to someone special for her birthday.

Today I did some more stencilling.  This time I used a piece of lacy card for a stencil.  It was a 12 x 12 sheet that cost me $3.  I cut it into 4 pieces

And here is the card it made

It looks much better IRL... the textured card doesn't photograph well.  I used some distress inks to sponge over the stencil.  I added a little vellum and card butterfly and the sentiment by Hero Arts.  I'm entering this into Simon Says Challenge as well as Virginia's View

That's it for me today.  Off to visit with son and his girlfriend and her family for a barbeque.. will be the last one for the summer with daylight saving finishing tonight :-(  that means that summer is officially over even if the weather doesn't think so with the temp still in the mid 20s most day.  

Have a great weekend all

Friday, 14 February 2014

Happy Valentines and Happy Birthday to Linda

Happy Valentine's Day, and yes, Valentine's Day is the birthday of Linda Wetterlin, our fabulous guest designer at Die Cut Divas.   To celebrate I have made her a card - using her favourite colour PURPLE


When I got my Dreamweaver stencils, I received a technique sheet for a technique called "Embossing Stire"  The technique involves using the stencil to emboss.  I used the totally awesome embossing pad that Dreamweavers have.  It is THICK and really embosses well.  I did spray the back of the paper with a special spray (but you can spray with rubbing alcohol as well)  this helps with the embossing.  Once you've embossed, you use a stencil paint brush with a pigment ink and drag it over the image. First one way then the other way.  This gives the look of linen.  I then decided to just add some distress ink over the raised area to give some definition.  I used some DCWV paper to cover my card.  The sentiment is a die cut from Britannia Dies cut with some purple card.  I finished with some gems. 

Happy Birthday Linda. 


Sunday, 2 February 2014

Dreamweavers at Die Cut Divas....

 Dreamweaver Stencils Sponsor

Yes the wonderful Lynell has agreed to sponsor us at Die Cut Divas again this month.... and guess what!  She has agreed to give us 4 prizes.. YES 4 prizes this month... one for each week.  How generous is that!  And she provided the Divas with some stencils and dies to work with, thanks so much.

Hannah's theme this month is "Girls Night Out".. to work with some friends (if possible) using a "girly" theme or a pink theme.

I've not had a chance to meet up with any friends in a while.... summer is always busy ~ and like this past weekend, we often go away for a few days R&R at the beach, but I did get to make a PINK card for the theme.

Very PINK!  In my latest purchase from Simon Says Stamp! I got a Gelli pad.  I've seen lots of artists using them and decided I need to try it out.  My background was made with some Chromacryl Magenta paint on my gelli pad and then the texture was using some bubble wrap, a piece of burlap ribbon, the cap of a spritz bottle, a stencils and goodness know what else!  I stuck with just the one colour print from the pad.  Over this I have layer a Dreamweaver's  Leafless Tree Die  It's huge and fitted my 13cm square card perfectly.   I added some punched flowers (in pinks) and some Enamel accents for the centres.  The Love sentiment is part of a Hero Arts sentiment.  I just used the last part with the big word.    I was thrilled to see that Dreamweaver used my card on their Facebook page and their blog today. 

Please hop over to Die Cut Divas blog to see what beauties the other Divas came up with and join us in our Girls Night Out Challenge.


Tuesday, 28 January 2014

Stenciled Day 3 ~ Texture and Dimension

 
Back with a card I did using stencils and some texture paste.

IMG_7737

I used a Dreamweaver stencil and some translucent paste.  I added some embossing powder over the paste and left it dry.  I used a maroon colour for the sail and brown for the boat and birds.  For the water I used a sparkle embossing powder.  Once it dried, I heated the embossing powder and then did a bit of resist watercolouring with Pearlescent paint.    I used some PP from a Rosie's Studio paper pack for my background.  The little stamp is from a date stamp type stamp with lots of little sentiments.

And here are some of other techniques I tried


Embossing powder on the paste (DIY stencil used from a die cut of the Simon Says Stamp Falling Hearts die) Translucent paste (to do a resist technique) and a bit of watercoloured stenciling (had the paint too wet) 

Today was the last day of the class but Jennifer did a bonus class as well and there was a SVG/PNG cut available for the class participants.   Not sure when I'll get time to finish my home work. 


Saturday, 25 January 2014

Stenciled ~ Day 1 Inking and Masking


I'm taking the online class ~ Stenciled ~and today's class had a number of different techniques using stencils.  I had ordered some stencils and they had arrived on Thursday, just in time.  I did some inking today with cards inspired by Jennifer's videos on inking, layering and masking.  

My first card involves sponging ink through the stencil and spritzing it with Shimmer Spritz before removing the stencil.  

Day 1 of Stenciled On line class

I used a Dreamweaver stencil and sponged on some distress inks with mini daubers.  I used Shabby Shutters and Peeled Paint for the greens and Dried Marigold and Ripe Persimmon for the oranges.   I trimmed the panel and matted with some orange card and used some of it to make the banner (Simon Says Stamp Tilted banner die) with a sentiment from the matching stamp set.  

My second card is also inspired by Jennifer's use of the MFT Petal Circles stencil.  

Stenciled Day 1 ~ layering and masking

This one involved layering and masking.  My first layer of the stencil was done in Shabby Shutters and then the stencil is moved over a little and the second layer was in Peeled Paint.  I then found a teeny tiny flower stamp on an older Hero Arts sentiment set and used some Seedless Preserves to add to the centre of darker circles.  I am really pleased with the colour combo.   The sentiment is from a CAS-ual Fridays.  I used dimensional tape to add the panel to the cardbase, 

I'm hoping to get some more time tomorrow and Monday (a public holiday here in Auckland for Auckland Anniversary Day) to try out some of the other ideas in the class.  

Today is the 3rd anniversary of the passing of one of my Hubby's sister's, Helen.  And at lunch today, we had a visit from a very dear friend of hers from England.  Lucy and her husband, Jules, have been here in NZ for a week's holiday and have been visiting with our family.  They were on their way to the airport for their trip home.  Lovely to reminisce about Helen and her life in London.  

Thanks for stopping by today.   Have an awesome weekend and if you are from the other side of the world,.... keep warm!


Tuesday, 1 October 2013

A BIG Thanks to Dreamweavers....

Dreamweaver Stencils 

Die Cut Divas was very lucky to have Dreamweaver Stencils as our sponsor for September and to say THANK YOU to Lynell and Dreamweavers we all made card of thanks.

For my card I chose to use the Damask Background again ~ this time with gold embossing.

Thank you Dreamweavers

I pressed the Versamark ink onto the stencil and then removed it and sprinkled with the gold EP.   I gold embossed the sentiment from Simon Says Stamp onto red card and trimmed it to fit onto the matching die cut from gold card.   I edged the panel with a gold pen and mounted onto cream card.  The finishing touch was a gold butterfly.  I have added this to the All that Glitters is Gold challenge at Moxie Fab World. 

Thanks a heap Dreamweavers.  You have been very generous to Die Cut Divas.  Hope over to the blog to see what Paula, Arlene and Hannah have created.  And a HUGE thank you to all our entrants this month... all 66 entries.  

And pop over to the blog today (1 October USA time) and see what Hannah has challenged you with for our October challenge.  I'm sure you will have fun creating. 


Thursday, 19 September 2013

Using a stencil and texture paste.

This month over at Die Cut Divas, our sponsor is Dreamweaver's Stencils.  Lynell very kindly gave us some stencils to use for our samples. 

Today Arlene is showing off some of our samples including this one that I made


I used some light texture paste through the stencil (LG678)  Once the paste dried I used watercolour paints, some distress inks and watered down Gelatos to colour the paste.  I added the sentiment with embossing powder.  I then matted the panel with some red card and added to a PP background.  To add a some movement, I used a Spellbinders edging to trim the PP.

Do hop over to the blog post and see what Paula and Arlene did.  Both used a cute little dog stencil.  And Lynell is also offering a 20% discount this month over at Stencils with Style  ~ Just use this code SWS20


Wednesday, 4 September 2013

Using metal stencils to Emboss

Today I'm here to tell you how you can use your metal stencil to emboss...

In fact there are a couple of ways to emboss.  You can hand emboss with a stylus or you can use your machine.  Yes... you can use a manual die machine like a Big Shot or Cuttlebug.

I used my Cuttlebug to emboss with the Hibiscus stencil from Dreamweavers


I followed the instructions I found on the Dream it Up! blog post .  Here they are.  I made a few adjustments (shown in red)

The main thing to remember while embossing by machine is the stacking method. If you follow these steps you will not ruin your stencil OR your machine.

1. Place the thickest white plate in the machine first if you own a Cuttlebug this is referred to as the A plate. If you own a Big Shot this is referred to as the thick white platform...do not use the TAB 1 or 2. Instead let those tabs follow through opened up. 

2. Place the  stencil face down on this thick white plate or platform. This means the copyright and stencil code is hidden from view. 

3. Next place the cardstock to be embossed on top of the stencil then spray this paper with rubbing alcohol. (I used a product called Paper Glide) This spritz of alcohol helps the paper fibers break and move into the stencil for a sharper embossed image without making the paper soggy like water would. And has the added advantage of not leaving water spots on the cardstock.

4. Now place the thick Stamping Details rubber mat on the paper. This mat is thicker than most but definitely worth having. Otherwise you need to use two or three plastic shims with your thinner rubber mat. But the rubber mat should be closest to the paper. (I used two of the tan mats from Spellbinders and didn't need any shim)

5. This is followed by two acrylic plates. For the Cuttlebug...these are identified as "B" plates.

Crank this stack of plates through the machine. DO NOT FORCE the machine. If it is too tight you could hurt the machine. Find the right formula for your machine by reading step #4 over again if necessary.


Once I had embossed I used Copic makers to colour the embossed area.  I trimmed out the stenciled area and edged with a gold pen.  The corners are a La La Land die, which I cut from gold card.  The sentiment is by Stamp-It

I hope this gives you some ideas on how to use stencils.    There are also lots of great techniques on the Dream it Up! blog.   I've also posted this over at Die Cut Divas as a sample for our Celebrate challenge.  We would love to have you join us.


Monday, 2 September 2013

It's September at Die Cut Divas.... let's Celebrate


Hi there.... Arlene is our host this month at Die Cut Divas and has a great challenge.... CELEBRATE.... what ever you celebrate.  And our wonderful sponsor this month is Dreamweaver Stencils


 Lynell Harnell, the owner, has been very generous and there will be FOUR prize packs ~ one for each week of the month.    And she very generously send us some stencils and a die to work with.  I have to say I had never seen their stencils.  They are beautifully worked metal stencils and there are so many ways to work with them.

My first sample card uses a stencil with distress inks.


I used some Simon Says watercolour paper to stencil onto.  I used a stencil brush and daubed on the distress inks on.  I added some glossy accents to the centres.  I used Spellbinders to cut my watercolour paper and the yellow mat.  I added some trellis die cut (Spellbinder) and cut a Simon Says die and stamp set for my sentiment. 

Do go to the blog  and join us with your project.... whatever you are making a card (or other project) to celebrate and use your machine to die cut or emboss.  We would love to see what you create and you've got a chance to win one of the four prize packs.

I'll be over at the blog on Wednesday to share another way to use the stencils.