Wednesday, 2 July 2014

New Challenge at CCC Digi Creations ~ Embossing

Hi there... A new challenge is underway at CCC Digi Creations... we want to see you cards with Embossing... wet or dry!  Our sponsor this month is none other than Bugaboo Digi Stamps


As you know I really enjoy working with Bugaboo Stamps.  They have such a variety.. from cute to humorous, and it's humorous that I worked with this month...

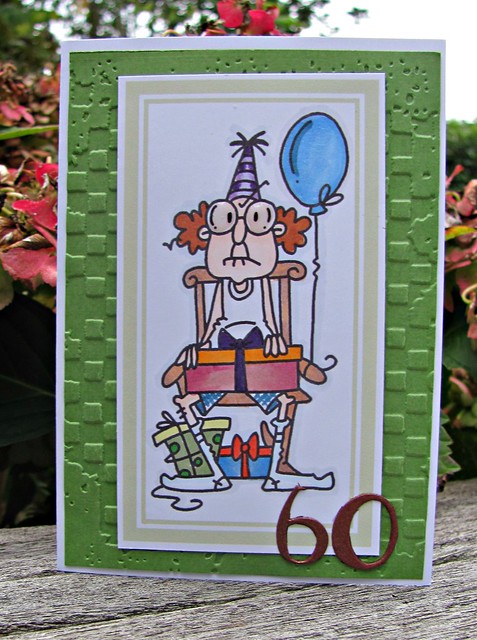
Michael turns 60.

My embossing is a Tim Holtz embossing folder.  I printed the image in Word and used a frame from there to surround it.  Once I cut it out, I used a die cut 60 as this card is for our friend who is turning 60 at the end of the month.  The sentiment inside says "You know you're old when you get the same sensation from a rocking chair that once you got from a roller coaster"   

Do come over and join us this month.  

Tuesday, 1 July 2014

Buttons and Bows... a new challenge at Die Cut Divas

Hi there it's my turn to host the challenge over at Die Cut Divas this month... and I've chosen a nice and simple challenge for you.

Use a button or bow on your card or even both!  

Our sponsor this month is once again the fabulous Bugaboo

 
We thank them for offering 7 free digis to our winner.
Remember you must use your Die Cut Machine... cutting or embossing. 
For my samples I have made one with buttons and one with a bow.
First up ~ buttons

This image is Kidz Fishing Boy.  I printed him and then used a Poppy Stamp die to cut a 3x4 inch journalling card.  I coloured with Copics and sponged some blue chalk around edge.  I took some PP and embossed it with a circle folder and then used a sanding block to distress.  Added the three buttons along the top.

And now ~ a bow.


 This one is using Flower Bird.   Once she was printed I die a the journalling card with some card and used it as a template to draw around the hand cut her out. I used some chalk ink to sponge the edges. I used some paper piecing for her hat and the ribbon and bow on the hat.  My embossing this time was a thin folder which once again I sanded.  Added the ribbon and a bow.
So pull out your die cutter or embosser and join me in our challenge this month.... and look out for the later in the month when we introduce our new DT.
I was able to use these as my samples for the new challenge at Chalk'n'Stock as well.  Two challenges inspirations with one set of cards.  

Monday, 30 June 2014

Thank You Hero Arts

This month's sponsor at Die Cut Diva's is none other than Hero Arts.  So I've made a card to say thanks.  Our theme was His, Hers or Ours... so my card is a bit masculine


It did start as a one-layer card, but when I was doing the embossing, the little folder slipped  a little, so had to trim it up to straighten.  I stamped and masked the feather from My Favorites (AC030)  using Hero Arts Wet Cement and Charcoal inks.  The sentiment was stamped with the Charcoal ink.   I added strips of black card down each side of the embossed part.  A few pearls to finish and some Wink of Stella in clear and black.

Do pop over to the blog as a new challenge starts tomorrow.

Sunday, 29 June 2014

Two for the price of One....plus one extra

Well at least two cards from one stencil and another from left over ink....

I had a great afternoon playing with my inks, stencils and stamps.  Recently I was lucky enough to win a Memory Box stencil on a blog hop - it's this one 


I pulled it out today and made one background with some embossing paste and then I decided to use some Distress inks to sponge.  I used vibrant colours - Mowed Lawn, Spiced Marmalade, Seeded Preserves and Salty Ocean.

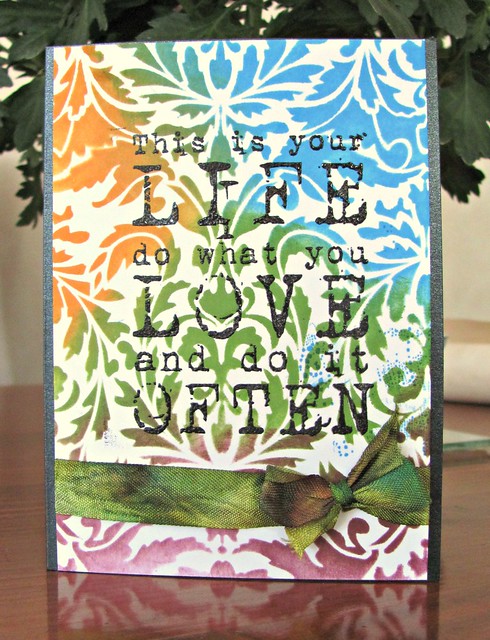
This is your life....

I used a Stamp-It sentiment as my focal point, but letting the background take pride of place.  I coloured up my ribbon with the inks but once I spritzed it, the green sort of took over... a bit more about that later! 

Before making up the card, I took the inky stencil and gave it a good spritzing with water and then used a piece of cardstock to "stamp" the stencil.  I think it's called reverse stencilling.  Tim Holtz showed in during the Stenciled Online class earlier this year.  The resulting negative of the stencil turned out very soft and airy looking.

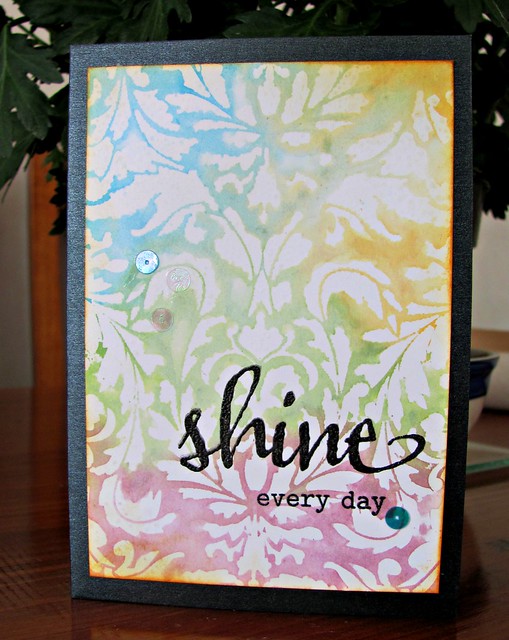
Shine Every Day

Once again, I wanted the beautiful background to take pride of place.  So just added a sentiment.  This one was from two Winnie and Walter sets and did involved a little stamp surgery... the every started life as everything.   Finished with a few iridescent flat sequins.

And my final card came about from the ink left over from my ribbon.  I had beads of ink on the craft sheet so grabbed a piece of white card stock to sop it up.  As it was very wet, as the card stock picked it up, little bobbles appeared.  I added a little more blue and orange inks to the sheet to fill in the gaps on the card.  Once it dried, a very interesting background resulted.  

IMG_8713

I decided to simply play and see what would happen.  Started by stamping the Scribbly Bird from a Dina Wakley set and enhancing it with some Copic markers.  Then stencils, inks, paints, some washi tape and the sentiment from the set.  A mixed media card resulted.   I am entering this into the Anything Goes Challenge at Simon Says Stamp

And I still have my embossed piece to do something with... a very successful day's crafting!


Saturday, 28 June 2014

Wine and High Heels...

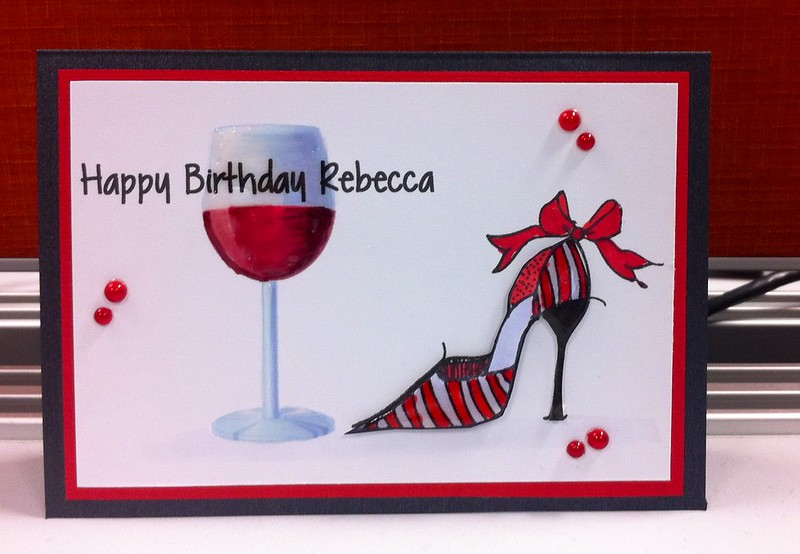
Quite a combination.  My friend Vaj commissioned me to make a card for her DIL, Rebecca, and said she wanted wine and high heels on it... well for a while I just sat there stumped as to what to do.  I knew I had high heels in a Hero Arts set... but a wine glass????

So first up was to look at Clip Art on Microsoft Office... and yes, found what I wanted... so here is how it turned out

Wine and High Heels

The wine glass held red wine so decided that I need to make the shoe red too.  I stamped it once on the card and then onto scrap white card, coloured and cut it out and popped it onto the card.  The sentiment was printed on the computer at the same time I printed the wine glass.  I added some Copics to the glass and then once I had it all matted together and on the card base, lots of glossy accents on the glass and the shoe.  Finished with some red pearls.  

Happy to say, Vaj, was thrilled with the results.  I had to take the photo at work as it was too dark when I finished it on Thursday evening.  So you can see the cords at the back of the desk.  Good light though in the office for taking photos!


Thursday, 26 June 2014

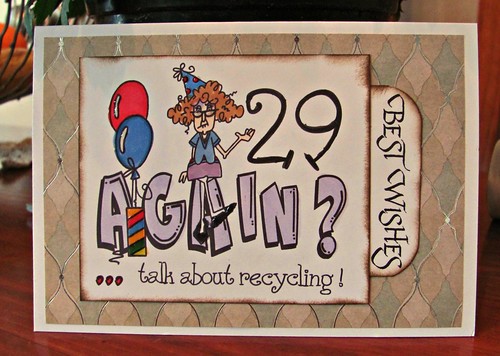
29 Again?

One of my work colleagues had her birthday this week.  I made her an amusing card using a Bugaboo image.  It made me laugh and she really enjoy the humour as well.

29 Again?

I printed it out and coloured with Copics.  The PP has a lovely sheen to it.  Add a touch of glossy accents to the balloons and the candle and on her hat.  I went over the 29 with Black Wink of Stella to give it a touch of sparkle. 

Off to make a card that has been commissioned.  The lady wants it for her daughter in law and has asked to a wine glass and high heel shoes.  A bit of a challenge! 


Tuesday, 24 June 2014

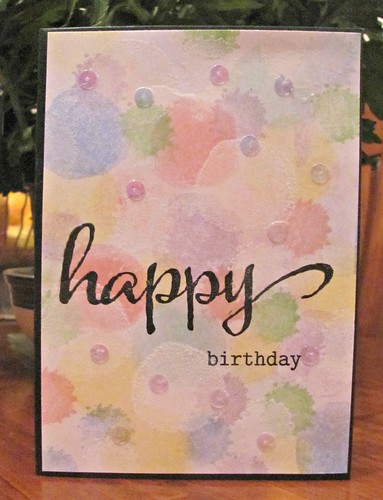
Bokeh Effect

Have you heard of the Bokeh effect?  I recently found out about it.  It's a photography term, and it refers to the look of sparkles that appear in a photograph when part of the image is out of focus or if light reflects.  Over at A Blog Named Hero the latest challenge is to use this effect.


I decided to make a CAS card using the Bokeh effect as my background.  I was inspired by the last photo in the above collage.

Bokeh Birthday

I used two stamps from Hero Arts Brush Stroke set and a variety of Hero Arts Shadow inks and distress inks together with Colourbox Frost white ink.  I added the sentiment from Winnie & Walter and finished with some iridescent sequins.

I'm really pleased with the look I achieved and this card will be going to a friend who is having a birthday later this week.  

Sunday, 22 June 2014

Inspired by Virginia.

Getting back from holiday I struggled for a day or two to get back into stamping and creating, despite new stamps sitting on my desk.  So off to the internet to see what my friends are up to.  Virginia has been really busy with one botanical collage stamp from Penny Black and it really got me inspired.  One of my new stamps is a set from Stamp-It, an Australian company, and is a collage set.


I did two cards using the stamps in the set.


This first one is the bigger of the two stamps.  I coloured with Copics and then masked them and used my air spritzing tool and a Copic and a Tombow marker to colour the background.  Sentiment is from Close to My Heart.  I added some Wink of Stella.  It splattered when I shook it and I ended up with splatters, so added some more all over the card. 

 
My second card used two of the other collages.  I used a Poppy Stamps die to cut the 3x4 journal card and stamped the image.  I used some Inktense pencils and a Tombow colourless blender to colour.  The sentiment is also a Stamp-It stamp.  For the background I used the smaller collage with some sepia Archival ink and added some distress around the edge.  I layered a couple of washi tapes across.  To finish I added black pearls. 

This was just the kick start I needed.  So much so that I managed two cards today for my July posts on Die Cut Divas.  Getting myself a little ahead.  And I even went out to look at some storage ideas for the craft room.  Got some ideas for tidying up one corner with some cube storage.  Just got to wait till some repairs on the corner of the floor are done.  A while back our water cylinder leaked and the floor under it and into the corner of my room has gone soft.   The repairer is coming in this week and I've moved out some of my supplies to give them room to fix the floor.  Once it's all back I'll get the new storage in place. 

Thanks for stopping by today.